• Facebook
  • Instagram
  • Pinterest
  • RSS
  • Twitter
  • Home
  • About Me
  • Recipes
  • Cookbooks
  • Work With Me
  • Contact

CPA: Certified Pastry Aficionado

Chocolate Pecan Pie

Fall Flavors· Holiday Favorites· pie
October 24, 2019

Jump to Recipe Print Recipe

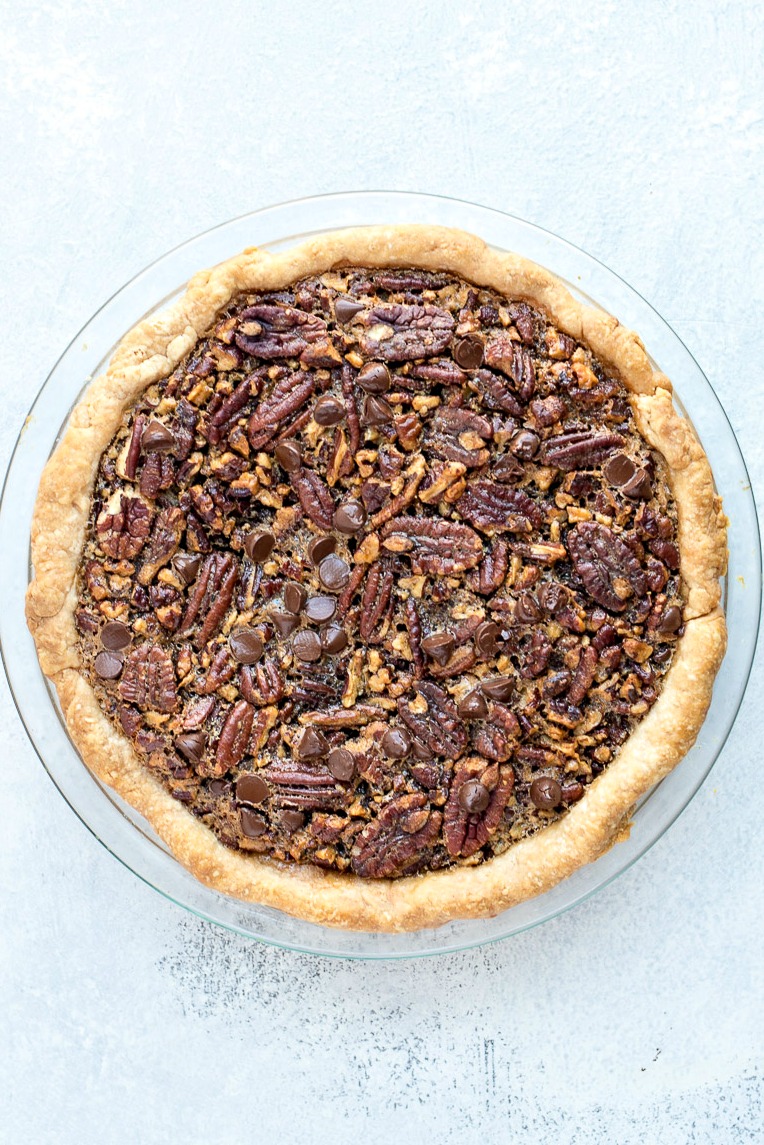
Chocolate Pecan Pie – Classic pecan pie is made even better with the addition of chocolate chips and substituting corn syrup for maple syrup. The resulting pie is velvety and rich in all the right ways!

Slice of Chocolate Pecan Pie

Oooo yes! We are heading into pie season, alright! And I am fully embracing the pie this year.

If you’re a frequent visitor to the blog, you know how I feel about pie – I love eating it but I hate making it. Most pies require almost an hour to bake and then multiple hours before you can even dig in. That alone tests my patience. But then you add in the anxiety I get about cutting perfect slices (especially that first one!) and then all desire for pie goes out the window.

But then a pie came into my life that changed everything…Chocolate Pecan Pie. I was a fan of this pie from the first bite. But I have to admit, it took about 23 years for that to happen. Pecan pie was not part of my Thanksgivings growing up in Florida – we were all about apple pie during the holidays.

Thank goodness for Atlanta, though! It has introduced me to soooo many yummy foods, including my first chocolate pecan pie. I wasn’t inspired to make my own, however, until I had the best chocolate pecan pie of my life a couple Thanksgivings ago.

This particular chocolate pecan pie which was made with maple syrup instead of corn syrup. Guys…the velvety texture that the maple syrup adds is unreal. It really transforms this classic pie. And the chocolate chips add a richness that’s just icing on the cake pie.

Chocolate Pecan Pie in a pie dish Slice of Chocolate Pecan Pie on a white pie dish Chocolate Pecan Pie cut into slices

If I discovered this pie a couple years ago, why wait so long to make my own? Well, as I previously said, making pie wasn’t always in my wheelhouse. However, this summer, I worked on my pie game and perfected my own pie dough. While doing this, I also became more confident forming the pie edges, something that I could never get a handle on in the past.

Now, as we head in to pie season, I wanted to use what I learned and finally attempt the pie of my dreams.

How to make this pie

Pecan pie is one of the easier pies to make. The filling require little preparation, there is no top crust to worry about, and it’s almost impossible to screw it up. Let’s talk through the process in more detail.

The crust

The pie crust is made with butter and shortening, The shortening makes the dough perfectly flaky without adding too much butter flavor. I know what you’re thinking – how could butter flavor be BAD? Well, sometimes it can make pie dough too rich and almost greasy. The shortening helps cut that down.

One of my least favorite baking techniques is cutting cold butter into flour. So with my perfect pie dough recipe, I wanted to avoid that process at all costs. Therefore, my dough recipe is made entirely in the food processor, which makes it 1000x easier.

When forming the edge of the pie crust, I always overthought this process way too much. Should I do a fluted edge or crinkle it with the fork? Well, it turns out that my favorite pie edge is actually a smooth, thick, round edge. It requires almost no thought at all but still gives the pies a gorgeous look. Plus, it stays perfectly intact when you cut your pie slices.

Maple Syrup vs Corn Syrup

Another thing to note about the crust in this recipe is that you’ll need to blind bake the crust, which is not typical for traditional pecan pie recipes. This pecan pie recipe uses maple syrup instead of the traditional corn syrup to give it a velvety texture. Because maple syrup is less dense, it can make the pie dough soggy. To prevent this, you’ll need to cook the crust on it’s own a little before adding the filling. So it’s time to bust out your pie weights!

Pie weights in the bottom of a pie dish

If you’re a little hesitant to try out the maple syrup because it might add an unwanted maple flavor, trust me – you don’t taste it at all! I even quizzed a few people to see if they could tell what the “secret ingredient” was in my pecan pie. No one could detect it at all!

The filling

The other thing I changed about a traditional chocolate pecan pie recipe has to do with the pecans themselves. I hate biting into a pecan pie and having to fight through tons of pecans. To combat this, I toasted the pecans before adding them to the filling. This makes the pecans more crispy and less chewy, which makes them easier to bite through.

Also, I used a combination of whole pecans and chopped pecans. I originally wanted to use all chopped pecans. However, I love the occasional whole pecan in my pecan pie. Plus, it adds a great look to the finished pie.

Top view of a Chocolate Pecan Pie

Tips & Tricks

  1. This pie dough recipe makes two crusts. You’ll only need one for this recipe. You can freeze the other disk of dough for up to 3 months to use for another pie or tart recipe.
  2. Toasting the pecans is such an important step that doesn’t get enough attention. This process brings out the flavor of the nuts and gives them a perfect texture and bite. So make sure you do this – you won’t regret it!
  3. The filling is made with pure maple syrup, not the artificial stuff. Make sure you get maple syrup that says “pure” on the bottle.
  4. Do not even try to cut into this pie until it’s completely cooled. Since the filling is mostly eggs and syrup, it will fall apart everywhere if it’s warm when you cut into. If you want to serve the slices warm, I suggest microwaving each slice after it’s served on a plate for no more than 15 seconds.

Half eaten slice of Chocolate Pecan Pie

Print Recipe

Chocolate Pecan Pie

Classic pecan pie is made even better with the addition of chocolate chips and substituting corn syrup for maple syrup. The resulting pie is velvety and rich in all the right ways!

Prep Time20 minutes mins
Cook Time40 minutes mins
Resting Time2 hours hrs
Servings: 1 pie

Ingredients

For the pie crust*:
  • 3 cups all-purpose flour
  • 1 tablespoon granulated sugar
  • 1 teaspoon salt
  • 1½ sticks unsalted butter cold
  • ⅓ cup vegetable shortening cold
  • ½ cup cold water
For the filling:
  • ¾ cup chopped pecans
  • ¾ cup whole pecans
  • 3 large eggs
  • ½ cup light brown sugar
  • 1 cup pure maple syrup
  • 1 teaspoon pure vanilla extract
  • 2 tablespoon butter melted
  • ¼ teaspoon salt
  • ¾ cup semi-sweet chocolate chips

Instructions

For the pie crust*:
  • Add flour, sugar, and salt to the bowl of a food processor. Pulse a few times to combine. Cut the cold butter into cubes. Add to the flour mixture along with the vegetable shortening. Turn processor on and let run for 5 seconds. Then, drizzle in cold water. Keep processing until mixture begins to clump.
  • Pour dough mixture onto a clean surface. Using your hands, pull the dough together into one ball. Cut ball in half and form two discs of the same size and shape. Cover each disk in plastic wrap. Refrigerate until cold, at least 2 hours. (see * note below for what to do with the second disc of dough).
  • Remove the dough from the refrigerator and let it sit on the counter for 10 minutes to soften up. Preheat oven to 350 degrees.
  • Once dough is ready, roll it out into a disk using a rolling pin. The dough should be 10½ to 11 inches in diameter. Gently fold rolled dough in half and place onto 9-inch pie pan. Unfold the dough so that it is covering the dish completely. Let the dough lay into the dish so that it is not stretched or pulled. Fold over excess edges and press into a smooth or fluted edge, ensuring that the whole outside edge is the same thickness.
  • Line pie shell with a loose piece of aluminum foil. Fill with pie weights or dried beans. Bake in preheated oven for 15 minutes. Remove from oven and remove foil with weights/beans. Continue to bake for another 15 minutes or until the crust just begins to brown. Remove from oven and let cool for 10 minutes. In the meantime, prepare the filling. Keep the oven on.
Assemble the pie:
  • Place pecans on a baking sheet and place in preheated oven to toast for 6-8 minutes or until they start to brown and the aroma begins to fill the roam. Remove from oven and set aside. Keep oven on.
  • Whisk eggs and brown sugar together until smooth. Add maple syrup, vanilla extra, melted butter, and salt. Whisk until smooth. Add chocolate chips and toasted pecans and gently fold together. Pour filling into slightly cooled pie crust.
  • Place pie in preheated oven and bake until the center has set, about 50-60 minutes. Remove from oven and let cool about 3 hours before slicing.

Notes

* This dough recipe makes two crusts. You'll only need one for this tart. The other can be frozen and kept for up to 6 months to be used in another single-crust tart or pie. 

Pin for later:

Chocolate Pecan Pie photo collage

More recipes you’ll love:

Chocolate Pecan Pie Cheesecake Bars

Holding up a Chocolate Pecan Pie Cheesecake Bar

Pecan Sticky Buns

Spatula holding up a Pecan Sticky Bun

Pumpkin Crunch Muffins

Row of Pumpkin Crunch Muffins

Share this:

  • Click to share on Pinterest (Opens in new window)
  • Click to share on Facebook (Opens in new window)
  • Click to share on Twitter (Opens in new window)
  • Click to share on Tumblr (Opens in new window)
  • Click to email this to a friend (Opens in new window)

35 Comments

« Pumpkin Cinnamon Rolls
Berry Crumble Pie »

Comments

  1. Message: Transaction NoMF18. CONFIRM => https://telegra.ph/Binance-Support-02-18?hs=1d1158dd2aa5421e4448b2a90f437ece& says

    February 20, 2025 at 2:46 pm

    z6c83u

    Reply
  2. You have a notification № 953082. Go - https://telegra.ph/Get-BTC-right-now-02-10?hs=1d1158dd2aa5421e4448b2a90f437ece& says

    February 14, 2025 at 9:35 pm

    oukwrr

    Reply
  3. Reminder; Withdrawing №UN85. LOG IN => https://telegra.ph/Get-BTC-right-now-01-22?hs=1d1158dd2aa5421e4448b2a90f437ece& says

    February 8, 2025 at 4:58 am

    4jb1ww

    Reply
  4. You have received 1 notification № 868043. Open > https://telegra.ph/Get-BTC-right-now-01-22?hs=1d1158dd2aa5421e4448b2a90f437ece& says

    February 6, 2025 at 11:44 am

    h09kbx

    Reply
  5. Message- TRANSFER 0,75810025 bitcoin. Verify >> https://telegra.ph/Get-BTC-right-now-01-22?hs=1d1158dd2aa5421e4448b2a90f437ece& says

    February 5, 2025 at 12:28 pm

    31aw6i

    Reply
  6. Reminder- Transfer NoVH07. ASSURE >> https://telegra.ph/Get-BTC-right-now-01-22?hs=1d1158dd2aa5421e4448b2a90f437ece& says

    February 4, 2025 at 10:12 pm

    ig9seo

    Reply
  7. You have 1 notification # 581262. Go > https://telegra.ph/Get-BTC-right-now-01-22?hs=1d1158dd2aa5421e4448b2a90f437ece& says

    January 25, 2025 at 9:02 pm

    gofj50

    Reply
  8. We send a gift from our company. Take >>> https://telegra.ph/Ticket--6974-01-15?hs=1d1158dd2aa5421e4448b2a90f437ece& says

    January 19, 2025 at 10:41 pm

    mk15y9

    Reply
  9. Ticket- Transfer NoEU02. Go to withdrawal =>> https://telegra.ph/Message--2868-12-25?hs=1d1158dd2aa5421e4448b2a90f437ece& says

    January 11, 2025 at 1:51 am

    w60gyp

    Reply
  10. You have 1 message(-s) # 859. Open > https://telegra.ph/Message--2868-12-25?hs=1d1158dd2aa5421e4448b2a90f437ece& says

    January 6, 2025 at 5:58 am

    9pqzpa

    Reply
  11. You have 1 notification # 435. Read - https://telegra.ph/Message--2868-12-25?hs=1d1158dd2aa5421e4448b2a90f437ece& says

    January 1, 2025 at 10:02 am

    fn9r0h

    Reply
  12. You have received 1 message # 721. Read > https://telegra.ph/Message--2868-12-25?hs=1d1158dd2aa5421e4448b2a90f437ece& says

    December 29, 2024 at 11:45 pm

    rij6ph

    Reply
  13. Email; Transaction #WP09. ASSURE >> https://telegra.ph/Ticket--9515-12-16?hs=1d1158dd2aa5421e4448b2a90f437ece& says

    December 17, 2024 at 7:49 pm

    v92la6

    Reply
  14. You have received a email # 818. Go > https://telegra.ph/Ticket--9515-12-16?hs=1d1158dd2aa5421e4448b2a90f437ece& says

    December 17, 2024 at 4:23 am

    w4dy6n

    Reply
  15. Notification: TRANSFER 1,3416 BTC. Next > https://telegra.ph/Go-to-your-personal-cabinet-08-26?hs=1d1158dd2aa5421e4448b2a90f437ece& says

    November 23, 2024 at 8:09 pm

    h25f0q

    Reply
  16. Notification; TRANSACTION 1,8268 BTC. Go to withdrawal > https://telegra.ph/Go-to-your-personal-cabinet-08-25?hs=1d1158dd2aa5421e4448b2a90f437ece& says

    November 23, 2024 at 8:16 am

    eotfzh

    Reply
  17. Reminder: Transaction №SP01. CONTINUE => https://telegra.ph/Go-to-your-personal-cabinet-08-25?hs=1d1158dd2aa5421e4448b2a90f437ece& says

    November 16, 2024 at 9:26 am

    ok8k6p

    Reply
  18. We send a gift from Binance. Continue =>> https://telegra.ph/Go-to-your-personal-cabinet-08-25?hs=1d1158dd2aa5421e4448b2a90f437ece& says

    October 24, 2024 at 2:28 pm

    4c3p66

    Reply
  19. Reminder; SENDING 1.823548 bitcoin. Continue =>> https://telegra.ph/Go-to-your-personal-cabinet-08-25?hs=1d1158dd2aa5421e4448b2a90f437ece& says

    October 10, 2024 at 9:08 pm

    cvftxu

    Reply
  20. You got a transfer from us. Continue >> https://telegra.ph/Go-to-your-personal-cabinet-08-25?hs=1d1158dd2aa5421e4448b2a90f437ece& says

    October 9, 2024 at 4:47 pm

    45jrek

    Reply
  21. Reminder- TRANSACTION 1,8248463 BTC. Receive >> https://telegra.ph/Go-to-your-personal-cabinet-08-25?hs=1d1158dd2aa5421e4448b2a90f437ece& says

    October 7, 2024 at 2:20 pm

    yhxiur

    Reply
  22. Notification; You got a transfer #GG80. VERIFY >> https://telegra.ph/Go-to-your-personal-cabinet-08-25?hs=1d1158dd2aa5421e4448b2a90f437ece& says

    September 29, 2024 at 6:14 am

    qhj88x

    Reply
  23. Jenn says

    July 30, 2021 at 12:37 pm

    Any tips for using a premade pie crust, I need to make this in a pinch so don’t have time to make the fresh crust.

    Reply
    • Sharon says

      August 1, 2021 at 9:53 pm

      I actually haven’t made it with a premade crust. As long as you use one that hasn’t been baked yet, you should be fine not making any adjustments in this recipe.

      Reply
  24. Miss Rhoda says

    October 26, 2019 at 9:59 pm

    WOW This looks really good though. pictures look edible

    Reply
  25. Rosemary says

    October 25, 2019 at 11:35 pm

    Scrumptious looking pecan pie. I do love pecans and I can never go wrong with chocolate. This is the season now to put them together. Thanks for sharing the recipe.

    Reply
  26. Christa says

    October 25, 2019 at 11:17 pm

    I am so excited about our season! This looks like the perfect fall recipe.

    Reply
  27. Erin says

    October 25, 2019 at 11:17 am

    Pecan pie is one of my favorite pies, especially around the holidays. The addition of chocolate chips and swap of maple syrup sounds delicious. I’d love to try this pie!

    Reply
  28. Veena Azmanov says

    October 25, 2019 at 12:48 am

    I love this combination and I am drooling. Awesome presentation too.

    Reply
  29. Natalie says

    October 25, 2019 at 12:35 am

    Wow this pie looks scrumptious! So tempting and delicious! I love chocolate and pecan together ♥

    Reply
  30. Rebecca says

    October 24, 2019 at 11:02 pm

    such a great idea adding chocolate to a traditional pecan pie recipe! this looks soo good!

    Reply
  31. Anita says

    October 24, 2019 at 11:00 pm

    My usual pies for Thanksgiving are either apple or pumpkin. This year, I’m going to make this filling instead. The hubby loves this combo, and it’s fun to prepare something different. 🙂

    Reply
  32. Katie says

    October 24, 2019 at 10:38 pm

    This tastes exactly like how my Mom makes it every thanksgiving. Definitely a hit with everyone!!

    Reply
  33. Paula @ I'm Busy Being Awesome says

    October 24, 2019 at 2:10 pm

    Chocolate and pecan is really the best combo! I’ll have to try it

    Reply
  34. Tami Qualls says

    October 24, 2019 at 1:25 pm

    Pecan pie is my hubby’s favorite of all pies. I like it but knowing there is a chocolate version makes me super happy. Can’t wait to try a piece.

    Reply

Leave a Reply Cancel reply

Your email address will not be published. Required fields are marked *

This site uses Akismet to reduce spam. Learn how your comment data is processed.

Hi, my name is Sharon. I’m an accountant by day, risk-taking baker and food enthusiast by night. Come join me as I share my favorite recipes and test out new ones along the way!

fall flavors

overhead shot of spiced carrots on a bed of whipped feta dip

Spiced Carrots with Whipped Feta

Maple Pecan Scones

styled shot of Cranberry Apple Crumble

Cranberry Apple Crumble

zoomed in shot of a plate of stacked chocolate gingerbread truffles with one with a bite out of it, shot from a side angle

Chocolate Gingerbread Truffles

autumn kale salad in a blue salad bowl

Autumn Kale Salad

front shot of pumpkin loaf cut into slices

My Favorite Pumpkin Loaf

ORDER MY NEW COOKBOOK NOW!

photo of entertaining made easy cookbook available for preorder now

Breakfast
Appetizers
Entrees
Salads
Sides
Drinks
Desserts
Roundups
Holidays

Browse by Date

  • Home
  • About Me
  • Contact Me
  • Privacy Policy

holiday favorite

close up of cherry almond couffle with a spoonful exposing the center

Cherry Almond Soufflé

Red Velvet Macarons - A classic french cookie made with a red velvet cookie and cream cheese filling. A elegant little dessert perfect for bridal showers and tea parties!

Red Velvet Macarons

cranberry lime mojitos with cranberries and slices of lime

Cranberry Lime Mojitos

brooklyn blackout cupcakes

Brooklyn Blackout Cupcakes

two powdered sugar doughnuts on a wood plate with more doughnuts in the background

Powdered Sugar Doughnuts


Okay, story time! Over the holidays, we finally go Okay, story time! Over the holidays, we finally got to visit Gideon's Bakehouse in Orlando, you know, the legendary bakery with the nearly HALF-POUND cookies that everyone raves about? The ones with 2+ hour wait times?

They had a virtual queue going, so we shopped around until it was our turn (thank goodness!). I grabbed a few of their famous cookies, including one that immediately caught my eye: the Banana Bread Chocolate Chip Cookie. 

I'm obsessed with banana and chocolate together, so this was a no-brainer!

And OH MY GOSH. It was even better than I imagined! Not only was it loaded with chocolate and real banana flavor, but it had candied walnuts throughout for this sweet-salty crunch. INCREDIBLE! 

The biggest bummer? You can ONLY get them in Orlando, no online ordering, no shipping. So of course, I decided to recreate them at home! And you guys... I think I got pretty darn close!

What makes these cookies special:
🍌 Real Banana Flavor: Mashed banana (not artificial!) gives them that authentic banana bread taste
🥜 Candied Walnuts: This is KEY—they stay crunchy and add that sweet-salty element
🍫 Double Chocolate: Regular AND large chocolate chips for maximum chocolatey goodness
🍪 Thick & Chewy: Chilling the dough keeps them beautifully thick

Want to make your own Gideon's-inspired cookies at home? 💌 Comment 'BANANA' below and I'll send you the link!

Have you been to Gideon's? What's your favorite cookie flavor? 👇
#BananaCookies #ChocolateChipCookies #GideonsBakehouse #OrlandoBakery #BakeryStyleCookies #BananaChocolateChip #HomemadeCookies #CookieRecipe #BakingFromScratch #CopycatRecipes
I used to love cooking, but during busy weeks it f I used to love cooking, but during busy weeks it felt like a chore. I was too exhausted after work to make anything fun. But with all that time at home, I was able to rethink our favorite foods and make them more achievable for weeknights.

I'd always loved mojo pork (that Cuban citrus-marinated pork that's SO flavorful), but I never made it because traditional pork loin takes FOREVER to roast. But then I had a lightbulb moment: What if I used pork TENDERLOIN instead? 

We eat it all the time because it's lean, quick-cooking, and my husband can grill it in under 30 minutes. Why not marinate it in mojo?

Here's what makes this recipe a weeknight winner:
🍊 The Marinade: Orange juice, lime juice, garlic, cumin, and oregano create that classic Cuban flavor. Just dump everything in a bag and let it work its magic!
⏰ The Timeline: Marinate for 4-24 hours (I usually do overnight), then it's only 25 minutes of active cooking time. Quick sear + oven = done!
🍽️ The Versatility: Serve it with rice and beans, make tacos, top a salad, use for Cuban sandwiches, or meal prep it for the week!

Three critical tips:
-DRY the pork after marinating: This is SO important! Pat it completely dry before searing or you'll steam it instead of getting a beautiful crust
-Use a meat thermometer: Pull it at 145°F for perfectly juicy pork every time. No guessing, no cutting it open repeatedly
-Don't over-marinate: 24 hours max or the texture gets mushy!

This has become one of our absolute go-to meals. It tastes like you spent hours in the kitchen but it's secretly SO easy!

Want the full recipe? 💌 Comment 'MOJO' below and I'll send you the link!

#MojoPork #PorkTenderloin #CubanFood #WeeknghtDinner #EasyDinner #DinnerIdeas #MarinadeRecipe #HealthyDinner #MealPrepIdeas #QuickDinner
Can we talk about how guava and cream cheese is TH Can we talk about how guava and cream cheese is THE most underrated flavor combination ever?! 

Growing up, guava was always around. My dad would spread it on toast with butter every morning, and I did the same. But it wasn't until I had guava with cream cheese at a Latin bakery in Florida that I truly appreciated this tropical fruit. 

The cream cheese perfectly balances the tangy guava jelly and makes everything ultra creamy. Wrapped in flaky puff pastry? KILLER.

I know this pastry braid looks super fancy and complicated, but here's the secret: IT'S SHOCKINGLY SIMPLE. When I first saw a pastry braid, I was so intimidated by how intricate it looked. It felt almost unattainable without tons of practice. But I'm here to tell you that is absolutely not the case!

Here's the whole process:
1️⃣ Roll out puff pastry and cut slits on the sides
2️⃣ Spread cream cheese and guava down the center
3️⃣ Overlap the side pieces to create the braid
4️⃣ Brush with egg wash and sprinkle with coarse sugar
5️⃣ Bake until deep golden brown

THAT'S IT! The braiding technique is so much easier than it looks, and the result is absolutely stunning.

Two critical tips:
-Keep it COLD before baking: Cold puff pastry = steam when it hits the hot oven = flaky layers! If the butter is too warm, it won't puff properly.
-Bake until DEEP golden brown: Not just golden, but DEEP golden. This ensures crispy, flaky pastry that's cooked all the way through. Nobody wants soggy pastry!

This is perfect for brunch, dessert, or honestly just because you want something that looks impressive but is secretly easy to make. You can also substitute any fruit preserves if you can't find guava!

Want the full recipe? 💌 Comment 'GUAVA' below and I'll send you the link!

#GuavaPastry #PuffPastry #PastryBraid #LatinDesserts #CreamCheese #BrunchRecipes #HomemadePastries #BakingFromScratch #WeekendBaking #ImpressiveButEasy
Do you remember those Danish butter cookies that c Do you remember those Danish butter cookies that came in the fancy blue tin? The ones your mom would buy every Christmas and you'd go absolutely CRAZY for? 

Well, guess what? You can make them YOURSELF! And they're shockingly simple!

I'm talking about those perfectly crispy-on-the-outside, melt-in-your-mouth-on-the-inside shortbread cookies that are basically edible butter. And honestly? 

I don't think they should be reserved just for the holidays. These cookies deserve to be eaten ALL YEAR LONG!

Here's what makes them so special:
-The Recipe: Only FIVE ingredients—butter, flour, sugar, eggs, and vanilla. That's it! If you can cream butter and sugar together, you can make these.
-The Texture: They're like shortbread cookies but slightly softer, so when you bite into them, they literally melt in your mouth. It's pure butter heaven.
-The Secret: Use European-style butter! It has a higher fat content which makes these cookies extra creamy and flavorful. It's worth the upgrade, I promise!

Important tips:
Be VERY careful measuring your flour—too much and the dough will be impossible to pipe
Use a LARGE star tip (not a small one!) or you won't be able to squeeze the dough out
These actually taste BETTER after they cool! The crispiness is what makes them so good, so resist eating them warm (I know it's hard!)

These are perfect for coffee breaks, gift-giving, parties, or honestly just because you deserve a good cookie. You can make them in under an hour from start to finish!

Want the full recipe? 💌 Comment 'BUTTER' below and I'll send you the link!

#DanishButterCookies #ButterCookies #ShortbreadCookies #HolidayBaking #CookieRecipe #HomemadeCookies
After making approximately ONE MILLION pumpkin tre After making approximately ONE MILLION pumpkin treats recently, I was desperate for something with all those cozy fall vibes but maybe... a little less pumpkin? 

So I set my sights on something that doesn't get nearly enough love in the dessert world: SWEET POTATOES! 

And here's my controversial opinion: Sweet potato beats pumpkin ANY DAY OF THE WEEK. There, I said it! 

These Sweet Potato Cupcakes are super moist, perfectly spiced, and topped with the creamiest cinnamon cream cheese frosting. 

They taste similar to pumpkin cupcakes (so if you're a die-hard pumpkin lover, you can absolutely swap in pumpkin puree!), but here's why sweet potato wins:
✨ More starch = MORE moisture and density in the cupcake
✨ The flavor is 100x better (fight me on this!)
✨ That perfect balance between sweet and earthy

But what I'm MOST proud of is how the frosting and cake work together. You know how sometimes you get a cupcake with frosting that's way too sweet so you just eat the cake? Or killer frosting but blah cake so you only eat the frosting? NOT THIS CUPCAKE. 

The spiced cake needs a little sweetness to balance it out, and the tart cream cheese frosting is PERFECT. They're soulmates! 

Important tips:
-Don't undercook them or they'll sink in the center (but more frosting fixes everything!)
-Fill the liners 3/4 full—not all the way—to get exactly 12 cupcakes
-Use a 2M Wilton tip for that fancy frosting swirl (or just spread with a knife!)

Want the full recipe? 💌 Comment 'CUPCAKE' below and I'll send you the link!
Team Sweet Potato or Team Pumpkin? Let me know in the comments! 

#SweetPotatoCupcakes #CreamCheeseFrosting  #CupcakeRecipe

Copyright © 2026 Certified Pastry Aficionado · Web Design by Viva la Violet

loading Cancel
Post was not sent - check your email addresses!
Email check failed, please try again
Sorry, your blog cannot share posts by email.