• Facebook
  • Instagram
  • Pinterest
  • RSS
  • Twitter
  • Home
  • About Me
  • Recipes
  • Cookbooks
  • Work With Me
  • Contact

CPA: Certified Pastry Aficionado

Mini Ham & Cheese Quiche with Caramelized Onions

appetizer· breakfast· breakfast casseroles· Easter· Holiday Favorites
April 13, 2017

Jump to Recipe Print Recipe

Mini Ham and Cheese Quiche with Caramelized Onions – A mini, buttery pastry crust filled with a mixture of eggs, cream, diced ham, gruyere cheese, and caramelized onions. These small little quiche are perfect for serving at parties and brunches. 

Mini Ham and Cheese Quiche with Caramelized Onions on a plateOh man…Easter is almost here, guys! I am so ready to dig into some rich, creamy chocolate. I have a huge chocolate peanut butter egg waiting for me to eat the second I wake on Easter morning. And then I’ll probably be making my favorite chocolate cake on the planet for breakfast. Yay!

If you’re new to the blog, I gave up chocolate for lent. It’s been strugglesville for the last 40 days and, man, am I ready it to be over. Clearly.

Today’s recipe is also a great one to serve on Easter: mini ham and cheese quiche with caramelized onions. It’s an adaptation of the first-ever quiche I made, which happen to be on Easter. I had a go-big-or-go-home attitude that year so I just had to make this deep-dish quiche from Tyler Florence. He made it look easy enough so why not?

Well, I failed to realize how long this baby took to bake in the oven. Sure, the recipe says it cooks for 1 hour and 45 minutes but scroll to the bottom and it says you also need to let it cool for 30 minutes so it can set. Otherwise, you’ll have a gloopy mess when you try to cut it. My family was not pleased about eating late, I’ll just say that.

But there was no denying the rich, creamy, buttery flavors of this quiche so I didn’t want to eliminate it from my repertoire completely just because it’s annoying to bake. Therefore, I opted of making this quiche into mini bites instead of a huge deep-dish. It cut out 1 1/2 hours of time! Man, did they turn out beautifully, or what?!

Mini Ham and Cheese Quiche with Caramelized Onions with a bite out of it Plate of Mini Ham and Cheese Quiche with Caramelized Onions Mini Ham and Cheese Quiche with Caramelized Onions

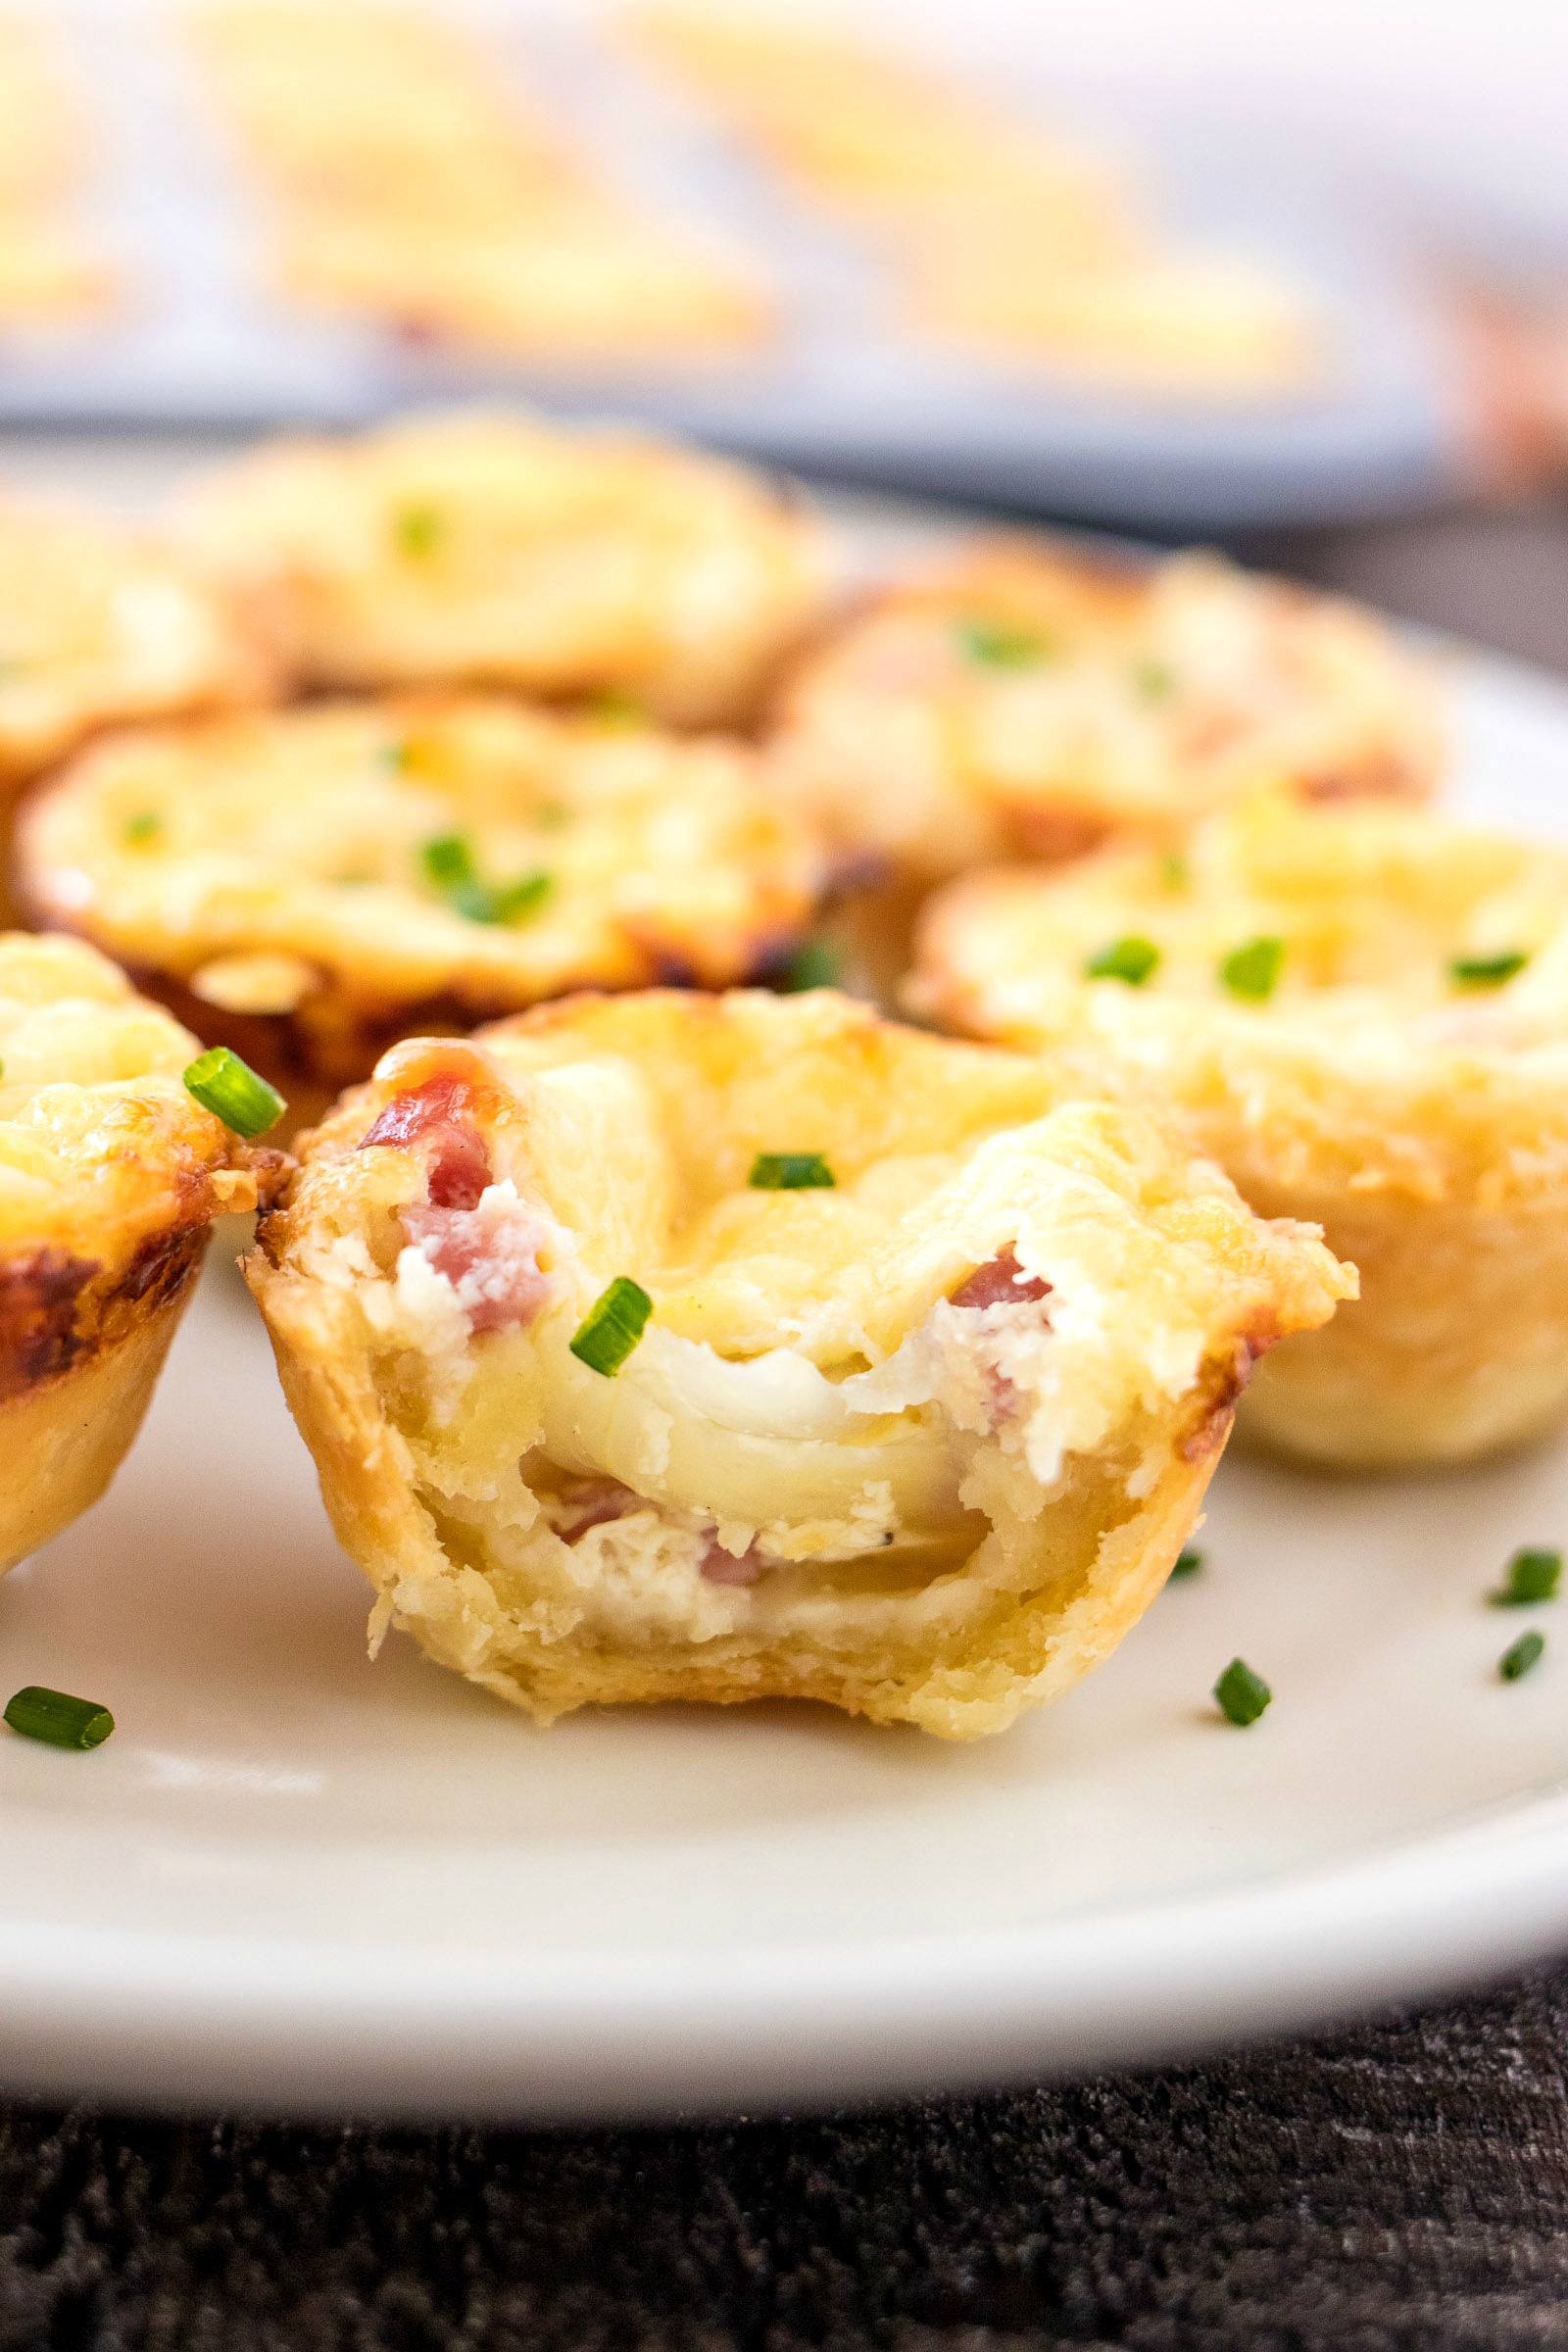
As I mentioned above, this quiche is super rich and creamy and buttery. But worth every bite! I could only handle a few before needing a break but my husband was eating them all night long. This recipe was definitely one of his favorites.

The best part about the quiche, in my opinion, is the crust. It is so crispy and buttery, as it should be, but it is also perfectly salty so the flavor just explodes all over your taste buds. I had some leftover crust that I just threw out because I didn’t know what to do with it. After tasting it with the quiche, I immediately regretted my decision; I should have just baked it by itself with a sprinkle of Parmesan for snacking. Learn from my mistakes!

I kept all the elements of Tyler’s recipe – crust, diced ham, caramelized onions, egg mixture- but I added one more that just had to be done: Gruyere cheese. Have you had it before? It’s super nutty and salty. And it’s the cheese most commonly found on top of french onion soup (and also in these sliders!).

Muffin Tray With Quiche Dough In The Holes Adding ham and onions into the quiche dough muffin holes

There wasn’t a whole lot of real estate left in the quiche shells after adding the ham and onions so I decided to add the cheese on top instead on inside the quiche. I love the crispy edges formed by the cheese! It gives the fancy quiche a little rustic flare.

One thing that I wish I did differently was dice the onions instead of slicing them. When sliced, the onions take up too much room so I couldn’t get as much egg mixture in the shell as I would have liked. So that’s why I tell you to dice the onions in the recipe, even though they clearly looked sliced below.

cooking the ham and onions

I don’t have to tell you how perfect these quiche are for your next party or brunch. Who can turn down eggs, cheese, ham, and pastry?! And they’re in small size so no utensils needed! That’s a major plus when hosting a larger party. You don’t want to see people struggling for a seat so they can eat their food with a knife and fork.

Before you get going on recipe, here are a few extra tips for these amazing quiche:

  1. It’s very important to chill the dough before you roll it out. Warm pastry dough does not get flaky, but rather it’s kind of doughy and greasy. No bueno. It only takes 20 minutes so it’ll go by fast while you work on the filling.
  2. If you don’t have Gruyere or you don’t want to spend the $$$ on it, you can substitute Parmesan cheese. I would still buy it and shred it yourself, if you can. That way it will melt better.
  3. To prevent the egg mixture from going all over the place, I recommend using a spouted bowl or measuring cup to pour the mixture into each muffin mold. I used my measuring cup since it has a handle. It worked like a charm!
  4. I highly encourage you to use a 24-cup mini muffin tin. I used to have one with only 12 cups and I’d have to do everything in two batches because most recipes makes 24. If you’re in the market for one, this is the one I use and it’s amazing because it’s super non-stick. Even though the cheese melted all over the place, it wiped right off.

I hope you’re drooling after reading this post. If so, I’ve done my job. I also hope you make these for your Easter celebration or even for Mother’s Day next month! Once you do, let me know how they turned out by commenting below!

Closeup of Mini Ham and Cheese Quiche with Caramelized Onions on a plate

Here are all the kitchen tools and serveware that I used in today’s recipe. For each item sold below, I make a small commission. I only recommend items that I own and love so you can trust that each recommendation is tried and true. Thank you for supporting CPA!

[show_shopthepost_widget id=”2591207″]

Print Recipe

Mini Ham & Cheese Quiche with Caramelized Onions

A mini, buttery pastry crust filled with a mixture of eggs, cream, diced ham, gruyere cheese, and caramelized onions. These small little quiche are perfect for serving at parties and brunches.
Prep Time15 minutes mins
Cook Time40 minutes mins
Total Time1 hour hr 25 minutes mins
Servings: 24 mini quiche

Ingredients

For the crust:
  • 2 cups all-purpose flour
  • 1 teaspoon salt
  • 1/4 teaspoon sugar
  • 6 ounces butter unsalted, cold
  • 1 large egg yolk
  • 4 tablespoons ice water
For the filling:
  • 1 1/2 tablespoon olive oil
  • 1 medium sweet onion diced
  • 4 ounces diced ham
  • 2 large eggs
  • 1 cup heavy cream
  • 1/8 teaspoon salt
  • 1/8 teaspoon pepper
  • 6 ounces gruyere cheese shredded
  • chives for garnish (optional)

Instructions

  • First, we'll make the crust. Add the flour, salt, and sugar in a medium bowl. Cut the butter into small cubes and add to the flour mixture. Use your hands (or a pastry blender) to combine the two until the butter is the size of small crumbs.
  • Mix egg yolk and water together in a small bowl. Make a well in the flour and butter mixture and add the egg yolk mixture to the well. Use a fork to gently combine the mixture together. Once combined, use your hands to form mixture into a disk. If the mixture is too crumbly to come together, add a little more water. Wrap disk in plastic wrap and freeze for 20 minutes. In the meantime, start the filling.
  • Add 1 1/2 tablespoons olive oil and onions to a medium skillet. Turn heat to medium and begin to cook onions until they are translucent, about 10 minutes. Add diced ham and continue to cook for another 10 minutes. Stir occasionally. Remove from heat and set aside. Preheat oven to 375 degrees.
  • After crust has chilled in the freezer for 20 minutes, place on floured surface and begin rolling into a large circle, about 1/8 inch thick. Using a 2.75-inch round cutter, cut out 24 circles. Keep in mind, you will probably need to roll out the scraps from the first batch in order to get 24 rounds.
  • Grease a mini-muffin tin with non-stick spray. Place each circle over a mini muffin mold and press it completely in the mold using your fingers or a shot glass. Push crust up the edges of the mold. My muffin tin has 24 molds so I could fit them all into one pan. But if your mold only holds 12, you'll have to do two batches. Place tin back in the freezer while we prepare the rest of the filling.
  • Whisk eggs until they become frothy. Add cream, salt, and pepper and whisk together. Pull the muffin tin from the freezer. Grab the ham and onion mixture and place a little in the bottom of each muffin mold. Be careful not to overfill or you won't be able to add any of the egg mixture.
  • Fill each muffin mold to the top with the egg mixture. I find it much easier to do this with a bowl or measuring cup that has a spout. Once all molds are filled, top each one with 1/2 teaspoon of shredded gruyere cheese.
  • Place quiche into prepared oven and bake for about 20 minutes. The quiche will get really puffy and the cheese edges will get crispy. Remove from oven and let them cool in the pan for 10 minutes. Remove from pan and place on plate to cool for another few minutes before eating. Serve warm or at room temperature.

Notes

Recipe adapted from Tyler Florence

Pin for later:

Mini Ham and Cheese Quiche with Caramelized Onions photo collage

More things you’ll love:

Goat Cheese-Stuffed Sweet Peppers

Bowl of Goat Cheese-Stuffed Sweet Peppers

Bacon and Gruyere Sliders with Beer-Caramelized Onions

Plate of bacon and gruyere sliders with beer caramelized onions

Cheesy Tater Tot Breakfast Casserole

Cheesy Tater Tot Breakfast Casserole being scooped with a spoon

Share this:

  • Click to share on Pinterest (Opens in new window)
  • Click to share on Facebook (Opens in new window)
  • Click to share on Twitter (Opens in new window)
  • Click to share on Tumblr (Opens in new window)
  • Click to email this to a friend (Opens in new window)

26 Comments

« Traditional English Trifle
Berry Mimosas »

Comments

  1. Chanel van Reenen says

    April 17, 2017 at 8:00 am

    you had me at cheese! these look amazing! I love anything bite sized!

    Reply
  2. Nicole Parise says

    April 15, 2017 at 4:41 pm

    Cartelized onions are always my thing! These look so good 🙂

    xx nicole
    http://www.nicoleparise.com

    Reply
  3. Julie Torres says

    April 15, 2017 at 2:52 pm

    Making these this Sunday for our week breakfasts on the go, looks so delicious, cannot wait to see how they come out.

    Reply
    • Sharon says

      April 16, 2017 at 11:02 am

      Yay! Such a great way to enjoy these quiche. Let me know how you like them!

      Reply
  4. Poonam says

    April 15, 2017 at 2:01 pm

    These are so cute and convenient for on the go. I love quiche so I can’t wait to make this recipe!

    Reply
  5. Cait Weingartner says

    April 15, 2017 at 1:30 pm

    Yum! These mini quiches look incredibly delicious. I know most people would
    make them to serve as a party appetizer, but honestly, I can see myself just
    eating a whole tray of them by myself for dinner!

    Reply
  6. kirstin morabito says

    April 15, 2017 at 10:12 am

    Man those look good – perfect to bring to a brunch!

    Reply
  7. Jazz says

    April 14, 2017 at 4:02 pm

    I love quiche! I think I’ll try this recipe with turkey.

    Reply
  8. Brittany Wise says

    April 14, 2017 at 8:03 am

    These looks so good and perfect for brunch!! Welcome back to chocolate! 🙂

    Reply
    • Sharon says

      April 14, 2017 at 12:07 pm

      Haha! Thank you! I am so ready to be back 🙂

      Reply
  9. Andrea says

    April 14, 2017 at 7:09 am

    They look really good – I’m almost sorry that I already had my breakfast….

    Reply
  10. Diane B, Your Personal Shopper says

    April 14, 2017 at 3:28 am

    Yum! Those look delicious! Perfect size breakfast for my little ones and me of course 😉

    Reply
  11. Jordan | Read. Eat. Repeat. says

    April 13, 2017 at 3:28 pm

    I love quiches because 1. They are delicious, and 2. They can multitask as a breakfast, lunch, or dinner – and since these are mini they could be a snack too!

    Reply
    • Sharon says

      April 14, 2017 at 4:29 am

      You’re so right – perfect for so many kinds of events and meals!

      Reply
  12. Davi says

    April 13, 2017 at 12:24 pm

    This looks AMAZING! Definitely adding this to my weekend breakfast recipes!

    Reply
  13. Kimberly @ Berly's Kitchen says

    April 13, 2017 at 10:29 am

    These are too cute. They look delicious and would be perfect for portion control. My husband and son go crazy over ham and cheese, so these would be super popular at my house.

    Reply
    • Sharon says

      April 14, 2017 at 4:28 am

      Thanks so much! That’s a huge reason why I love bite-sized food – portion control!

      Reply
  14. Helene says

    April 13, 2017 at 9:38 am

    These are so adorable and sound absolutely delicious. If I ever have a tea party I would love to make these!

    xo, Helene
    http://www.circleskirtsandpetticoats.wordpress.com

    Reply
  15. Annie says

    April 13, 2017 at 9:21 am

    I love quiche! These would be perfect for my son to grab and eat on his own

    Reply
    • Sharon says

      April 14, 2017 at 4:15 am

      You’re so right! Perfect for tiny hands 🙂

      Reply
  16. Andrea says

    April 13, 2017 at 8:06 am

    Quiche is one of my favorites! What a great idea to spice it up with caramilized onions! This post made me cery hungry btw . I’m giving this recipe a try ASAP! Thanks for sharing 🙂

    Reply
    • Sharon says

      April 14, 2017 at 4:14 am

      Haha perfect! Glad you love it!

      Reply
  17. Trish says

    April 13, 2017 at 7:15 am

    These look amazing!! I’ve always wanted to make quiche but never have, thanks for sharing this, I have pinned to my food board. 🙂

    Reply
    • Sharon says

      April 14, 2017 at 4:14 am

      You’ll be surprised at how easy it is!

      Reply
  18. shan says

    April 13, 2017 at 7:12 am

    Oh my goodness. What a perfect breakfast! Yum!

    Reply

Trackbacks

  1. Ham & Cheese Croquettes says:
    May 31, 2018 at 7:18 am

    […] Mini Ham & Cheese Quiche with Caramelized Onions […]

    Reply

Leave a Reply Cancel reply

Your email address will not be published. Required fields are marked *

This site uses Akismet to reduce spam. Learn how your comment data is processed.

Hi, my name is Sharon. I’m an accountant by day, risk-taking baker and food enthusiast by night. Come join me as I share my favorite recipes and test out new ones along the way!

fall flavors

a glass dish with pumpkin cinnamon rolls in it with some missing from the center and a spatula with a pumpkin the background, shot from a side angle

Pumpkin Cinnamon Rolls

photo of two glasses of sangria with the pitcher in the background

Cranberry Apple Sangria

Pumpkin Tres Leches

vinaigrette dressing being poured over a plate of Orchard Harvest Salad (Panera Copycat) from a glass bottle with a half and whole pair and cherry preserves in the background, shot from a side angle

Orchard Harvest Salad (Panera Copycat)

styled shot of Cranberry Apple Crumble

Cranberry Apple Crumble

a bowl of Butterscotch Vanilla Bean Sauce with a spoon in it and a bowl of brown sugar with a spoon in it on a cloth napkin, shot from a side angle

Butterscotch Vanilla Bean Sauce

ORDER MY NEW COOKBOOK NOW!

photo of entertaining made easy cookbook available for preorder now

Breakfast
Appetizers
Entrees
Salads
Sides
Drinks
Desserts
Roundups
Holidays

Browse by Date

  • Home
  • About Me
  • Contact Me
  • Privacy Policy

holiday favorite

close up of cherry almond couffle with a spoonful exposing the center

Cherry Almond Soufflé

a plate of BLT benedicts on a cloth napkin with half a lemon in the background, shot from a side angle

BLT Benedict

photo of creme brulee doughnuts stacked together with the top doughnut missing a bite

Crème Brûlée Doughnuts

a White Chocolate Cream Puff cut in half with the filling showing and a plate of cream puffs in the background and white chocolate chips around it, shot from a side angle

White Chocolate Cream Puffs

overhead shot of fig and goat cheese crostini on a serving platter

Fig & Goat Cheese Crostini


Can we talk about how guava and cream cheese is TH Can we talk about how guava and cream cheese is THE most underrated flavor combination ever?! 

Growing up, guava was always around. My dad would spread it on toast with butter every morning, and I did the same. But it wasn't until I had guava with cream cheese at a Latin bakery in Florida that I truly appreciated this tropical fruit. 

The cream cheese perfectly balances the tangy guava jelly and makes everything ultra creamy. Wrapped in flaky puff pastry? KILLER.

I know this pastry braid looks super fancy and complicated, but here's the secret: IT'S SHOCKINGLY SIMPLE. When I first saw a pastry braid, I was so intimidated by how intricate it looked. It felt almost unattainable without tons of practice. But I'm here to tell you that is absolutely not the case!

Here's the whole process:
1️⃣ Roll out puff pastry and cut slits on the sides
2️⃣ Spread cream cheese and guava down the center
3️⃣ Overlap the side pieces to create the braid
4️⃣ Brush with egg wash and sprinkle with coarse sugar
5️⃣ Bake until deep golden brown

THAT'S IT! The braiding technique is so much easier than it looks, and the result is absolutely stunning.

Two critical tips:
-Keep it COLD before baking: Cold puff pastry = steam when it hits the hot oven = flaky layers! If the butter is too warm, it won't puff properly.
-Bake until DEEP golden brown: Not just golden, but DEEP golden. This ensures crispy, flaky pastry that's cooked all the way through. Nobody wants soggy pastry!

This is perfect for brunch, dessert, or honestly just because you want something that looks impressive but is secretly easy to make. You can also substitute any fruit preserves if you can't find guava!

Want the full recipe? 💌 Comment 'GUAVA' below and I'll send you the link!

#GuavaPastry #PuffPastry #PastryBraid #LatinDesserts #CreamCheese #BrunchRecipes #HomemadePastries #BakingFromScratch #WeekendBaking #ImpressiveButEasy
Do you remember those Danish butter cookies that c Do you remember those Danish butter cookies that came in the fancy blue tin? The ones your mom would buy every Christmas and you'd go absolutely CRAZY for? 

Well, guess what? You can make them YOURSELF! And they're shockingly simple!

I'm talking about those perfectly crispy-on-the-outside, melt-in-your-mouth-on-the-inside shortbread cookies that are basically edible butter. And honestly? 

I don't think they should be reserved just for the holidays. These cookies deserve to be eaten ALL YEAR LONG!

Here's what makes them so special:
-The Recipe: Only FIVE ingredients—butter, flour, sugar, eggs, and vanilla. That's it! If you can cream butter and sugar together, you can make these.
-The Texture: They're like shortbread cookies but slightly softer, so when you bite into them, they literally melt in your mouth. It's pure butter heaven.
-The Secret: Use European-style butter! It has a higher fat content which makes these cookies extra creamy and flavorful. It's worth the upgrade, I promise!

Important tips:
Be VERY careful measuring your flour—too much and the dough will be impossible to pipe
Use a LARGE star tip (not a small one!) or you won't be able to squeeze the dough out
These actually taste BETTER after they cool! The crispiness is what makes them so good, so resist eating them warm (I know it's hard!)

These are perfect for coffee breaks, gift-giving, parties, or honestly just because you deserve a good cookie. You can make them in under an hour from start to finish!

Want the full recipe? 💌 Comment 'BUTTER' below and I'll send you the link!

#DanishButterCookies #ButterCookies #ShortbreadCookies #HolidayBaking #CookieRecipe #HomemadeCookies
After making approximately ONE MILLION pumpkin tre After making approximately ONE MILLION pumpkin treats recently, I was desperate for something with all those cozy fall vibes but maybe... a little less pumpkin? 

So I set my sights on something that doesn't get nearly enough love in the dessert world: SWEET POTATOES! 

And here's my controversial opinion: Sweet potato beats pumpkin ANY DAY OF THE WEEK. There, I said it! 

These Sweet Potato Cupcakes are super moist, perfectly spiced, and topped with the creamiest cinnamon cream cheese frosting. 

They taste similar to pumpkin cupcakes (so if you're a die-hard pumpkin lover, you can absolutely swap in pumpkin puree!), but here's why sweet potato wins:
✨ More starch = MORE moisture and density in the cupcake
✨ The flavor is 100x better (fight me on this!)
✨ That perfect balance between sweet and earthy

But what I'm MOST proud of is how the frosting and cake work together. You know how sometimes you get a cupcake with frosting that's way too sweet so you just eat the cake? Or killer frosting but blah cake so you only eat the frosting? NOT THIS CUPCAKE. 

The spiced cake needs a little sweetness to balance it out, and the tart cream cheese frosting is PERFECT. They're soulmates! 

Important tips:
-Don't undercook them or they'll sink in the center (but more frosting fixes everything!)
-Fill the liners 3/4 full—not all the way—to get exactly 12 cupcakes
-Use a 2M Wilton tip for that fancy frosting swirl (or just spread with a knife!)

Want the full recipe? 💌 Comment 'CUPCAKE' below and I'll send you the link!
Team Sweet Potato or Team Pumpkin? Let me know in the comments! 

#SweetPotatoCupcakes #CreamCheeseFrosting  #CupcakeRecipe
Y'all, I need to talk about these Kentucky Derby C Y'all, I need to talk about these Kentucky Derby Cookie Bars because they might just be the most decadent thing I've ever created!

So here's the deal: I love taking traditional recipes and giving them a major upgrade. 

Traditional Derby Pie is delicious, but I wanted to make something even MORE special. And these bars? They're Derby Pie on steroids!

Here's what makes them absolutely incredible:
The Cookie Crust: Instead of regular pie crust, we're using a thick chocolate chip cookie base. Game. Changer.
The Filling: Loaded with pecans, chocolate chips, and a hint of bourbon that adds this rich, complex flavor. The filling is more dense and cakey than traditional Derby Pie, which gives you the perfect chewy texture.
The Bourbon Caramel: This homemade bourbon caramel sauce is what takes these bars over the top. It's sweet, buttery, and has that gorgeous bourbon depth. And yes, the alcohol cooks out, so it's safe for everyone (even made these while I was pregnant!)!

Important tips:
Don't chop your pecans too finely—leave nice chunks for better texture
If the bars start browning too quickly, just cover them with foil while the center finishes baking
Don't over-thicken the caramel sauce on the stove—it will thicken as it cools!

These bars are perfect for Derby Day (obviously!), but honestly, they're amazing for any summer gathering, BBQ, or potluck. 

Want the full recipe with that bourbon caramel sauce? 💌 Comment 'DERBY' below and I'll send you the link!

#DerbyPie #CookieBars #BourbonDesserts #PecanDesserts
Y'all, I just made the BEST hot chocolate of my li Y'all, I just made the BEST hot chocolate of my life and I need you to try it immediately!

Growing up, I only knew hot chocolate from those packets where you just add hot water. I had NO idea you could make it from scratch so easily! 

All it takes is hot milk, cocoa powder, chocolate chips, and the secret ingredient... PEANUT BUTTER!

I've always been obsessed with the peanut butter and chocolate combo (if you've been following me, you know this is true!), but for some reason, it never occurred to me to add it to hot chocolate until recently. And now I'm officially never going back to regular hot chocolate!

What makes this recipe so special? The peanut butter adds this incredible creaminess and depth of flavor without overpowering the chocolate. 

Plus, you don't need to add any extra sugar because the chocolate chips provide all the sweetness you need. 

Top it with marshmallows and maybe a drizzle of chocolate and peanut butter sauce, and you've got pure heaven in a mug.

Important tips:
-Be careful not to overheat the chocolate and peanut butter—too much heat will cause the chocolate to harden
-Add the milk SLOWLY to the chocolate mixture and whisk constantly. It makes blending so much easier!
-This recipe makes 4 cups, and leftovers keep for 5 days in the fridge!

This is the ultimate cozy drink for cold winter nights, holiday gatherings, or honestly any time you need a little comfort. It's ready in less than 10 minutes!

Want the full recipe? 💌 Comment 'COZY' below and I'll send you the link!

What's your favorite hot drink for winter? Let me know in the comments! 
#HotChocolateRecipe  #HomemadeHotChocolate #WinterRecipes

Copyright © 2026 Certified Pastry Aficionado · Web Design by Viva la Violet

loading Cancel
Post was not sent - check your email addresses!
Email check failed, please try again
Sorry, your blog cannot share posts by email.