• Facebook
  • Instagram
  • Pinterest
  • RSS
  • Twitter
  • Home
  • About Me
  • Recipes
  • Cookbooks
  • Work With Me
  • Contact

CPA: Certified Pastry Aficionado

Black & White Cookies

Cookies· dessert
March 5, 2018

Jump to Recipe Print Recipe

Black & White Cookies – Soft, cakey vanilla cookies covered in vanilla and chocolate icing

Black & White Cookies with half chocolate and half vanilla icingIt’s cookie time! For you new readers, every month, I like to start out with a new cookie recipe. Last month, I made these uber-festive raspberry macaron hearts. Did you get a chance to try them out???

This month I’m making a classic American cookie – the Black & White Cookie. Have you had a black & white cookie before? They became popular in New York City when a local bakery wanted to use up some extra cake batter. They thickened up the batter a little and made cookies out of it and voila!

Look how gorgeous they are!

Black & White Cookies with half the cookie in a black chocolate icing and half in a vanilla icing Close-up on a Black & White Cookie Black & White Cookie broken in half

I was actually introduced to black & white cookies when I worked at Starbucks back in college. As a sweets enthusiast, it was imperative that I taste every pastry we sold. And it would make me better at my job when the millionth person asked “What pastry do you recommend?”

I didn’t really know what to expect when eating a black & white cookie. Okay, that’s not entirely true – I expected it to be crunchy like every other sugar cookie that I had before. But other than that, I had zero expectations.

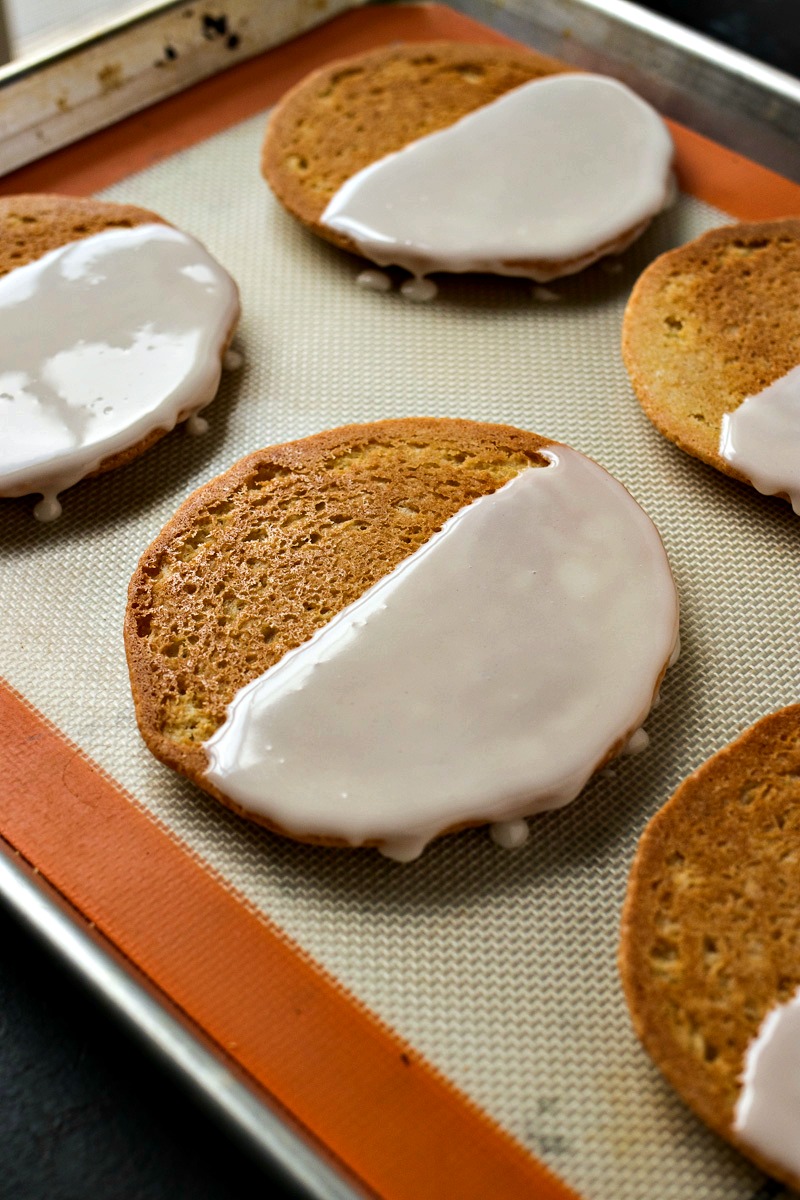
Well folks, let me tell ya – crunchy this cookie is not. It’s so cakey and soft and fluffy and lovely.

To make sure this cookie comes out cakey and not crunchy, the batter needs to be mice and thick and needs to have a little baking powder. If the batter isn’t thicken enough, the cookies will spread way too thin.

After the cookies are done baking, you let them cool completely and then ice with vanilla on one half of each cookie. Once the vanilla icing has cooled, ice it with the chocolate. If you don’t let them cool in between icing flavors, they will bleed together.

Mixer blade in a bowl of cookie dough Cookie dough balls on a cookie sheet Whisk dripping with the chocolate icing Cookies with half the cookie iced in vanilla icing

As you following the recipe below, make sure you keep these important tips in mind:

  1. Like I said above, this batter needs to be thick, about the consistency of thick brownie batter. If, for some reason, it’s not thick, add more flour about a tablespoon at a time
  2. Do not even think about icing the cookies until they are completely cool. When icing is placed on warm cookies, it melts off. Trust me – you do not want to deal with that mess.
  3. When icing the cookies, make sure you let the white icing dry before adding the black icing. Otherwise, they’ll bleed together.

Alright, that’s all there is to it! These cookies are gonna blow you away!

What cookies are you looking forward to seeing this year – more macarons, chocolate cookies, fruit cookies, more sugar cookies??? Let me know in the comments below!

Black and White cookie broken in half and stacked

Print Recipe

Black & White Cookies

Soft, cakey vanilla cookies covered in vanilla and chocolate icing
Prep Time20 minutes mins
Cook Time15 minutes mins
Total Time2 hours hrs 35 minutes mins
Servings: 12 cookies

Ingredients

For the cookies:
  • 2 cups flour
  • 1 teaspoon baking powder
  • 1/4 teaspoon baking soda
  • 1/4 teaspoon salt
  • 10 tablespoons butter unsalted, softened
  • 1 cup sugar
  • 1 large egg
  • 2 teaspoon pure vanilla extract
  • 1/3 cup sour cream
For the icing:
  • 5 1/2 cups powdered sugar
  • 7 tablespoons milk divided
  • 2 tablespoons light corn syrup
  • 1 teaspoon pure vanilla extract
  • 1/2 teaspoon salt
  • 3 tablespoons dark cocoa powder

Instructions

To bake cookies:
  • Preheat oven to 350 degrees. Prepare two large baking sheets by lining with parchment paper. Set aside.
  • Add flour, baking powder, baking soda, and salt to medium bowl. Whisk together to combine. Set aside.
  • In a bowl fitted for a stand mixer, beat butter and sugar with a paddle attachment until nice and smooth - about 3 minutes. Add egg and vanilla and beat until just combined. Add 1/3 of flour mixture and beat until combined. Add 1/2 of sour cream and beat until combined. Repeat until flour mixture and sour cream are fully incorporated, ending with the last 1/3 of the flour mixture. Batter should be super thick.
  • Using an ice cream scoop of 1/4-cup measuring cup, scoop cookie dough and place onto prepared cookie sheet with tons of space between cookies. 6 cookies per sheet. Place in preheated oven and bake for 14-15 minutes, or until the edges turn slightly golden brown. Not too long or they'll get crunchy instead of cakey!
  • Remove from oven and let cool for 5 minutes before transferring to wire rack to cool completely. Do not ice cookies until completely cool.
To ice cookies:
  • Whisk the powdered sugar, 6 tablespoons milk, corn syrup, vanilla extract, and salt in large bowl. Transfer 1 cup of mixture to another bowl. Sift 3 tablespoons of cocoa powder into one bowl and add last remaining tablespoon of milk. Whisk together to make chocolate icing.
  • To frost cookies, start with white icing. Spread icing with an offset spatula on half of each cookie. Set back on cooled baking sheet and place in fridge to let the icing set up for 15 minutes. Once set, repeat with chocolate frosting. Feel free to go over some of the white icing to create a nice, flat edge in the middle. Place back in fridge to set for another hour. Remove from fridge and let them get back to room temperature before serving. Enjoy!

Notes

Recipe adapted from Sally's Baking Addiction

Pin for later:

Black & White Cookies photo collage

More cookie recipes you’ll love:

Soft, Frosted Sugar Cookies

Soft Frosted Sugar Cookies decorated for valentines day

Triple Chocolate Soft Baked Cookies

Stack of Triple Chocolate Soft Baked Cookies

Funfetti Whoopie Pies

Plate of Funfetti Whoopie Pies

Share this:

  • Click to share on Pinterest (Opens in new window)
  • Click to share on Facebook (Opens in new window)
  • Click to share on Twitter (Opens in new window)
  • Click to share on Tumblr (Opens in new window)
  • Click to email this to a friend (Opens in new window)

38 Comments

« Sweet Corn Risotto with Crispy Shrimp (+ wine pairing)
Chocolate Chip Coffee Cake »

Comments

  1. Julie says

    March 12, 2018 at 4:15 pm

    Black and white cookies are my absolute favorite! I finally started making them myself this fall, which has been so dangerous – now I can have them whenever I want. Before, I was at least limited to our trips back to NYC to visit a real bakery (because let’s be honest, outside of NYC, they just aren’t the same!).

    Reply
    • Sharon says

      March 15, 2018 at 11:05 am

      You’re so right!

      Reply
  2. Stacey says

    March 12, 2018 at 12:51 pm

    These are always a classic. I love them, but haven’t had them in so long…I think I’ll be making them soon!

    Reply
    • Sharon says

      March 15, 2018 at 11:06 am

      Awesome!

      Reply
  3. Kristina says

    March 11, 2018 at 11:13 pm

    I LOVE black and white cookies! I always order them when I see them in a pastry shops, but I’ve never tried making them on my own. These look super easy and I will definitely be making them soon!

    Reply
  4. Veronika's Kitchen says

    March 11, 2018 at 10:25 pm

    These cookies make me think about New York. When I lived there, I used to buy them all the time at the bakery shop) Great recipe!

    Reply
  5. Kim @ Three Olives Branch says

    March 11, 2018 at 10:57 am

    I agree, they are so pretty! And I love the mixture of the black and white to change up the flavor a little while you eat them. Yum!

    Reply
  6. Karyl / Karyl’s Kulinary Krusade says

    March 10, 2018 at 10:44 am

    These are so cute! I love that dark chocolate, and the great contrast to the white icing. These would be awesome for a wedding

    Reply
  7. Kathryn @ FoodieGirlChicago says

    March 9, 2018 at 4:10 pm

    Such good looking cookies and I’m sure so tasty as well!!

    Reply
  8. Latasha says

    March 7, 2018 at 9:33 am

    These cookies looks delicious! Going to add them to my family dessert menu.

    Reply
  9. Cynthia Nicoletti says

    March 6, 2018 at 9:27 am

    I love your recipe and I love black and white cookies. I have to try and make thesethey look and sound fabulous.

    Reply
    • Sharon says

      March 6, 2018 at 12:32 pm

      Thanks so much!

      Reply
  10. Brit Strawbridge says

    March 6, 2018 at 8:03 am

    I have never tried black + white cookies! I am all about simple and delicious. But those funfetti whoopie pies I just saw are a whole other story..yuuuuum!

    Reply
    • Sharon says

      March 6, 2018 at 12:33 pm

      You’re gonna love both of those fabulous cookies!

      Reply
  11. Claire | Sprinkles and Sprouts says

    March 5, 2018 at 9:45 pm

    Firstly I will have to come back next month to see your next cookie recipe!!!

    This recipe is so adorable!
    My youngest some loves black and white everything. Because it reminds him of his favourite animals, pandas and penguins!
    So he is going to be super happy to see me make these!

    Reply
    • Sharon says

      March 6, 2018 at 12:33 pm

      Aw how cute is that?! You gotta tell me if he loved the cookies!

      Reply
  12. Nicole | Culinary Cool says

    March 5, 2018 at 9:43 pm

    I’ve seen these everywhere, but, confession time: I’ve never actually tried one! I had no idea it was made with a cake-type batter! The things you learn!

    Reply
    • Sharon says

      March 6, 2018 at 12:34 pm

      I hope you get the chance to try them soon!

      Reply
  13. Kate says

    March 5, 2018 at 7:08 pm

    I love black and white cookies. Such a classic! I have never made them myself, though. Love your step by step photos!

    Reply
    • Sharon says

      March 6, 2018 at 12:35 pm

      Thanks so much!

      Reply
  14. K.C. says

    March 5, 2018 at 12:01 pm

    Perfect crumb on these cookies. Black and white cookies are perfect for people like me who don’t want to decide between chocolate and vanilla!

    Reply
    • Sharon says

      March 6, 2018 at 12:39 pm

      So true!

      Reply
  15. Ginny says

    March 5, 2018 at 11:49 am

    These look like such pretty little cookies. I love the crunchy bite that they have

    Reply
    • Sharon says

      March 6, 2018 at 12:40 pm

      Oh don’t get confused – these aren’t crunchy cookies. They’re super cakey!

      Reply
  16. Teri Stephens says

    March 5, 2018 at 11:39 am

    Love this recipe. They would be perfect for a classy birthday party, an Oscars party, New Years and more. Great share!

    Reply
    • Sharon says

      March 6, 2018 at 12:40 pm

      Or even just a weekend treat 😉

      Reply
  17. Adriana Lopez Martin says

    March 5, 2018 at 11:35 am

    I am not a baker so have never dare to make this black and white cookies that I have to confess I adore. Those are so good!

    Reply
    • Sharon says

      March 6, 2018 at 12:41 pm

      Thanks!

      Reply
  18. Sophia says

    March 5, 2018 at 10:57 am

    These are so adorable and look easy to make. I will have to pin these and try them later. Thanks for sharing 🙂

    Reply
    • Sharon says

      March 6, 2018 at 12:41 pm

      Let me know how you like them!

      Reply
  19. Sarah Belanger | Sincerely Anchored says

    March 5, 2018 at 10:43 am

    I’m obsessed with black and white cookies! We always called them half moon cookies and did a chocolate base, but this would be fun to make too!

    Reply
    • Sharon says

      March 6, 2018 at 12:42 pm

      Ooo a chocolate base would be yummy too!!

      Reply
  20. Leslie Haasch says

    March 5, 2018 at 10:30 am

    When I moved to New England and went to NYC for the first time, I was told I HAD to have a black and white cookie. I was never a fan of cakey cookies until I had these – I’m going to have to try your version!

    Reply
    • Sharon says

      March 6, 2018 at 12:42 pm

      That’s awesome!! I hope these stand up to the NYC classics!

      Reply
  21. Carrie | Clean Eating Kitchen says

    March 5, 2018 at 10:18 am

    These look and sound delicious! I can never have too many cookie recipes to try out!

    Reply
    • Sharon says

      March 6, 2018 at 12:43 pm

      Thanks so much!

      Reply
  22. Abby @ WinsteadWandering says

    March 5, 2018 at 9:53 am

    I’ve never had black and white cookies before so, like you, I expected them to be crunchy. Cakey changes things!

    Reply
    • Sharon says

      March 6, 2018 at 12:43 pm

      Exactly!!

      Reply

Leave a Reply Cancel reply

Your email address will not be published. Required fields are marked *

This site uses Akismet to reduce spam. Learn how your comment data is processed.

Hi, my name is Sharon. I’m an accountant by day, risk-taking baker and food enthusiast by night. Come join me as I share my favorite recipes and test out new ones along the way!

fall flavors

zoomed in shot of a bowl of sweet potato gnocchi, shot from a side angle

Sweet Potato Gnocchi with Sage Browned Butter

angled view of cup of dirt pudding

Cup of Dirt Pudding

a plate with a slice of stone fruit tart and slices of fruit in the background, shot from the front

Stone Fruit Tart

two copper mugs filled with holiday mule drinks and a pitcher in the background

Holiday Mule

overhead shot of pumpkin churros on a plate of cinnamon sugar

Pumpkin Churros

a trio of gingerbread souffles on a serving platter

Gingerbread Soufflé

ORDER MY NEW COOKBOOK NOW!

photo of entertaining made easy cookbook available for preorder now

Breakfast
Appetizers
Entrees
Salads
Sides
Drinks
Desserts
Roundups
Holidays

Browse by Date

  • Home
  • About Me
  • Contact Me
  • Privacy Policy

holiday favorite

casserole dish of Cheesy Tater Tot Breakfast Casserole

Cheesy Tater Tot Breakfast Casserole

zoomed in shot of a plate of stacked chocolate gingerbread truffles with one with a bite out of it, shot from a side angle

Chocolate Gingerbread Truffles

a plate with an Almond Croissant on it with a baking sheet of more croissants on it with almonds sprinkled around the table, shot from a side angle

Almond Croissants

a slice of chocolate cream pie with a bite out of it on a plate with more pie in the background, shot from the front

Chocolate Cream Pie

zoomed in shot of a piece of Vanilla Bean Cheesecake with a bite taken out of it with a plate of more cheesecake in the background, shot from the front

Vanilla Bean Cheesecake


Okay I'm taking a break from all this healthy eati Okay I'm taking a break from all this healthy eating. Gimme me all the chocolate!

This Red Velvet Loaf is EXACTLY what I needed after a month of Weight Watchers! Ultra-moist red velvet cake topped with fluffy cream cheese frosting - and the best part? It's a loaf so there's no fussy layering!

Here's why you'll LOVE this recipe:
🔴 Super moist thanks to buttermilk (my secret weapon!)
🔴 Perfect for Valentine's Day or any time you need something red and festive
🔴 Easy loaf format - no cake decorating skills needed
🔴 That classic red velvet flavor with mild chocolate notes

The trick to keeping this cake moist? Don't overbake it! I start checking around the 1-hour mark. Also, gel food coloring is KEY - it won't mess with your batter consistency.

Fun fact: I never even tasted red velvet until I moved to Atlanta! Now it's one of my favorite treats to make.

Want the full recipe? 💌 Comment 'RED VELVET' below and I'll send you the link!
Have you tried making red velvet at home? Let me know in the comments! 

#RedVelvetLoaf #RedVelvetCake #ValentinesDayDessert #ValentinesDayBaking #LoafCake #HomemadeCake #RedVelvet #DessertRecipe #CakeRecipe #ValentinesTreatsl
Okay, story time! Over the holidays, we finally go Okay, story time! Over the holidays, we finally got to visit Gideon's Bakehouse in Orlando, you know, the legendary bakery with the nearly HALF-POUND cookies that everyone raves about? The ones with 2+ hour wait times?

They had a virtual queue going, so we shopped around until it was our turn (thank goodness!). I grabbed a few of their famous cookies, including one that immediately caught my eye: the Banana Bread Chocolate Chip Cookie. 

I'm obsessed with banana and chocolate together, so this was a no-brainer!

And OH MY GOSH. It was even better than I imagined! Not only was it loaded with chocolate and real banana flavor, but it had candied walnuts throughout for this sweet-salty crunch. INCREDIBLE! 

The biggest bummer? You can ONLY get them in Orlando, no online ordering, no shipping. So of course, I decided to recreate them at home! And you guys... I think I got pretty darn close!

What makes these cookies special:
🍌 Real Banana Flavor: Mashed banana (not artificial!) gives them that authentic banana bread taste
🥜 Candied Walnuts: This is KEY—they stay crunchy and add that sweet-salty element
🍫 Double Chocolate: Regular AND large chocolate chips for maximum chocolatey goodness
🍪 Thick & Chewy: Chilling the dough keeps them beautifully thick

Want to make your own Gideon's-inspired cookies at home? 💌 Comment 'BANANA' below and I'll send you the link!

Have you been to Gideon's? What's your favorite cookie flavor? 👇
#BananaCookies #ChocolateChipCookies #GideonsBakehouse #OrlandoBakery #BakeryStyleCookies #BananaChocolateChip #HomemadeCookies #CookieRecipe #BakingFromScratch #CopycatRecipes
I used to love cooking, but during busy weeks it f I used to love cooking, but during busy weeks it felt like a chore. I was too exhausted after work to make anything fun. But with all that time at home, I was able to rethink our favorite foods and make them more achievable for weeknights.

I'd always loved mojo pork (that Cuban citrus-marinated pork that's SO flavorful), but I never made it because traditional pork loin takes FOREVER to roast. But then I had a lightbulb moment: What if I used pork TENDERLOIN instead? 

We eat it all the time because it's lean, quick-cooking, and my husband can grill it in under 30 minutes. Why not marinate it in mojo?

Here's what makes this recipe a weeknight winner:
🍊 The Marinade: Orange juice, lime juice, garlic, cumin, and oregano create that classic Cuban flavor. Just dump everything in a bag and let it work its magic!
⏰ The Timeline: Marinate for 4-24 hours (I usually do overnight), then it's only 25 minutes of active cooking time. Quick sear + oven = done!
🍽️ The Versatility: Serve it with rice and beans, make tacos, top a salad, use for Cuban sandwiches, or meal prep it for the week!

Three critical tips:
-DRY the pork after marinating: This is SO important! Pat it completely dry before searing or you'll steam it instead of getting a beautiful crust
-Use a meat thermometer: Pull it at 145°F for perfectly juicy pork every time. No guessing, no cutting it open repeatedly
-Don't over-marinate: 24 hours max or the texture gets mushy!

This has become one of our absolute go-to meals. It tastes like you spent hours in the kitchen but it's secretly SO easy!

Want the full recipe? 💌 Comment 'MOJO' below and I'll send you the link!

#MojoPork #PorkTenderloin #CubanFood #WeeknghtDinner #EasyDinner #DinnerIdeas #MarinadeRecipe #HealthyDinner #MealPrepIdeas #QuickDinner
Can we talk about how guava and cream cheese is TH Can we talk about how guava and cream cheese is THE most underrated flavor combination ever?! 

Growing up, guava was always around. My dad would spread it on toast with butter every morning, and I did the same. But it wasn't until I had guava with cream cheese at a Latin bakery in Florida that I truly appreciated this tropical fruit. 

The cream cheese perfectly balances the tangy guava jelly and makes everything ultra creamy. Wrapped in flaky puff pastry? KILLER.

I know this pastry braid looks super fancy and complicated, but here's the secret: IT'S SHOCKINGLY SIMPLE. When I first saw a pastry braid, I was so intimidated by how intricate it looked. It felt almost unattainable without tons of practice. But I'm here to tell you that is absolutely not the case!

Here's the whole process:
1️⃣ Roll out puff pastry and cut slits on the sides
2️⃣ Spread cream cheese and guava down the center
3️⃣ Overlap the side pieces to create the braid
4️⃣ Brush with egg wash and sprinkle with coarse sugar
5️⃣ Bake until deep golden brown

THAT'S IT! The braiding technique is so much easier than it looks, and the result is absolutely stunning.

Two critical tips:
-Keep it COLD before baking: Cold puff pastry = steam when it hits the hot oven = flaky layers! If the butter is too warm, it won't puff properly.
-Bake until DEEP golden brown: Not just golden, but DEEP golden. This ensures crispy, flaky pastry that's cooked all the way through. Nobody wants soggy pastry!

This is perfect for brunch, dessert, or honestly just because you want something that looks impressive but is secretly easy to make. You can also substitute any fruit preserves if you can't find guava!

Want the full recipe? 💌 Comment 'GUAVA' below and I'll send you the link!

#GuavaPastry #PuffPastry #PastryBraid #LatinDesserts #CreamCheese #BrunchRecipes #HomemadePastries #BakingFromScratch #WeekendBaking #ImpressiveButEasy
Do you remember those Danish butter cookies that c Do you remember those Danish butter cookies that came in the fancy blue tin? The ones your mom would buy every Christmas and you'd go absolutely CRAZY for? 

Well, guess what? You can make them YOURSELF! And they're shockingly simple!

I'm talking about those perfectly crispy-on-the-outside, melt-in-your-mouth-on-the-inside shortbread cookies that are basically edible butter. And honestly? 

I don't think they should be reserved just for the holidays. These cookies deserve to be eaten ALL YEAR LONG!

Here's what makes them so special:
-The Recipe: Only FIVE ingredients—butter, flour, sugar, eggs, and vanilla. That's it! If you can cream butter and sugar together, you can make these.
-The Texture: They're like shortbread cookies but slightly softer, so when you bite into them, they literally melt in your mouth. It's pure butter heaven.
-The Secret: Use European-style butter! It has a higher fat content which makes these cookies extra creamy and flavorful. It's worth the upgrade, I promise!

Important tips:
Be VERY careful measuring your flour—too much and the dough will be impossible to pipe
Use a LARGE star tip (not a small one!) or you won't be able to squeeze the dough out
These actually taste BETTER after they cool! The crispiness is what makes them so good, so resist eating them warm (I know it's hard!)

These are perfect for coffee breaks, gift-giving, parties, or honestly just because you deserve a good cookie. You can make them in under an hour from start to finish!

Want the full recipe? 💌 Comment 'BUTTER' below and I'll send you the link!

#DanishButterCookies #ButterCookies #ShortbreadCookies #HolidayBaking #CookieRecipe #HomemadeCookies

Copyright © 2026 Certified Pastry Aficionado · Web Design by Viva la Violet

loading Cancel
Post was not sent - check your email addresses!
Email check failed, please try again
Sorry, your blog cannot share posts by email.