• Facebook
  • Instagram
  • Pinterest
  • RSS
  • Twitter
  • Home
  • About Me
  • Recipes
  • Cookbooks
  • Work With Me
  • Contact

CPA: Certified Pastry Aficionado

Italian Cheeseburger Sliders

beef entrees· Summertime Favorites· Tailgating Recipes
September 5, 2019

Jump to Recipe Print Recipe

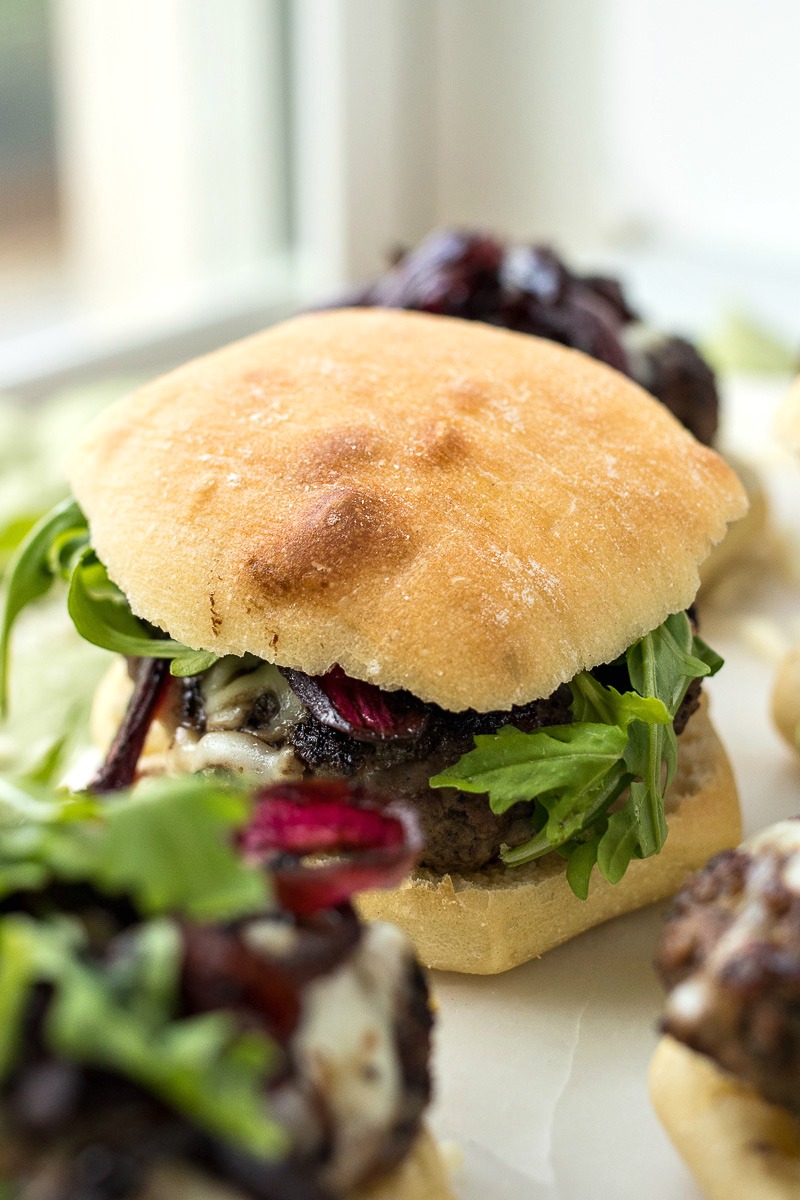
Italian Cheeseburger Sliders – Ground beef is mixed with Italian seasonings, cooked through and then topped with shredded mozzarella cheese, balsamic caramelized onions, and peppery arugula and placed into a mini ciabatta roll. 

Italian Cheeseburger Sliders with the top of the ciabatta roll off to show the arugula and caramelized onions

Sliders are becoming my go-to burger because of their adorable size and smaller portion. Normal burgers just seem to large and messy so, more often than not, I am all about the slider. Plus, if I’m super hungry, I can eat two and not feel gross.

It’s been way too long since I posted a slider recipe for you guys. It was all the way back in 2017. Do you remember these bacon gruyere sliders? They were such a hit so I know you guys are craving a new slider recipe. Well get ready because here it comes…

Say hello to my Italian Cheeseburger Sliders!

Plate of Italian Cheeseburger Sliders before adding the top bun Closeup on a Italian Cheeseburger Slider Italian Cheeseburger Sliders after being assembled

How to make these sliders

These sliders are incredibly simple to make. Since they’re smaller than regular burgers, they cook much faster so they’ll be ready in no time. Let’s talk through the recipe, starting with the ingredients.

Ingredients

What makes these sliders “Italian”? Initially, it was the flavors: Italian seasoning, mozzarella cheese, balsamic caramelized onions, arugula, and the ciabatta buns. However, as I photographed them, I realized that the ingredients resembled the three colors of the Italian flag: “red” from the red onion, green from the arugula, and white from the mozzarella cheese. How cute is that?!

Of all the ingredients, my favorite are the balsamic caramelized onions. No matter how many times I make caramelized onions, I still get shocked at how simple they are yet pack so much flavor and texture. With only two ingredients required to make them, you’ll be shocked too!

Italian Cheeseburger Slider topped with caramelized onions

Making the sliders

We swear by the smash burger technique in our house rather than grilling. This technique produces a crispy, juicy patty with tons of flavor. And the patties are done in no time at all!

So what exactly does this method entail? First, you roll the meat into balls with the Italian seasoning – do not patty them! Then, you add salt and pepper on top. Next, add butter to a super hot skillet. Finally, you add the balls of meat to the hot pan and smash them into patties. Since the pan is super hot, the patties will turn super crispy without overcooking them. Finish off the patties by adding shredded mozzarella cheese so it can melt over the hot patties.

Once the patties are made, it’s time to assemble the sliders. First, you split the ciabatta buns into two halves. You can toast them if you like. I recommend brushing olive oil on the cut sides before toasting so they get nice and crispy. Then, top the buns with the patties, onions, arugula, and a little ketchup for some tang.

Tray of Italian Cheeseburger Sliders

Tips & Tricks

  1. I used a very large red onion to create enough caramelized onions for this recipe. If you don’t have very large onions available, use two medium ones.
  2. I located ciabatta rolls in the bakery section of my local grocery store. I have also seen them in the freezer section. If you still cannot find any, feel free to use brioche buns or french rolls. Focaccia would also work so great with these burgers!
  3. If you really want the flavor and texture of a great burger, do not use lean beef. The fat in the meat is what gives the patties their crispy, yet juicy texture. Lean beef will make them too dry.
Print Recipe

Italian Cheeseburger Sliders

Ground beef is mixed with Italian seasonings, cooked through and then topped with shredded mozzarella cheese, balsamic caramelized onions, and peppery arugula and placed into a mini ciabatta roll

Prep Time20 minutes mins
Cook Time15 minutes mins
Servings: 12 sliders

Ingredients

  • 1 large red onion
  • 1 tablespoon olive oil
  • 3 tablespoons balsamic vinegar
  • 40 ounces ground beef (80/20 for best texture)
  • 2 tablespoons Italian seasoning
  • salt & pepper to taste
  • 2 tablespoons butter
  • 1 cup shredded mozzarella cheese
  • 2 cups baby arugula
  • 12 small ciabatta rolls sliced in half
  • ketchup

Instructions

  • Slice red onion into thin strips. Heat oil over medium-high heat. An onions and cook until tender, about 5 minutes. Add 3 tablespoons of balsamic vinegar and continue cooking until onions are really soft and caramelized, about 10 minutes.
  • While the onions cook, prepare the patties. Add ground beef and Italian seasoning to a medium bowl and combine with your hands. Once combined, form the meat into 12 evenly-sized balls. Season the tops of the balls with salt and pepper.
  • Place butter in large skillet over medium-high heat. Once the pan is super hot, add one 3 to 4 patties to the pan, leaving enough room for them to be flattened. Using a spatula, flatten the balls into patties. Cook until edges turn super crispy, about 2 minutes. Flip and cook for 1 more minute. Add 1 tablespoon of cheese to the tops of the burgers while they finish cooking. Remove from heat and place onto bottom halves of ciabatta buns.
  • Once burgers and onions are done, it's time to assemble the sliders. Top each burger with a spoonful of onions and a few leaves of arugula. Add a drizzle of ketchup to the cut side top burger bun. Place top bun on top of arugula. Repeat with the other sliders Serve sliders immediately.

Pin for later:

Italian Cheeseburger Sliders photo collage

More recipe you’ll love:

Philly Cheesesteak Sliders

Stack of Philly Cheesesteak Sliders on a plate

Bacon Gruyere Sliders with Beer-caramelized Onions

Tray of Bacon Gruyere Sliders with Beer-caramelized Onions

Pork Gouda Burgers

Plate of Pork Gouda Burgers

Share this:

  • Click to share on Pinterest (Opens in new window)
  • Click to share on Facebook (Opens in new window)
  • Click to share on Twitter (Opens in new window)
  • Click to share on Tumblr (Opens in new window)
  • Click to email this to a friend (Opens in new window)

13 Comments

« Potato Skin Bites
Buffalo Chicken Pockets »

Comments

  1. camprelieved says

    March 15, 2026 at 10:47 pm

    This makes the game perfect for snow rider short gaming sessions, allowing players to jump in for a quick attempt whenever they have free time.

    Reply
  2. Chloe says

    March 14, 2026 at 4:02 am

    These sliders sound absolutely amazing! I’m totally with you on the whole slider preference over full-sized burgers – they’re less daunting and you can sample a few varieties without feeling overstuffed. That balsamic caramelized onion addition is genius, really elevates it beyond a standard cheeseburger. Speaking of getting creative with food, I was just trying to pull the audio recipe instructions from a cooking video I found, and stumbled upon this really handy video to audio converter that works right in your browser. Made it so much easier to listen while I cooked.

    Reply
  3. Block Blast says

    January 6, 2025 at 3:55 am

    I loved these little burgers. I had a whole package of Hawaiian rolls left over from Thanksgiving and was thrilled to find this recipe so they didn’t go to waste. I followed the recipe exactly and would definitely make them again.

    Reply
  4. Rachel says

    September 6, 2019 at 9:12 pm

    The onions look amazing. I would love these sliders.

    Reply
  5. Karly says

    September 6, 2019 at 12:05 pm

    These sliders look amazing! Kind of a grown up burger! Thanks for sharing.

    Reply
  6. Alexandra says

    September 5, 2019 at 10:32 pm

    These look so full of flavour! Perfect for entertaining 🙂

    Reply
  7. Sarah | Wandercooks says

    September 5, 2019 at 9:58 pm

    Love using mozzarella on sliders. Yum! Thanks for the recipe.

    Reply
  8. Elaine says

    September 5, 2019 at 9:44 pm

    I can imagine how tasty and flavorful these sliders are – they look absolutely amazing! And the photos are awesome, too. Can’t wait to add those caramelized onions to the burger – yummmmm!

    Reply
  9. Krissy Allori says

    September 5, 2019 at 8:51 pm

    These look amazing! I’ll be adding them to a game night soon!

    Reply
  10. Heather says

    September 5, 2019 at 2:19 pm

    This is such a great idea! I have to make these for my husband. He would love them.

    Reply
  11. Catherine @ To & Fro Fam says

    September 5, 2019 at 12:58 pm

    I beth this fresh take on hamburgers is a huge crowd favorite! Such a good idea to use Italian seasoning in the burger itself.

    Reply
  12. Tami says

    September 5, 2019 at 12:56 pm

    Sliders are more my size, too. A regular burger seems overwhelming to eat. Hubby will enjoy these as much as I expect to.

    Reply
  13. Marta says

    September 5, 2019 at 12:16 pm

    YEP! I love everything about this, but especially the use of arugula!

    Reply

Leave a Reply Cancel reply

Your email address will not be published. Required fields are marked *

This site uses Akismet to reduce spam. Learn how your comment data is processed.

Hi, my name is Sharon. I’m an accountant by day, risk-taking baker and food enthusiast by night. Come join me as I share my favorite recipes and test out new ones along the way!

fall flavors

warm banana bread with a couple bites removed sitting on a plate with two scoops on butter pecan ice cream stacked on top and caramelized bananas over the top and a spoon on the side

Banana Bread Sundae

oatmeal rolls sitting on a baking sheet

Oatmeal Dinner Rolls

overhead shot of pumpkin churros on a plate of cinnamon sugar

Pumpkin Churros

Candied Pecans

Maple Pecan Scones

Butterscotch Pear Turnovers on a baking sheet with parchment paper, shot from overhead

Butterscotch Pear Turnovers

ORDER MY NEW COOKBOOK NOW!

photo of entertaining made easy cookbook available for preorder now

Breakfast
Appetizers
Entrees
Salads
Sides
Drinks
Desserts
Roundups
Holidays

Browse by Date

  • Home
  • About Me
  • Contact Me
  • Privacy Policy

holiday favorite

staged shot of pumpkin cinnamon crunch muffins with sprinkled pecans and pumpkins in the background, shot from a side angle

Pumpkin Cinnamon Crunch Muffins

The Best Waffles

two copper mugs filled with holiday mule drinks and a pitcher in the background

Holiday Mule

photo of cinnamon apple kolaches with granny smith apples in the background

Cinnamon Apple Kolaches

close up of pretzel bread pudding slice on a plate in a pool of whiskey sauce

Pretzel Bread Pudding


Berry Crumble Pie – homemade pie crust filled wi Berry Crumble Pie – homemade pie crust filled with four kinds of berries and baked with a brown sugar cinnamon crumble topping!

My husband said this might be his NEW favorite pie, you guys – and apple has ALWAYS been his #1! What he loves? The sweet and tart flavors balancing each other perfectly, plus that crispy (not crunchy!) cinnamon crumble! 

The secret? Starting with a blueberry sauce creates a thick base so the filling doesn't get watery!

Pro tip: Don't cut into this pie until it's completely cooled (3 hours!) or it will fall apart everywhere!

Perfect for Thanksgiving, holidays, or anytime you want an incredible berry pie!

💬 Comment "BERRYPIE" for the recipe
💾 SAVE for pie season
📤 SHARE with someone who loves pie!

https://www.certifiedpastryaficionado.com/berry-crumble-pie/
Caesar Pasta Salad – penne pasta tossed with all Caesar Pasta Salad – penne pasta tossed with all your favorite Caesar salad ingredients! 🥗

I'm not usually a huge creamy pasta salad fan, you guys, but this one BLEW ME AWAY! The homemade Caesar dressing adds SO much bold flavor and only gets better as time goes by! 

The combo of crispy romaine, perfectly al dente pasta, juicy tomatoes, and that incredible dressing? Perfection!

Pro tip: Shred your own Parmesan cheese! Pre-shredded is too thick – freshly shredded blends into the salad SO much better!

Perfect for summer BBQs, potlucks, picnics, or anytime you need an amazing pasta salad! ☀️

💬 Comment "CAESAR" for the recipe
💾 SAVE for summer entertaining
📤 SHARE with someone who loves Caesar salad!

https://www.certifiedpastryaficionado.com/caesar-pasta-salad
#PastaSalad #CaesarSalad #SummerSalad #PastaSaladRecipe #SummerSide #SummerRecipes #EasySalad #HomemadeDressing #PastaSalads #SummerFood
Grilled Bang Bang Shrimp Skewers – grilled shrim Grilled Bang Bang Shrimp Skewers – grilled shrimp covered in a spicy, creamy, sweet chili sauce!

Grilling is my FAVORITE, you guys! Those charred grill marks add SO much flavor! This is my grilled twist on the classic fried Bang Bang Shrimp from that upscale seafood restaurant – healthier and just as delicious! 

The sauce is simply mayo + sweet chili sauce + sriracha. SO easy!

Pro tip: Taste your sauce first and add more sriracha if needed – mine was too mild so I kept adding more! And soak those wooden skewers for 30 minutes so they don't catch fire!

Perfect for summer BBQs, pool parties, or anytime you want easy grilled appetizers! 

💬 Comment "BANGBANG" for the recipe
💾 SAVE for grilling season
📤 SHARE with someone who loves shrimp!

https://www.certifiedpastryaficionado.com/grilled-bang-bang-shrimp-skewers

#BangBangShrimp #GrilledShrimp #ShrimpSkewers #BBQRecipes #GrilledSeafood #ShrimpRecipes #PoolPartyFood #OutdoorCooking #SummerFood
Carrot Snack Cake – a single-layer carrot cake t Carrot Snack Cake – a single-layer carrot cake topped with homemade cream cheese frosting and sprinkled with chopped pecans!

Easter isn't the same without carrot cake, but who has time for a three-layer version anymore? Not me! This snack cake has ALL the classic flavors – cinnamon, carrot, nutmeg, brown sugar, pecans – with HALF the effort! 

Made in a 9x9 pan and you can even frost it right in the pan for extra simplicity!
Pro tip: Freshly shred your carrots – they're softer and taste SO much better than pre-shredded matchstick carrots!

Perfect for Easter, spring gatherings, potlucks, or anytime you want carrot cake without the fuss! 

💬 Comment "CARROTCAKE" for the recipe
💾 SAVE for easy baking
📤 SHARE with someone who loves carrot cake!

https://www.certifiedpastryaficionado.com/carrot-snack-cake/
#CarrotCake #CarrotSnackCake #EasterDessert #SpringDesserts #EasyCake #CakeRecipes #HomemadeCake #SpringBaking #EasyDessert #SheetCake
Mixed Berry Fool – a no-bake British dessert mad Mixed Berry Fool – a no-bake British dessert made from sweetened smashed berries folded into fresh whipped cream!

I learned about this from my Great British Baking Show binges, you guys! A "fool" is just crushed fruit folded into whipped cream – SO simple! This version uses strawberries, raspberries, and blueberries for the perfect spring treat!

Everyone in my family loved this! Creamy, light, tart, and sweet all at once!
Pro tip: Chill the berries for 15 minutes but DON'T let them freeze – stir occasionally to prevent ice crystals!

Perfect for Easter, Valentine's Day, spring brunches, or anytime you need an elegant no-bake dessert! 🌸

💬 Comment "BERRYFOOL" for the recipe
💾 SAVE for spring entertaining
📤 SHARE with someone who loves berries

https://www.certifiedpastryaficionado.com/mixed-berry-fool

#MixedBerryFool #BerryFool #NoBakeDessert #SpringDesserts #BritishDessert #EasterDessert #BerryDessert #FreshBerries #SummerDessert #BrunchDessert

Copyright © 2026 Certified Pastry Aficionado · Web Design by Viva la Violet

loading Cancel
Post was not sent - check your email addresses!
Email check failed, please try again
Sorry, your blog cannot share posts by email.