• Facebook
  • Instagram
  • Pinterest
  • RSS
  • Twitter
  • Home
  • About Me
  • Recipes
  • Cookbooks
  • Work With Me
  • Contact

CPA: Certified Pastry Aficionado

Chocolate Cream Pie

dessert· Easter· Holiday Favorites· pie· Valentine's Day
November 18, 2019

Jump to Recipe Print Recipe

Chocolate Cream Pie – My perfect pie crust is baked to perfection and then filled with a chocolate pudding filling and topped with a fresh whipped cream that is sure not to wilt due to my special ingredient. 

Slice of Chocolate Cream Pie

Chocolate. Cream. Pie. What is there to say about a dessert whose name can be split into three separate entities that can stand so well on their own?? Is it chocolatey? Oh you betcha. Is it creamy? Uh huh. And is it pie? Obviously.

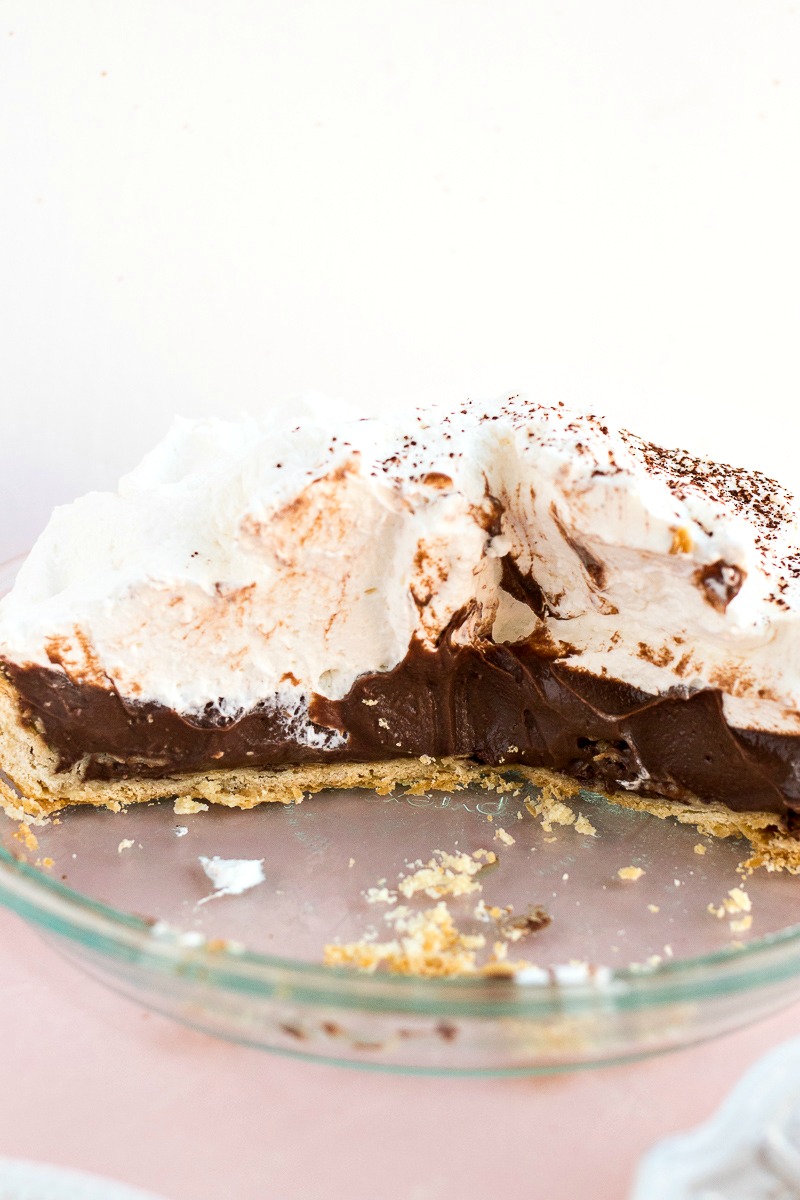
But what makes this pie so spectacular is the way all three elements come together to make one incredible dessert. The salty, buttery crust pairs perfectly with the rich chocolate pudding, which is then tamed a bit by the fresh whipped cream. I mean…does it get any better than this??

This chocolate cream pie is just the pie to make if you’re trying to switch up your Thanksgiving traditions. Sometimes you need a break from the pumpkin pie and pecan pie!

Chocolate Cream Pie Slice of Chocolate Cream Pie on a white plate

What is chocolate cream pie?

Chocolate cream pie is traditionally made with three ingredients: flaky pie crust, chocolate pudding, and whipped cream. I personally think chocolate pudding pie describes it better but it just doesn’t have the same ring to it.

The pie is “no-bake” which means that the filling is added to a fully-baked pie crust. This is the first “no-bake” pie that I’ve featured so there’s lots to share about these types of pies that I learned in this process. So let’s chat!

How is this pie made?

The crust

First, this pie starts off with my perfect pie dough. The dough is rolled out and placed into the pie dish. Then, you’ll fill it with pie weights and bake for 20 minutes. This helps keep the crust flat and formed into the pie pan. After 20 minutes, you’ll remove the weights to let the crust brown beautifully.

Pie dish with pie weights in foil over the pie crust

The pudding

After the crust is completely cooked, it’s time to make the pudding. The pudding is a very traditional chocolate pudding, made with milk and eggs and two kinds of chocolate – cocoa powder and semis-sweet chocolate pieces.

The pudding starts by heating milk on the stove. Meanwhile, you will whisk the eggs, sugar, cocoa powder, and cornstarch together in a medium bowl. Once the milk is hot, you’ll slowly add it to the egg mixture. If you do this too fast, the eggs will scramble and the pudding will get lumpy. And trust me- a lumpy pudding is not a good look for a creamy pie like this one.

Next, the pudding is cooked to thicken it up. Once it thickens up, the vanilla and salt and chocolate is added to finish it off. The vanilla is added last so that the flavor doesn’t cook out. The chocolate is added last to give the pudding it’s beautiful shine.

Once the pudding is done, it’s added to the baked pie crust and placed in the refrigerator to set for 2 hours.

Chocolate Cream Pie before adding the cream Closeup of Chocolate Cream The whipped cream

Once the filling has set, it’s time to finish off the pie with some fresh whipped cream. However, as anyone knows, adding whipped cream to a cake or pie before serving could turn into a mess if you’re not serving the pie immediately because whipped cream will melt or wilt over time as it loses it’s structure.

But I have a solution for this – unflavored gelatin! The gelatin is melted and whipped with the cream. As the gelatin gets cold, it firms up and makes a whipped cream that won’t wilt. Hooray!! Now you can make this pie ahead of time and focus on making the rest of Thanksgiving dinner.

Pie dish with half of the Chocolate Cream Pie gone Spoonful of Chocolate Cream Pie

Tips & Tricks

  1. This pie dough recipe makes two crusts. You’ll only need one for this recipe. You can freeze the other disk of dough for up to 3 months to use for another pie or tart recipe.
  2. If you don’t have pie weights, you can use dry beans instead. However, you’ll have to throw them out after using them.
  3. Do not stop stirring the pudding while it’s cooking. This ensures the pudding doesn’t overcook in some spots and create lumps.
  4. If your pie gets lumpy, don’t worry! You can push it through a metal sieve to smooth it out.
Print Recipe

Chocolate Cream Pie

My perfect pie crust is baked to perfection and then filled with a chocolate pudding filling and topped with a fresh whipped cream that is sure not to wilt due to my special ingredient. 
Prep Time15 minutes mins
Cook Time45 minutes mins
Resting Time2 hours hrs
Total Time3 hours hrs
Servings: 1 pie

Ingredients

For the pie crust*:
  • 3 cups all-purpose flour
  • 1 tablespoon granulated sugar
  • 1 teaspoon salt
  • 1½ sticks unsalted butter cold
  • ⅓ cup vegetable shortening cold
  • ½ cup cold water
For the filling:
  • 2½ cups whole milk
  • ⅔ cup granulated sugar
  • 2 large eggs
  • 2 large egg yolks
  • 3 tablespoons unsweetened cocoa powder
  • 2 tablespoons cornstarch
  • 1 teaspoon pure vanilla extract
  • ¼ teaspoon salt
  • 4 ounces semi-sweet chocolate chopped
For the whipped cream topping:
  • 1 teaspoon unflavored gelatin
  • 2 cups heavy whipping cream
  • ¼ cup granulated sugar
  • 2 teaspoons pure vanilla extract
  • ⅛ teaspoon salt
  • unsweetened cocoa powder for dusting

Instructions

For the pie crust*:
  • Add flour, sugar, and salt to the bowl of a food processor. Pulse a few times to combine. Cut the cold butter into cubes. Add to the flour mixture along with the vegetable shortening. Turn processor on and let run for 5 seconds. Then, drizzle in cold water. Keep processing until mixture begins to clump.
  • Pour dough mixture onto a clean surface. Using your hands, pull the dough together into one ball. Cut ball in half and form two discs of the same size and shape. Cover each disk in plastic wrap. Refrigerate until cold, at least 2 hours. (see * note below for what to do with the second disc of dough).
  • Remove the dough from the refrigerator and let it sit on the counter for 10 minutes to soften up. Preheat oven to 400 degrees.
  • Once dough is ready, roll it out into a disk using a rolling pin. The dough should be 10½ to 11 inches in diameter. Gently fold rolled dough in half and place onto 9-inch pie pan. Unfold the dough so that it is covering the dish completely. Let the dough lay into the dish so that it is not stretched or pulled. Fold over excess edges and press into a smooth or fluted edge, ensuring that the whole outside edge is the same thickness.
  • Line pie shell with a loose piece of aluminum foil. Fill with pie weights or dried beans. Bake in preheated oven for 20 minutes. Remove from oven and remove foil with weights/beans. Continue to bake for another 15 minutes or until the crust is golden brown. Remove from oven and let cool completely. In the meantime, prepare the filling. Turn the oven off.
Fill the pie:
  • Place milk in a large sauce pan and heat over medium heat just before boiling. While it's heating, whisk eggs, egg yolks, and sugar together in a medium bowl until light in color, about 1 minute. Sift in cocoa powder and cornstarch. Whisk until combined.
  • Once the milk has heated up, turn off heat and very slowly whisk 1/4 cup of hot milk into egg mixture. Then, slowly mix the rest of the hot milk into the mixture. Pour combined mixture back into sauce pan. Place pan on stove and heat to medium.
  • Whisk mixture consistently until it begins to boil and thicken. Once you feel it start to thicken, cook and continue whisking for 3 more minutes. Then turn off heat. Let mixture cool for 5 minutes, whisking every minute to allow steam to escape.
  • Whisk in vanilla extract, salt, and chopped chocolate until the chocolate has melted completely. Pour pudding into baked pie crust and refrigerate until set, about 2 hours.
Add the topping:
  • Once the filling has set, it's time to make the topping. Add 1 tablespoon of water to 1 teaspoon of unflavored gelatin. Stir to combine. Let it sit for 5 minutes to let it firm up. Then, microwave for 5-10 seconds to melt it into a liquid. Set aside.
  • Add whipping cream, vanilla, sugar, and salt to the bowl of a stand mixture and whip on medium-high until soft peaks form. With the mixture on low, drizzle in the melted gelatin. Continue whipping until stiff peaks form.
  • Top set pudding with whipped cream. Dust with a little unsweetened cocoa to finish it off. Serve immediately or place in refrigerator for up to 2 days.

Notes

* This dough recipe makes two crusts. You'll only need one for this tart. The other can be frozen and kept for up to 6 months to be used in another single-crust tart or pie. 

Pin for later:

Chocolate Cream Pie photo collage

More recipes you’ll love:

Southern Banana Pudding

Pouring banana pudding over banana slices

Traditional English Trifle

Traditional English Trifle layered with fruit and pudding

Mocha Brownie Pie

Slice of Mocha Brownie Pie with a bite out of it

Share this:

  • Click to share on Pinterest (Opens in new window)
  • Click to share on Facebook (Opens in new window)
  • Click to share on Twitter (Opens in new window)
  • Click to share on Tumblr (Opens in new window)
  • Click to email this to a friend (Opens in new window)

20 Comments

« Roasted Brussels Sprouts with Honey Mustard Vinaigrette
Turkey Cranberry Pinwheels »

Comments

  1. John McKee says

    October 13, 2025 at 12:27 am

    Geometry Dash Lite Oh, yum! The texture on this pie looks so luxurious and velvety.

    Reply
  2. Jacob says

    December 11, 2019 at 12:33 pm

    Cooking was simple and from this even more pleasant. Thank you)

    Reply
  3. Paula Montenegro says

    November 24, 2019 at 2:19 pm

    It’s stunning both in looks and flavor! I love the tip of the gelatin. It makes the cream almost marshmallow-like. Gorgeous chocolate pie and a perfect addition to the holiday table.

    Reply
  4. GUNJAN C Dudani says

    November 24, 2019 at 1:53 pm

    This is an ultimate dessert. Its craveable and so amazing. Your images are absolutely drool worthy and making me even more hungry for this dessert.

    Reply
  5. Marisa F. Stewart says

    November 23, 2019 at 12:49 pm

    I really loved the idea of the gelatin in the whipped cream I had to make the pie and test it out. It worked and after a day in the fridge — we didn’t eat it all — the whipped cream was perfect. The pie was so creamy and chocolatey. A great recipe to remake for the holidays.

    Reply
  6. Veronika says

    November 22, 2019 at 8:12 pm

    Ok, there is nothing better than a homemade rich and creamy chocolate pie! It looks so scrumptious! I want 2 slices of it right now!)

    Reply
  7. Tammy says

    November 22, 2019 at 3:39 pm

    Oh my weakness in life!! This look absolutely heavenly and now I’m craving a slice <3

    Reply
  8. Sophie says

    November 22, 2019 at 10:02 am

    This looks so so good. I love chocolate and cream a lot and this dessert is perfect for me.

    Reply
  9. Leslie says

    November 22, 2019 at 9:41 am

    One of my favorite things about this is how much cream you put on top! I like a good, thick cream on top and you nailed it! Delish!!

    Reply
  10. Monica says

    November 19, 2019 at 1:56 pm

    I want to dive right into this pie! Looks heavenly!

    Reply
  11. Emily says

    November 19, 2019 at 12:54 am

    Chocolate cream pie is one of my favorites. My brother refuses to eat cooked fruit so this is our pie compromise.

    Reply
  12. Jenn says

    November 18, 2019 at 9:22 pm

    This was soo amazing! Easy to make, indulgent and rich, it was just the right kind of creamy and delicious all rolled into one!

    Reply
  13. cf says

    November 18, 2019 at 9:14 pm

    Say YES to this pie! WHOA a chocolate cream pie completely from scratch, so delicious!!

    Reply
  14. Michelle says

    November 18, 2019 at 9:11 pm

    So smooth, creamy, and chocolatey. Doesn’t get any better than this!

    Reply
  15. Candice says

    November 18, 2019 at 8:59 pm

    This is definitely chocolate decadence at it’s finest. The texture is fantastic and it came out great on the first try…. the only problem is I couldn’t stop eating it! Thanks for such a delicious recipe.

    Reply
  16. Amanda says

    November 18, 2019 at 8:56 pm

    Oh, yum! The texture on this pie looks so luxurious and velvety. This will be the perfect pie to serve with the holidays coming up.

    Reply
  17. Megan Ellam says

    November 18, 2019 at 8:37 pm

    I swear this recipe is just following me around. It looks so good and I know I have to make it. Thanks for tempting me with your delicious looking pie.

    Reply
  18. Sarah says

    November 18, 2019 at 7:34 pm

    This brings back great memories from holidays past. My Grandmother always made chocolate and banana cream pies every Christmas!

    Reply
  19. Lori Geurin says

    November 18, 2019 at 12:57 pm

    This looks unbelievably delicious and reminds me of a pie my aunt used to make every year at Christmas time. I love that you used real ingredients and didn’t skimp on the whipped cream. 🙂

    Reply
  20. Kelsie says

    November 18, 2019 at 12:31 pm

    This looks absolutely amazing! I always love trying new desserts during the holidays- this just made my list!

    Reply

Leave a Reply Cancel reply

Your email address will not be published. Required fields are marked *

This site uses Akismet to reduce spam. Learn how your comment data is processed.

Hi, my name is Sharon. I’m an accountant by day, risk-taking baker and food enthusiast by night. Come join me as I share my favorite recipes and test out new ones along the way!

fall flavors

close up of a serving bowl with sage and brown butter mashed sweet potatoes

Sage & Brown Butter Mashed Sweet Potatoes

zoomed in shot of chocolate snickerdoodles on parchment paper with a spoon in front, shot from a side angle

Chocolate Snickerdoodles

a stack of Pumpkin Chocolate Chip Cookies and individual cookies on a sheet pan with chocolate chips around them and a stack of pumpkins in the background, shot from a side angle

Pumpkin Chocolate Chip Cookies

shortcut apple strudel on a marble serving platter cut down the middle to expose the apple center with vanilla ice cream on top and a fork in the foreground

Shortcut Apple Strudel

close up of potato dinner rolls on a wooden round serving platter

Potato Dinner Rolls

slice of carrot snack cake on a pink plate

Carrot Snack Cake

ORDER MY NEW COOKBOOK NOW!

photo of entertaining made easy cookbook available for preorder now

Breakfast
Appetizers
Entrees
Salads
Sides
Drinks
Desserts
Roundups
Holidays

Browse by Date

  • Home
  • About Me
  • Contact Me
  • Privacy Policy

holiday favorite

photo of cinnamon apple kolaches with granny smith apples in the background

Cinnamon Apple Kolaches

stacked and spread out butter pecan macarons with crushed pecans spread around them, shot from a side angle

Butter Pecan Macarons

apple cinnamon monkey bread with a chunk out of it and sliced apples in front, shot from a side angle

Apple Cinnamon Monkey Bread

a pie plate of berry crumble pie, shot from overhead

Berry Crumble Pie

Turkey Cranberry Pinwheels on a plate with sprigs of herbs in between the pinwheels, shot from overhead

Turkey Cranberry Pinwheels


Peach & Goat Cheese Crostini = The ULTIMATE Appeti Peach & Goat Cheese Crostini = The ULTIMATE Appetizer! 

These elegant little bites are SO easy to make but look incredibly fancy! Toasted baguette slices rubbed with garlic, topped with whipped goat cheese, fresh peach slices, basil, and a drizzle of balsamic glaze. 

Why you'll LOVE these crostini:
✨ Easy but impressive (looks fancy!)
✨ Sweet + savory perfection
✨ Ready in under 25 minutes
✨ Perfect for entertaining
✨ Can prep components ahead
✨ Good luck eating just one!

Here's the magic: we rub warm toasted bread with a garlic clove instead of adding chopped garlic. The heat absorbs the garlic oils and adds the most subtle, perfect garlic flavor without being overpowering. Don't skip this step - it makes ALL the difference! 

The combination of creamy whipped goat cheese, sweet juicy peaches, fresh basil, and tangy balsamic glaze is absolutely PERFECT. These disappeared so fast at my last party - everyone kept coming back for more!

Pro tips:
🔸 Whip goat cheese with cream cheese for smooth texture
🔸 Rub garlic on WARM toast (key to flavor!)
🔸 Use store-bought balsamic glaze to save time
🔸 Don't assemble until ready to serve (bread gets soggy!)
🔸 Can use frozen peaches when fresh aren't available

These are perfect for holiday parties, summer gatherings, wine nights, or any time you want an elegant appetizer that doesn't require tons of work. Pair with a crisp white wine and you're set for an amazing evening! 

Want the full recipe? Comment CROSTINI below and I'll send it straight to your DMs!

#PeachGoatCheeseCrostini #Crostini #Appetizers #PartyFood #GoatCheeseRecipes #PeachRecipes #EasyAppetizers #EntertainerRecipes #SummerAppetizers #HolidayAppetizers #WineNight #ElegantAppetizers #FingersFood #PartyAppetizers #EasyEntertaining #BruschettaRecipe #SummerRecipes #GoatCheese #Peaches #BrunchIdeas #CocktailParty #Entertaining #FoodBlogger #AppetizerIdeas #FancyFood #EasyRecipes #SummerEntertaining #Foodie #PartyIdeas #deliciousfood
This easy homemade turkey noodle soup is the PERFE This easy homemade turkey noodle soup is the PERFECT way to use leftover Thanksgiving turkey! It's light, comforting, loaded with veggies and egg noodles, and ready in just 30-40 minutes. Way better than another turkey sandwich!

Why you'll LOVE this soup:
✨ Uses leftover turkey (or rotisserie chicken!)
✨ Ready in 30-40 minutes
✨ Light but still comforting
✨ Fresh herbs add amazing flavor
✨ Secret ingredient: lemon juice!
✨ Freezes perfectly for up to 6 months

Here's what makes this soup special: fresh herbs (thyme and oregano) add a brightness you can't get from canned soup, and a splash of lemon juice at the end totally transforms it! I was so surprised by how much the lemon brightened up the whole bowl. You'll never make turkey/chicken soup without it again! 

This is the PERFECT post-Thanksgiving recipe - light enough after all that heavy holiday eating, but still cozy and comforting for cold nights. Plus, it uses up those turkey leftovers in the best way possible!

Pro tips:
🔸 Works with chicken too (rotisserie is perfect!)
🔸 Use any pasta noodles you like
🔸 Prep veggies ahead to save 10 minutes
🔸 Add 1-2 cups water if you want it more brothy
🔸 Serve with crusty French bread!

The soup is noodle-heavy as written, but you can easily adjust the broth amount to your preference. I love it loaded with noodles - makes it extra hearty! And don't forget that crusty bread for dunking! 

Want the full recipe? Comment SOUP below and I'll send it straight to your DMs!

What do you do with your Thanksgiving leftovers? Let me know!

#TurkeyNoodleSoup #LeftoverTurkey #ThanksgivingLeftovers #ChickenNoodleSoup #HomemadeSoup #ComfortFood #SoupRecipe #LeftoverRecipes #TurkeyRecipes #FallSoup #WinterSoup #EasyDinner #OnePotMeal #HealthyComfortFood #SoupSeason #CozyFood #FamilyDinner #MealPrep #FreezerMeal #ThanksgivingRecipes #WeeknightDinner #LeftoverMagic #ComfortFoodRecipes #FoodBlogger #HomeCooking #Soup #WarmingRecipes #EasyRecipes #Foodie #healthydinner
These soft, fluffy pumpkin cookies are loaded with These soft, fluffy pumpkin cookies are loaded with chocolate chips and spiced with just cinnamon for the perfect fall flavor! Best part? NO CHILL TIME needed - you can make and eat them immediately! Perfect for when that cookie craving hits!

Why you'll LOVE these cookies:
✨ NO chill time required (make them NOW!)
✨ Soft, fluffy, and chewy texture
✨ Just cinnamon (not overpowering!)
✨ Pumpkin + chocolate = perfect combo
✨ Cookies barely spread (easy to bake!)
✨ Ready in under 25 minutes

Here's what makes these special: instead of pumpkin pie spice (with all the nutmeg, ginger, and cloves), these use JUST cinnamon! This lets the pumpkin and chocolate flavors stand out without being overpowered by spices. It's simple, but SO good! 

The texture is incredible - soft and fluffy like a pumpkin muffin top but in cookie form. And because the batter is made with real pumpkin puree, they stay moist and delicious for days!

Pro tips:
🔸 No chill time needed (yes, really!)
🔸 Use a cookie scoop for uniform cookies
🔸 Add extra chips on top before baking for presentation
🔸 Cookies barely spread, so 2 inches apart is plenty
🔸 Store in airtight container for up to 3 days

These were a HUGE hit at last year's Friendsgiving and they're about to become your new fall favorite! They're perfect for holiday parties, cookie swaps, or just satisfying that pumpkin craving. 

Want the full recipe? Comment COOKIES below and I'll send it straight to your DMs! 

#PumpkinChocolateChipCookies #PumpkinCookies #ChocolateChipCookies #FallBaking #PumpkinRecipes #FallCookies #NoChill #EasyCookies #PumpkinSpice #FallDesserts #CookieRecipe #PumpkinSeason #FallTreats #HomemadeCookies #BakingFromScratch #FallBaking #PumpkinDesserts #ChocolateChips #SoftCookies #CookieLove #FallFlavors #PumpkinEverything #CookieMonster #BakingLove #FoodBlogger #FallFood #SeasonalBaking #PumpkinLovers #Foodie #CookieTime
This no-frills classic chili is everything you nee This no-frills classic chili is everything you need for cozy fall nights! Made with lean ground beef, two kinds of beans, peppers, and the perfect blend of spices. 

It's hearty, comforting, and SO easy to customize however you like!

Why you'll LOVE this recipe:
✨ Simple, beginner-friendly recipe
✨ Totally customizable (add veggies, adjust spice!)
✨ Works with beef OR turkey
✨ Feeds 6-8 people easily
✨ Tastes even BETTER the next day
✨ Freezes perfectly for up to 3 months

Here's what makes this chili special: it's a bare-bones classic that YOU can make your own! Want to add zucchini and squash? Do it! Need more heat? Add jalapeño! Don't like beans? (Wait, what?! 😱) You can leave them out! It's the perfect base recipe that satisfies everyone.

I serve this chili so many ways:
🥔 Over baked potatoes
🌮 On nachos with cheese
🍝 Mixed with spaghetti (don't knock it 'til you try it!)
🌭 On hot dogs
Or just in a big bowl with ALL the toppings!

Pro tips:
🔸 Use a large pot or dutch oven (not cast iron!)
🔸 Cook 45 min for runny, 60 min for thick
🔸 Add spices gradually if you're nervous about heat
🔸 Don't forget the toppings (cheese, sour cream, cilantro!)

The best part? This chili tastes even better the next day! Make a big batch and enjoy it all week. It's perfect for meal prep, game day, or just when you need that ultimate comfort food fix. 

Want the full recipe? Comment CHILI below and I'll send it straight to your DMs!

#ClassicChili #ChiliRecipe #ComfortFood #FallRecipes #EasyDinner #ChiliSeason #HomemadeChili #BeefChili #BeanChili #WinterFood #CozyFood #MealPrep #FreezerMeal #GameDayFood #ChiliNight #EasyRecipes #FamilyDinner #OnePotMeal #HeartyMeal #FallCooking #ComfortFoodRecipes #ChiliBar #FoodBlogger #WeeknightDinner #BeginnerCooking #SimpleCooking #Foodie #FallComfortFood #CozyDinner #chililove
These pillowy soft dinner rolls are made with mash These pillowy soft dinner rolls are made with mashed potatoes for the most incredible fluffy texture! 

They're sturdy enough to use as slider buns but soft enough to melt in your mouth. Perfect for Thanksgiving, Christmas, or any time you want to impress with homemade rolls!

Why you'll LOVE these potato rolls:
✨ Mashed potatoes make them extra fluffy
✨ The potato helps yeast rise faster
✨ Pillowy soft texture
✨ Sturdy enough for sliders
✨ Better than anything store-bought
✨ Stay fresh for days

Here's the magic: mashed potatoes in the dough feed the yeast better, so they rise faster and create that signature fluffy, pillowy texture! Plus, I use bread flour instead of all-purpose to give them more structure - perfect for holding up against turkey, roast beef, or turning them into mini sandwiches! 

The process is easier than you think - boil and mash a potato, mix the dough, let it rise twice, and bake until golden brown. Your house will smell AMAZING! These rolls are always the first thing to disappear at our holiday table.

Pro tips:
🔸 Let potato cool completely before adding to dough
🔸 Firmly pack mashed potato into measuring cup
🔸 Make all rolls the same size for even baking
🔸 Freeze extras for up to a month!

These are perfect for Thanksgiving dinner, Christmas, Easter, or any special meal where you want to wow your guests! Serve warm with butter and watch them disappear. Trust me - once you make homemade rolls, you'll never go back!

Want the full recipe? https://www.certifiedpastryaficionado.com/potato-dinner-rolls/

Copyright © 2025 Certified Pastry Aficionado · Web Design by Viva la Violet

loading Cancel
Post was not sent - check your email addresses!
Email check failed, please try again
Sorry, your blog cannot share posts by email.