• Facebook
  • Instagram
  • Pinterest
  • RSS
  • Twitter
  • Home
  • About Me
  • Recipes
  • Cookbooks
  • Work With Me
  • Contact

CPA: Certified Pastry Aficionado

Berry Crumble Pie

dessert· Easter· Holiday Favorites· pie· Summertime Favorites· Valentine's Day
October 28, 2019

Jump to Recipe Print Recipe

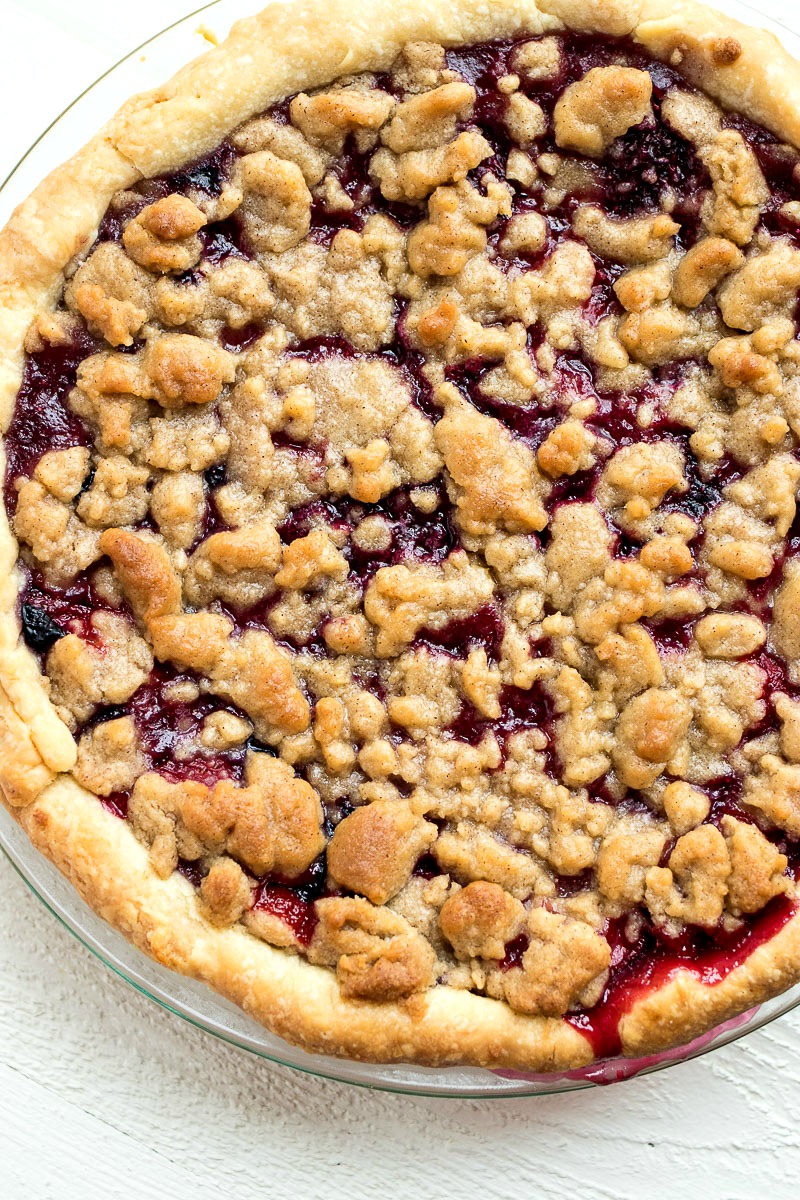
Berry Crumble Pie – My favorite pie crust is filled with four kinds of berries and baked with a brown sugar and cinnamon crumble topping. 

Berry Crumble Pie in a pie dish

November is almost here which means pie season is coming!! I’ve been celebrating a little early by testing out some pie recipes. Last week, I introduced my favorite pie EVER and this week I am introducing my husband’s *new* favorite pie: Berry Crumble Pie!

I call it his *new* favorite pie because apple pie has always, always, always been his favorite. No ifs, ands, or buts about it. But then I made this pie for him and he actually said “I think this pie might be my new favorite.” And without any prompting from me, I swear!!!

When asking him what he loved the most about this pie, he said it was the sweet and tart flavors balancing each other out. Plus, he loved the cinnamon crumble topping. The topping is crispy, but not crunchy and loaded with brown sugar and cinnamon. Who wouldn’t love it???

Slice of Berry Crumble Pie on a plate Two slices of Berry Crumble Pie next to the whole pie Slice of Berry Crumble Pie on a white plate

How to make this pie

The crust

This pie uses my perfect pie crust recipe. I used this same crust in the stone fruit tart and chocolate pecan pie recipes that I posted earlier this season. It’s a classic recipe and that is completely versatile.

To make the crust, you simply mix flour, sugar, salt, butter, shortening, and water together in a food processor and then let it do all the work. You have to chill the dough for at least two hours so make sure to give yourself enough time.

Berry Filling

The filling starts with making a sauce with the blueberries. This sauce creates a thick base for the filling so that it doesn’t get too watery. It also helps break down the blueberries, which has pretty thick skin, unlike the other berries. To make it, you’ll boil sugar, water, blueberries, and corn starch until thick.

Wooden spoon in the blueberry sauce

When the blueberry sauce is done and off the heat, you’ll add in cinnamon and lemon juice. You don’t want to add the cinnamon and lemon juice while the blueberry mixture is boiling because you’ll loose their flavor when it boils out.

Finally, the other berries are folded in to the mixture and poured into the pie shell. You’ll want to fold gently to make sure the fruit doesn’t break down.

Plastic containers of berries next to a lemonWooden spoon in a bowl of fruit

Crumb topping

Berry pie can be a little trickier than apple pie because it’s a softer fruit. Since it’s softer, it turns to a thin syrup after baking for so long. For this reason, I do not like to use a top crust on the pie because the pie will sink and the top crust won’t look so great. Therefore, a crumb or lattice topping is really perfect with berry pies.

I decided to use a crumb topping because the cinnamon in the crumbs pair so well with the berry filling. Let’s talk about how this crumb topping is made.

The crumb topping is the same one I’ve used in this classic crumb cake and this cranberry apple crumble. It’s made with brown sugar, white sugar, cinnamon, salt, melted butter, and flour. The mixture turns into a thick mixture so it might be a little confusing how it will turn into a crumble. But stay with me!

The mixture is then chilled to make it solid. Then, you’ll crumble the mixture over the filled pie to create large and small little crumbs. It’s important the you wait until the mixture has turned solid or else you won’t be able to form the crumbs.

Finally, the pie goes into the oven and baked for up to 45 minutes. You’ll know the pie is ready when you start to see the filling bubble up.

Finished Berry Crumble Pie Slice of Berry Crumble PieTips & Tricks

  1. This pie dough recipe makes two crusts. You’ll only need one for this recipe. You can freeze the other disk of dough for up to 3 months to use for another pie or tart recipe.
  2. The first time I made this pie, the topping got too brown. Therefore, every time after I covered the pie with foil about halfway through to ensure it stays the pretty golden brown.
  3. Do not even try to cut into this pie until it’s completely cooled. Since the filling is made from soft fruit that turns to syrup, it will fall apart everywhere if it’s warm when you cut into. If you want to serve the slices warm, I suggest microwaving each slice after it’s served on a plate for no more than 15 seconds.

Closeup on the crumble on top of the Berry Crumble Pie

Print Recipe

Berry Crumble Pie

My favorite pie crust is filled with four kinds of berries and baked with a brown sugar and cinnamon crumble topping. 


Prep Time20 minutes mins
Cook Time1 hour hr
Resting Time3 hours hrs
Total Time3 hours hrs 20 minutes mins
Servings: 1 pie

Ingredients

For the pie crust*:
  • 3 cups all-purpose flour
  • 1 tablespoon granulated sugar
  • 1 teaspoon salt
  • 1½ sticks unsalted butter cold
  • ⅓ cup vegetable shortening cold
  • ½ cup cold water
For the filling:
  • 1 cup sugar
  • ¼ cup corn starch
  • ¼ teaspoon salt
  • 1 cup fresh blueberries
  • ½ teaspoon ground cinnamon
  • 2 tablespoons water
  • 1 cup fresh raspberries
  • 1 cup fresh strawberry halves
  • ¾ cup fresh blackberries
  • 1 tablespoons fresh lemon juice
For the crumble topping:
  • 3 tablespoons light brown sugar
  • 3 tablespoons granulated sugar
  • ½ teaspoon ground cinnamon
  • ⅛ teaspoon salt
  • 4 tablespoons butter unsalted, melted
  • ½ cup all-purpose flour

Instructions

For the pie crust*:
  • Add flour, sugar, and salt to the bowl of a food processor. Pulse a few times to combine. Cut the cold butter into cubes. Add to the flour mixture along with the vegetable shortening. Turn processor on and let run for 5 seconds. Then, drizzle in cold water. Keep processing until mixture begins to clump.
  • Pour dough mixture onto a clean surface. Using your hands, pull the dough together into one ball. Cut ball in half and form two discs of the same size and shape. Cover each disk in plastic wrap. Refrigerate until cold, at least 2 hours. (see * note below for what to do with the second disc of dough).
  • Remove one disk of dough from the refrigerator and let it sit on the counter for 10 minutes to soften up. Preheat oven to 375 degrees.
  • Once dough is ready, roll it out into a disk using a rolling pin. The dough should be 10½ to 11 inches in diameter. Gently fold rolled dough in half and place onto 9-inch pie pan. Unfold the dough so that it is covering the dish completely. Let the dough lay into the dish so that it is not stretched or pulled. Fold over excess edges and press into a smooth or fluted edge, ensuring that the whole outside edge is the same thickness. Chill while you make the filling and topping.
For the topping:
  • Mix sugars, cinnamon, and salt together in a medium bowl with a spoon or spatula. Add melted butter and combine. Add flour, ⅓ cup at a time until all combined. The mixture will resemble a paste. Don't worry, we will make it look like crumbs after it chills. Place in refrigerator to chill until you need it.
Assemble the pie:
  • Add sugar, cornstarch, salt, blueberries, and 2 tablespoons of water to a medium saucepan. Bring to a boil and cook for 4 minutes or until thickened. Remove from heat. Cool for 5 minutes. Add blueberries to a large bowl. Stir in cinnamon. Add the remaining berries and lemon juice. Toss very gently, as to not break up the berries. Add filling to chilled pie crust and spread to create an even layer.
  • Grab chilled crumb mixture from the refrigerator. Scoop a handful of the mixture from the bowl. Using your hands, crumble mixture evenly over the berry mixture. Crumbs should be the size of raspberries but don't worry if they are some bigger and smaller than that. The topping actually looks better when the size of the crumbs are uneven. Repeat with the rest of the mixture.
  • Place pie into a preheated oven and bake for 30 minutes. Remove pie and cover with aluminum foil. Bake for another 20-25 minutes. You'll know it's done when the berries are bubbling through the crumbs and the topping is deep, golden brown.
  • Let pie cool for at least 3 hours before cutting. Store leftovers in the refrigerator for up to 3 days.

Notes

* This dough recipe makes two crusts. You'll only need one for this tart. The other can be frozen and kept for up to 6 months to be used in another single-crust tart or pie. 

Pin for later:

Berry Crumble Pie photo collage

More recipes you’ll love:

Berries & Cream Stuffed French Toast

Casserole dish of Berries & Cream Stuffed French Toast

Red, White, & Blue Pie Bars

Tray of Red, White, & Blue Pie Bars

Traditional English Trifle

Traditional English Trifle with layers of pudding and fruit

Share this:

  • Click to share on Pinterest (Opens in new window)
  • Click to share on Facebook (Opens in new window)
  • Click to share on Twitter (Opens in new window)
  • Click to share on Tumblr (Opens in new window)
  • Click to email this to a friend (Opens in new window)

28 Comments

« Chocolate Pecan Pie
Black Bean Soup with Lime Crema and Cilantro Chimichurri »

Comments

  1. Devin says

    December 21, 2020 at 8:04 pm

    Can this be made a day ahead and free or refrigerate until ready to bake?

    Reply
    • Devin says

      December 21, 2020 at 8:05 pm

      *freeze or refrigerate

      Reply
  2. Karen says

    September 13, 2020 at 11:34 pm

    The pie crust calls for 1.5 sticks of butter?! Is that correct?!

    Reply
    • Sharon says

      September 14, 2020 at 3:38 pm

      Yup that’s correct!

      Reply
  3. Lauren says

    September 5, 2020 at 11:24 pm

    This is an absolutely delicious pie recipe!!! The crust is perfect. Truly one of the best crust recipes I have used. I don’t own a food processor, so I grated frozen butter into the flour mixture instead and it worked great. All of that said, this is not a beginner or easy pie recipe. Prepping 3 separate components is a little more advanced and the timing was not just 3 hours 20 minutes because the prep time should include the 2 hours to chill the dough. All of that said, it is well worth the effort because the result is truly delicious!!

    Reply
  4. Patty Sin says

    June 26, 2020 at 8:04 pm

    I’m fifteen and my family doesn’t like pie but this is great!! It’s perfect for even the least of the pie fans. It’s easy and fun to make!! Looks exactly like the picture too which just goes to show how easy the directions are to follow!

    Reply
    • Patty Sin says

      June 26, 2020 at 8:05 pm

      I used mullberries from a tree in my yard instead of blueberries and it came out great!

      Reply
    • Sharon says

      June 26, 2020 at 8:05 pm

      Aw thank you so much for the compliment! I am so happy you liked it 🙂

      Reply
  5. Jess says

    November 3, 2019 at 7:31 pm

    This berry pie looks and sounds so good! It’s perfect for fall and the upcoming holidays. I want to dive right in!

    Reply
  6. Paula Montenegro says

    November 3, 2019 at 6:21 pm

    A fabulous pie recipe that I can’t wait to try! I love that it has mixed berries and that you added cinnamon to the crumble. Genius idea! Thanks for sharing.

    Reply
  7. Sophie says

    November 3, 2019 at 9:00 am

    This sounds so so delicious! I love the detailed recipe with step by step instructions. Thank you.

    Reply
  8. Veronika says

    November 1, 2019 at 1:35 pm

    I love berry pies! They have a perfect mix of sweet and tart flavors! Your recipe is easy to make, which makes it even better!

    Reply
  9. Aleta says

    November 1, 2019 at 12:32 pm

    Yum!!! I love this easy pie crust and four types of berries?! How exciting! The cinnamon crumble topping looks absolutely delicious, what an amazing combo!

    Reply
  10. Aline says

    November 1, 2019 at 2:50 am

    Oh my!! This berry pie looks and sounds amazing!!!! I love the crumbly top – such a great idea!! Can’t wait to try it!

    Reply
  11. Heather says

    October 31, 2019 at 3:20 pm

    Growing up my family would always buy a pie similar to this and it was always my absolute favorite. So I can’t wait to make a version from scratch this Thanksgiving!

    Reply
  12. Peachy @ The Peach Kitchen says

    October 30, 2019 at 3:55 pm

    I love your crust! This looks so delicious!

    Reply
  13. Carly says

    October 30, 2019 at 2:14 pm

    This is the pie of my dreams! I am saving your recipe. Thank you for sharing!!

    Reply
  14. Veena Azmanov says

    October 30, 2019 at 2:00 pm

    Best Berry Crumble Pie for me to make this weekend. Love your crust and the filling too. Thanks for this yummy recipe.

    Reply
  15. Analida Braeger says

    October 30, 2019 at 9:21 am

    I love the thickening tip you have for this pie. No one likes runny pie even though they usually taste the same. Thanks for sharing a great recipe!

    Reply
  16. Nicole E. says

    October 30, 2019 at 1:16 am

    Looks so indulging..! The berries looks so sweet.. Yum..! There’s no doubt, this could be everyone else’s favorite.

    Reply
  17. Rachel says

    October 29, 2019 at 10:18 pm

    This looks and sounds amazzzzzing!

    Reply
  18. Kelly Anthony says

    October 29, 2019 at 9:01 pm

    I love a good berry pie. I’ve never made one with raspberries so I’m excited to try something new. I think the cinnamon crumble topping really adds something special to this berry crumble pie.

    Reply
  19. Amanda Martin says

    October 29, 2019 at 9:06 am

    Drooling over here!! I love a homemade pie but I especially love one with crumble on top!

    Reply
  20. Irina Karulina says

    October 29, 2019 at 1:11 am

    This Berry Crumble Pie sounds so yummy and delicious: cinnamon perfectly pairs with caramel flavor of brown sugar. Plus, this streusel on top! SO GOOD!

    Reply
  21. Natalie says

    October 29, 2019 at 1:05 am

    This berry pie looks and sounds amazing! Can’t wait to try this recipe!

    Reply
  22. SHANIKA says

    October 29, 2019 at 12:04 am

    Now this Pie is seriously too good not to finish in one sitting! I’m loving that delicious crumble on top and those berries that burst out the sides—Oh my!

    Reply
  23. Patty at Spoonabilities says

    October 28, 2019 at 11:22 pm

    This pie crust and the crumble topping, and all those magnificent berries — I cannot wait to make this delicious pie!

    Reply
  24. Suzy says

    October 28, 2019 at 10:50 pm

    My family is going to love all of the fresh berries in this pie! It’s one of their favorites! Looks so good!

    Reply

Leave a Reply Cancel reply

Your email address will not be published. Required fields are marked *

This site uses Akismet to reduce spam. Learn how your comment data is processed.

Hi, my name is Sharon. I’m an accountant by day, risk-taking baker and food enthusiast by night. Come join me as I share my favorite recipes and test out new ones along the way!

fall flavors

a hand holding up a cinnamon bun soft pretzel

Cinnamon Bun Soft Pretzels

plate of Pumpkin Cheesecake Macarons with a gourd in the background, shot from the front

Pumpkin Cheesecake Macarons

close up of two brown sugar cinnamon cookie bars stacked on top of each other

Brown Sugar Cinnamon Cookie Bars

caramel macchiato cupcakes some drizzled with caramel sauce, shot from the front

Caramel Macchiato Cupcakes

carrot raisin muffins stacked on top of each other and sitting on a purple plate

Carrot Raisin Muffins

vinaigrette dressing being poured over a plate of Orchard Harvest Salad (Panera Copycat) from a glass bottle with a half and whole pair and cherry preserves in the background, shot from a side angle

Orchard Harvest Salad (Panera Copycat)

ORDER MY NEW COOKBOOK NOW!

photo of entertaining made easy cookbook available for preorder now

Breakfast
Appetizers
Entrees
Salads
Sides
Drinks
Desserts
Roundups
Holidays

Browse by Date

  • Home
  • About Me
  • Contact Me
  • Privacy Policy

holiday favorite

a plate with an Almond Croissant on it with a baking sheet of more croissants on it with almonds sprinkled around the table, shot from a side angle

Almond Croissants

picture of mixed berry almond tart dusted with powdered sugar shot at an angle from the front

Mixed Berry Almond Tart

apple cinnamon monkey bread with a chunk out of it and sliced apples in front, shot from a side angle

Apple Cinnamon Monkey Bread

zoomed in shot of sour cream doughnuts and donut holes on a cloth napkin, shot from a side angle

Sour Cream Doughnuts

a bowl of Butterscotch Vanilla Bean Sauce with a spoon in it and a bowl of brown sugar with a spoon in it on a cloth napkin, shot from a side angle

Butterscotch Vanilla Bean Sauce


Can we talk about how guava and cream cheese is TH Can we talk about how guava and cream cheese is THE most underrated flavor combination ever?! 

Growing up, guava was always around. My dad would spread it on toast with butter every morning, and I did the same. But it wasn't until I had guava with cream cheese at a Latin bakery in Florida that I truly appreciated this tropical fruit. 

The cream cheese perfectly balances the tangy guava jelly and makes everything ultra creamy. Wrapped in flaky puff pastry? KILLER.

I know this pastry braid looks super fancy and complicated, but here's the secret: IT'S SHOCKINGLY SIMPLE. When I first saw a pastry braid, I was so intimidated by how intricate it looked. It felt almost unattainable without tons of practice. But I'm here to tell you that is absolutely not the case!

Here's the whole process:
1️⃣ Roll out puff pastry and cut slits on the sides
2️⃣ Spread cream cheese and guava down the center
3️⃣ Overlap the side pieces to create the braid
4️⃣ Brush with egg wash and sprinkle with coarse sugar
5️⃣ Bake until deep golden brown

THAT'S IT! The braiding technique is so much easier than it looks, and the result is absolutely stunning.

Two critical tips:
-Keep it COLD before baking: Cold puff pastry = steam when it hits the hot oven = flaky layers! If the butter is too warm, it won't puff properly.
-Bake until DEEP golden brown: Not just golden, but DEEP golden. This ensures crispy, flaky pastry that's cooked all the way through. Nobody wants soggy pastry!

This is perfect for brunch, dessert, or honestly just because you want something that looks impressive but is secretly easy to make. You can also substitute any fruit preserves if you can't find guava!

Want the full recipe? 💌 Comment 'GUAVA' below and I'll send you the link!

#GuavaPastry #PuffPastry #PastryBraid #LatinDesserts #CreamCheese #BrunchRecipes #HomemadePastries #BakingFromScratch #WeekendBaking #ImpressiveButEasy
Do you remember those Danish butter cookies that c Do you remember those Danish butter cookies that came in the fancy blue tin? The ones your mom would buy every Christmas and you'd go absolutely CRAZY for? 

Well, guess what? You can make them YOURSELF! And they're shockingly simple!

I'm talking about those perfectly crispy-on-the-outside, melt-in-your-mouth-on-the-inside shortbread cookies that are basically edible butter. And honestly? 

I don't think they should be reserved just for the holidays. These cookies deserve to be eaten ALL YEAR LONG!

Here's what makes them so special:
-The Recipe: Only FIVE ingredients—butter, flour, sugar, eggs, and vanilla. That's it! If you can cream butter and sugar together, you can make these.
-The Texture: They're like shortbread cookies but slightly softer, so when you bite into them, they literally melt in your mouth. It's pure butter heaven.
-The Secret: Use European-style butter! It has a higher fat content which makes these cookies extra creamy and flavorful. It's worth the upgrade, I promise!

Important tips:
Be VERY careful measuring your flour—too much and the dough will be impossible to pipe
Use a LARGE star tip (not a small one!) or you won't be able to squeeze the dough out
These actually taste BETTER after they cool! The crispiness is what makes them so good, so resist eating them warm (I know it's hard!)

These are perfect for coffee breaks, gift-giving, parties, or honestly just because you deserve a good cookie. You can make them in under an hour from start to finish!

Want the full recipe? 💌 Comment 'BUTTER' below and I'll send you the link!

#DanishButterCookies #ButterCookies #ShortbreadCookies #HolidayBaking #CookieRecipe #HomemadeCookies
After making approximately ONE MILLION pumpkin tre After making approximately ONE MILLION pumpkin treats recently, I was desperate for something with all those cozy fall vibes but maybe... a little less pumpkin? 

So I set my sights on something that doesn't get nearly enough love in the dessert world: SWEET POTATOES! 

And here's my controversial opinion: Sweet potato beats pumpkin ANY DAY OF THE WEEK. There, I said it! 

These Sweet Potato Cupcakes are super moist, perfectly spiced, and topped with the creamiest cinnamon cream cheese frosting. 

They taste similar to pumpkin cupcakes (so if you're a die-hard pumpkin lover, you can absolutely swap in pumpkin puree!), but here's why sweet potato wins:
✨ More starch = MORE moisture and density in the cupcake
✨ The flavor is 100x better (fight me on this!)
✨ That perfect balance between sweet and earthy

But what I'm MOST proud of is how the frosting and cake work together. You know how sometimes you get a cupcake with frosting that's way too sweet so you just eat the cake? Or killer frosting but blah cake so you only eat the frosting? NOT THIS CUPCAKE. 

The spiced cake needs a little sweetness to balance it out, and the tart cream cheese frosting is PERFECT. They're soulmates! 

Important tips:
-Don't undercook them or they'll sink in the center (but more frosting fixes everything!)
-Fill the liners 3/4 full—not all the way—to get exactly 12 cupcakes
-Use a 2M Wilton tip for that fancy frosting swirl (or just spread with a knife!)

Want the full recipe? 💌 Comment 'CUPCAKE' below and I'll send you the link!
Team Sweet Potato or Team Pumpkin? Let me know in the comments! 

#SweetPotatoCupcakes #CreamCheeseFrosting  #CupcakeRecipe
Y'all, I need to talk about these Kentucky Derby C Y'all, I need to talk about these Kentucky Derby Cookie Bars because they might just be the most decadent thing I've ever created!

So here's the deal: I love taking traditional recipes and giving them a major upgrade. 

Traditional Derby Pie is delicious, but I wanted to make something even MORE special. And these bars? They're Derby Pie on steroids!

Here's what makes them absolutely incredible:
The Cookie Crust: Instead of regular pie crust, we're using a thick chocolate chip cookie base. Game. Changer.
The Filling: Loaded with pecans, chocolate chips, and a hint of bourbon that adds this rich, complex flavor. The filling is more dense and cakey than traditional Derby Pie, which gives you the perfect chewy texture.
The Bourbon Caramel: This homemade bourbon caramel sauce is what takes these bars over the top. It's sweet, buttery, and has that gorgeous bourbon depth. And yes, the alcohol cooks out, so it's safe for everyone (even made these while I was pregnant!)!

Important tips:
Don't chop your pecans too finely—leave nice chunks for better texture
If the bars start browning too quickly, just cover them with foil while the center finishes baking
Don't over-thicken the caramel sauce on the stove—it will thicken as it cools!

These bars are perfect for Derby Day (obviously!), but honestly, they're amazing for any summer gathering, BBQ, or potluck. 

Want the full recipe with that bourbon caramel sauce? 💌 Comment 'DERBY' below and I'll send you the link!

#DerbyPie #CookieBars #BourbonDesserts #PecanDesserts
Y'all, I just made the BEST hot chocolate of my li Y'all, I just made the BEST hot chocolate of my life and I need you to try it immediately!

Growing up, I only knew hot chocolate from those packets where you just add hot water. I had NO idea you could make it from scratch so easily! 

All it takes is hot milk, cocoa powder, chocolate chips, and the secret ingredient... PEANUT BUTTER!

I've always been obsessed with the peanut butter and chocolate combo (if you've been following me, you know this is true!), but for some reason, it never occurred to me to add it to hot chocolate until recently. And now I'm officially never going back to regular hot chocolate!

What makes this recipe so special? The peanut butter adds this incredible creaminess and depth of flavor without overpowering the chocolate. 

Plus, you don't need to add any extra sugar because the chocolate chips provide all the sweetness you need. 

Top it with marshmallows and maybe a drizzle of chocolate and peanut butter sauce, and you've got pure heaven in a mug.

Important tips:
-Be careful not to overheat the chocolate and peanut butter—too much heat will cause the chocolate to harden
-Add the milk SLOWLY to the chocolate mixture and whisk constantly. It makes blending so much easier!
-This recipe makes 4 cups, and leftovers keep for 5 days in the fridge!

This is the ultimate cozy drink for cold winter nights, holiday gatherings, or honestly any time you need a little comfort. It's ready in less than 10 minutes!

Want the full recipe? 💌 Comment 'COZY' below and I'll send you the link!

What's your favorite hot drink for winter? Let me know in the comments! 
#HotChocolateRecipe  #HomemadeHotChocolate #WinterRecipes

Copyright © 2026 Certified Pastry Aficionado · Web Design by Viva la Violet

loading Cancel
Post was not sent - check your email addresses!
Email check failed, please try again
Sorry, your blog cannot share posts by email.