• Facebook
  • Instagram
  • Pinterest
  • RSS
  • Twitter
  • Home
  • About Me
  • Recipes
  • Cookbooks
  • Work With Me
  • Contact

CPA: Certified Pastry Aficionado

Cannoli Cones

dessert
June 3, 2019

Jump to Recipe Print Recipe

Cannoli Cones – An easy way to make a homemade cannoli without the hassle of frying cannoli shells. Made with sugar ice cream cones which are stuffed with homemade cannoli cream and dipped in your favorite cannoli toppings. 

Cannoli Cones topped with chocolate chips and crushed pistachios

There’s something about a fresh cannoli with creamy ricotta cheese filling and covered in chocolate that just speaks my language. I love how all the textures and flavors come together to make one well-rounded dessert – crunchy, creamy, sweet, salty, rich, tangy. There’s nothing I don’t love about them!

But when it comes to making cannoli at home from scratch, I’m just not committed enough to attempt it…not yet, anyway. The ricotta filling is easy to make but the shells are a little trickier. You need to make a dough, wrap it around special cannoli tubes, and fry until crispy. I just don’t have the energy for all of that.

So I decided to take a little shortcut! Sugar ice cream cones have the same crunchy texture that cannoli shells have so I decided to use those instead. Plus, it makes for a fun presentation.

Check out my Cannoli Cones!

Cannoli Cones close up of the chocolate chips and pistachio pieces topping the cones Dish of two Cannoli Cones on a tray of Cannoli Cones Tray of Cannoli Cones

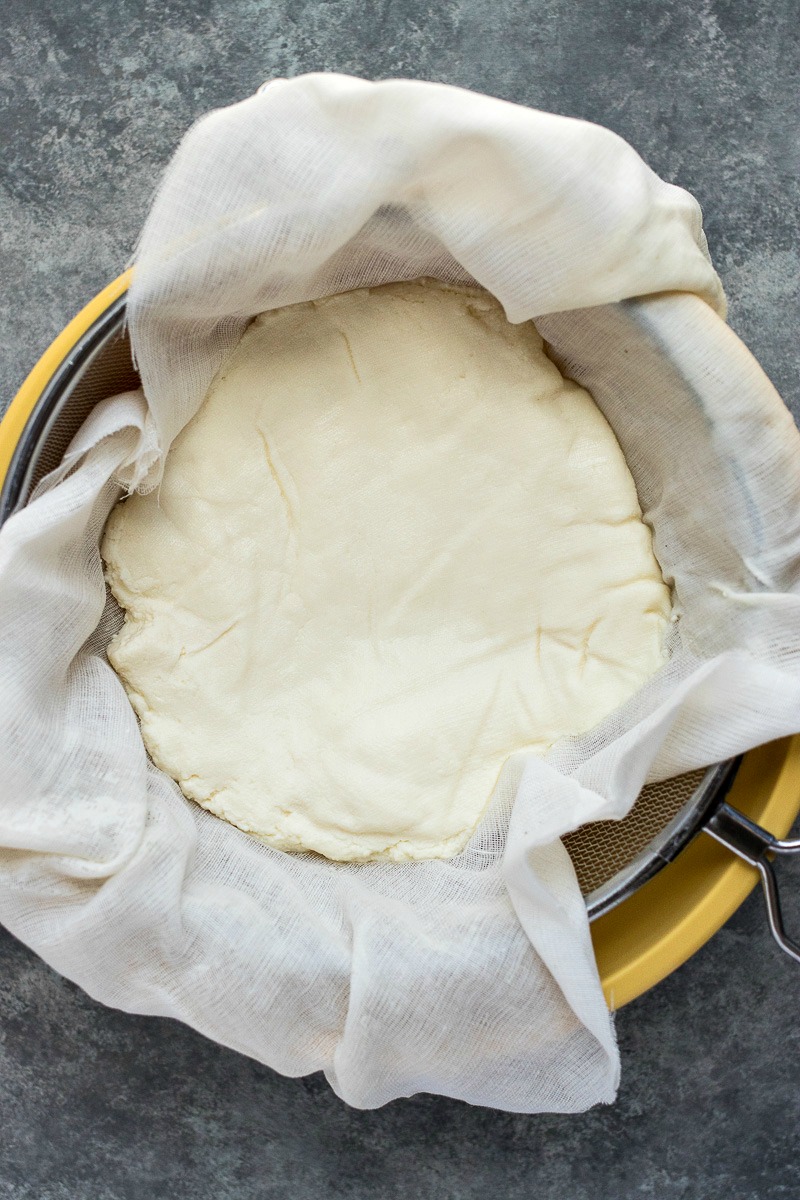
Working with Ricotta Cheese

Ricotta cheese is a creamy cheese that is used in many Italian recipes – lasagna, stuffed shells, and cannoli. It’s important to drain it for at least 8 hours to remove excess liquid from the ricotta. This is especially important for cannoli because you won’t be able to achieve a creamy, fluffy cannoli cream filling with the excess liquid – the cream will be gloopy and loose if the ricotta is too wet.

To remove the liquid, line a mesh strainer with a cheesecloth. Add ricotta cheese and press into cloth and cover with excess cloth. Let it sit over a medium bowl to drain overnight.

Removing the liquid from ricotta cheese with a cheese cloth and a mesh strainer Ricotta cheese after being drained of liquid

How to make this recipe

Once the ricotta is drained, you’re ready to make this recipe!

First, you need to prepare the cannoli cones. I like my cannoli shells dipped in chocolate to achieve that extra crunch. So I dipped the tops of my cones in chocolate to achieve the same texture.

Ice cream cones with the ends dipped in chocolate

While the chocolate hardens, it’s time to make the cannoli cream. The cannoli cream is made by whipping the drained ricotta cheese, powdered sugar, heavy cream, and vanilla extract. Then, we fold in the mini chocolate chips.

Folding chocolate chips into the cannoli cream

After the cannoli cream is whipped, add the cream to a piping bag and pipe the cream into the prepared cones. Finally, the cones are dipped in your favorite cannoli toppings – I used mini chocolate chips and crushed pistachios.

Tray of Cannoli Cones Dish of Cannoli Cones topped with pistachio pieces and chocolate chips

Tips & Tricks

As always, here are a few tips to ensure these cannoli cones come out perfectly:

  1. To ensure my cannoli cream fluffs up easily, I chill my mixer bowl and beater attachment in the freezer for 30 minutes. This is also a great tip for making homemade whipped cream – it gets whipped so quickly when the ingredients stay super cold.
  2. I have to use a piping bag to fill the cannoli to make sure they look as pretty as possible. If I just fill with a spoon, they look so messy and, dare I say, quite ugly.
  3. Do not make these cannoli cones ahead of time. The longer the cream sits in the cones, the softer the cone gets and you’ll lose that crunch. However, you can make the cannoli cream ahead of time and simply fill the cones when serving.
Print Recipe

Cannoli Cones

An easy way to make a homemade cannoli without the hassle of frying cannoli shells. Made with sugar ice cream cones which are stuffed with homemade cannoli cream and dipped in your favorite cannoli toppings. 
Prep Time30 minutes mins
Servings: 12 cones

Ingredients

  • 3 cups whole milk ricotta cheese
  • 1 cup heavy cream
  • 1 1/4 cup powdered sugar
  • 1 teaspoon vanilla extract
  • 1 cup mini chocolate chips divided
  • 12 sugar cones
  • 4 ounces semi sweet chocolate
  • 1/2 cup chopped pistachios

Instructions

  • Set a mesh strainer over a medium bowl. Line the inside of the strainer with a cheese cloth, making sure excess cloth hangs over the sides of the strainer. Add ricotta cheese to the cheesecloth and cover with the excess cloth to prevent the cheese from getting crusty. Refrigerate for 8 hours to drain the excess water from the ricotta cheese. 
  • While the cheese is draining, you can prepare the cones. Melt the 4 ounces of semi sweet chocolate in the microwave in 30-second intervals. Dip the tops of the cones into the chocolate and gently tap off the excess. Place on a baking sheet lined with parchment paper to dry and harden. 
  • 30 minutes before you use the cheese, place the bowl of a stand mixer and the whisk attachment in the freezer so it gets extra cold. 
  • Once the cheese is ready and the bowl is chilled, add the cheese, heavy cream, powdered sugar, and vanilla extract to the bowl. Beat on low to combine. Then, raise the speed to medium high and beat until the mixture is nice and thick, about 3 minutes. Be careful not to overmix or the mixture will break and get gloopy. 
  • Add 1/2 cup of mini chocolate chips to the mixture and fold in. Fill pastry bag (without a piping tip) with ricotta mixture. Cut about 1 1/2 inches off the top of the bag. Fill the sugar cones with cannoli cream. Dip into mini chocolate chips or chopped pistachios. Serve immediately. 

Pin for later:

Cannoli Cones photo collage

More recipes you’d love:

Classic Cannoli Dip

Classic Cannoli Dip with a cookie dipped in

Pistachio Biscotti

Slices of Pistachio Biscotti on a plate

Mini Chocolate Chip Cookie Dough Cheesecakes

Mini Chocolate Chip Cookie Dough Cheesecake with a cookie base

Share this:

  • Click to share on Pinterest (Opens in new window)
  • Click to share on Facebook (Opens in new window)
  • Click to share on Twitter (Opens in new window)
  • Click to share on Tumblr (Opens in new window)
  • Click to email this to a friend (Opens in new window)

27 Comments

« Avocado Cucumber Salad
Wasabi Soy Wings »

Comments

  1. Amanda says

    June 9, 2019 at 10:35 pm

    Ohhh, I have a soft spot for anything with ricotta, so these cannoli cones are my perfect dessert. Plus, the presentation in a cone is so cute and fun. Thanks for sharing!

    Reply
  2. Sara says

    June 8, 2019 at 7:23 pm

    These cones look absolutely delicious, and seem so approachable! I actually have a couple of tubs of ricotta in my refrigerator right now, and was searching for recipes earlier to use with them. I think this is fate to stumble upon your recipe! I cannot wait to make these!

    Reply
  3. Alisha Rodrigues says

    June 7, 2019 at 6:39 pm

    These look so pretty. I’d love to make a few and serve them at the next get together we have. Absolutely gorgeous and looks yum

    Reply
  4. Jenni LeBaron says

    June 7, 2019 at 11:51 am

    What a genius idea to serve the cannoli filling in sugar cones! I love that these are easier to hold and really fun to display, plus you can see the gorgeous toppings so much better in these cones!

    Reply
  5. Amanda Mason says

    June 7, 2019 at 12:51 am

    How cute are these cannoli cones!! My kids would love to make these with me! I dont use ricotta cheese a ton so your info was super helpful! Can’t wait to try these out with the kids!

    Reply
  6. Nicolas Hortense says

    June 5, 2019 at 9:13 pm

    Oh my I just want to reach through the screen and bite into one of these right now!!

    Reply
  7. Rebecca Blackwell says

    June 5, 2019 at 2:26 pm

    True story: I bought a set of cannoli pastry molds about 10 years ago and have never used them. Every now and then, I notice them in the cupboard and think, “One of these days…”. But, maybe I should just give them away now, because using ice cream cones to make cannolis is BRILLIANT. Seriously. I’m so in love with this idea. Thank you so much for sharing!

    Reply
    • Sharon says

      June 16, 2019 at 3:15 pm

      Haha! I am the same way about my pasta maker! One of these days…

      Reply
  8. Kylee from Kylee Cooks says

    June 5, 2019 at 2:24 pm

    I keep seeing these and wanting to grab one out of my screen. My family would ADORE these, they look so fun and yummy!

    Reply
  9. Karly says

    June 5, 2019 at 12:01 pm

    Awesome idea!

    Reply
  10. Natalie says

    June 5, 2019 at 11:05 am

    These look like the ultimate summer snack!

    Reply
  11. Tammy says

    June 5, 2019 at 10:54 am

    Ooh I want one right now!!! I’ll take this over ice cream gladly 😀 Such an awesome idea and so fun for summer. My family would love this ^_^

    Reply
  12. Asia says

    June 5, 2019 at 9:47 am

    Oh my goodness I NEED to try these!!! This looks amazing

    Reply
  13. Lola Osinkolu says

    June 4, 2019 at 8:06 pm

    I love cannoli! I’ve alwyas wanted to try them out at home. Thanks!

    Reply
  14. Destinee Nicole says

    June 4, 2019 at 4:30 pm

    These look so yummy! Using ice cream cones is such a good idea.

    Reply
  15. Aleta says

    June 4, 2019 at 3:20 pm

    I have never heard of a cannoli until now, but boy oh boy, I cannot wait to have one! That ricotta cream look incredible and I love the cones dipped in chocolate. I bet my girls will have a blast making these with me and especially sampling the finished product!

    Reply
  16. Lori | The Kitchen Whisperer says

    June 4, 2019 at 1:03 pm

    Marrying in to an Italian family cannolis are well, a requirement to know how to make including the shells. It’s a labor of love to say the least. I’m seriously LOVING the shortcut you took on making these with sugar cones. They are super fun and cute and definitely a crowd favorite! AND YES!!! Finally someone else that explains why you have to strain the ricotta for hours. I do this too and it’s such a crucial step!

    Reply
  17. Paula - Vintage Kitchen says

    June 4, 2019 at 12:51 pm

    This is such a great idea! I have never made homemade cannoli either, but absolutely love anything with ricotta. So this is a genius recipe in my book. Great idea!

    Reply
  18. Rachel says

    June 4, 2019 at 10:51 am

    My husband loves canolies. I am going to have to make these for him as a special treat.

    Reply
  19. Lyndsay says

    June 3, 2019 at 10:25 pm

    What a great idea! They were so easy and my kids loved them! Thanks for the fantastic recipe 🙂

    Reply
  20. Sara Welch says

    June 3, 2019 at 10:14 pm

    This reminds me of a treat I’d get at Disneyland! I love this; can’t wait to have these on a hot day; looks perfectly delicious!

    Reply
  21. Michelle says

    June 3, 2019 at 9:55 pm

    These are adorable! I love the idea of using cones for the shell. I’m horrible at deep frying so this is perfect for me!

    Reply
  22. Elaine says

    June 3, 2019 at 9:15 pm

    These cones are so cute! I am so glad I have stumbled upon your recipe because most of others that I saw are pretty complex. Yours looks easy, quick and beautiful. Very excited!

    Reply
  23. Caitlyn Erhardt says

    June 3, 2019 at 8:36 pm

    Yum! These are so cute and look almost too perfect to eat! But, let’s be real, I’ll take 20!

    Reply
  24. Catherine @ To & Fro Fam says

    June 3, 2019 at 4:31 pm

    I can guarantee I would never ever fry my own cones – I just think of the mess, the waste and the smell! But I could def get behind this cannoli shortcut.

    Reply
  25. Diana @ Nanny to Mommy says

    June 3, 2019 at 12:22 pm

    What a fantastic summer treat! My kiddos would go crazy for these. And they would be fun to bring to a summer block party.

    Reply

Trackbacks

  1. 23 Delicious Cannoli Desserts You Need To Try says:
    February 7, 2020 at 11:49 am

    […] Ice Cream – Dessert First Girl Cannoli Stuffed Crepes – I Breathe I’m Hungry Cannoli Cones – Certified Pastry Aficionado Italian Cannoli Pound Cake – Ask Chef Dennis Cannoli […]

    Reply

Leave a Reply Cancel reply

Your email address will not be published. Required fields are marked *

This site uses Akismet to reduce spam. Learn how your comment data is processed.

Hi, my name is Sharon. I’m an accountant by day, risk-taking baker and food enthusiast by night. Come join me as I share my favorite recipes and test out new ones along the way!

fall flavors

warm banana bread with a couple bites removed sitting on a plate with two scoops on butter pecan ice cream stacked on top and caramelized bananas over the top and a spoon on the side

Banana Bread Sundae

two stacked Cinnamon Chocolate Muffins and one muffin cut in half next to it and a pan of cinnamon chocolate muffins, shot from a side angle

Cinnamon Chocolate Muffins

picture of apple pecan farro salad served on a white plate

Apple Pecan Farro Salad

a plate with a slice of stone fruit tart and slices of fruit in the background, shot from the front

Stone Fruit Tart

sweet potato biscuits on parchment paper with butter to the side and a cast iron pan of more biscuits in it, shot from a side angle

Sweet Potato Biscuits

zoomed in shot of Smashed Sweet Potatoes with cheese being shredded over them

Smashed Sweet Potatoes with Garlic Butter

ORDER MY NEW COOKBOOK NOW!

photo of entertaining made easy cookbook available for preorder now

Breakfast
Appetizers
Entrees
Salads
Sides
Drinks
Desserts
Roundups
Holidays

Browse by Date

  • Home
  • About Me
  • Contact Me
  • Privacy Policy

holiday favorite

overhead shot of partially eaten baked carrot cake oatmeal in casserole dish with serving spoon

Baked Carrot Cake Oatmeal

a White Chocolate Cream Puff cut in half with the filling showing and a plate of cream puffs in the background and white chocolate chips around it, shot from a side angle

White Chocolate Cream Puffs

a casserole dish of Berries & Cream Stuffed French Toast Casserole on top of a cloth napkin with a bowl of mixed berries next to it, shot from overhead

Berries & Cream Stuffed French Toast Casserole

photo of two glasses of sangria with the pitcher in the background

Cranberry Apple Sangria

a slice of victoria sandwich cake with a bite remove and a few crumbs on the plate

Victoria Sandwich Cake


These Dijon Apple Pork Chops are proof that weekni These Dijon Apple Pork Chops are proof that weeknight dinners can be BOTH quick and fancy!

Perfectly cooked pork chops topped with a Dijon apple pan sauce made with fresh apples, rosemary, apple cider, and a touch of Dijon mustard. It's fall flavors at their finest, and it's ready in just 30 minutes!

Why you'll LOVE this recipe:
✨ Quick weeknight dinner (30 minutes!)
✨ Fall flavors you can enjoy all season
✨ Restaurant-quality at home
✨ Simple ingredients you probably have
✨ Pan sauce is EVERYTHING

Here's the magic: while the pork stays hot, we make the sauce first - apples sautéed with rosemary, then simmered in apple cider until tender, finished with Dijon and butter. Pour it over perfectly seared pork chops and you've got a dinner that tastes like you spent hours in the kitchen!

The combination of sweet apples, fragrant rosemary, and tangy Dijon is absolutely PERFECT with pork. Serve with roasted Brussels sprouts and mashed potatoes for the ultimate fall dinner!

Pro tips:
🔸 Use pork chops that are at least 1 inch thick
🔸 Go easy on rosemary (it's powerful!)
🔸 Let pork rest 5 minutes before serving
🔸 Cook to 145°F internal temp for juicy chops

Want the full recipe? Comment PORK below and I'll send it straight to your DMs! 

#DijonApplePorkChops #PorkChops #FallDinner #WeekNightDinner #EasyDinner #PorkRecipes #FallRecipes #QuickDinner #30MinuteMeals #PanSauce #AppleRecipes #FallFlavors #DinnerIdeas #EasyRecipes #WeeknightMeals #PorkChopRecipe #FallCooking #HealthyDinner #HomeCooking #DinnerRecipe #FallFood #QuickRecipes #FoodBlogger #Rosemary #AppleCider #FamilyDinner #SeasonalCooking #ComfortFood #Foodie #DeliciousDinner
These aren't your average buttermilk pancakes! Mad These aren't your average buttermilk pancakes! Made with ground pistachios, honey, and a hint of almond extract, these fluffy pancakes are rich, nutty, and absolutely DELICIOUS. 

What makes these pancakes SPECIAL:
✨ Ground pistachios for nutty flavor (no crunch!)
✨ Honey instead of sugar (pairs perfectly with pistachios)
✨ Almond extract brings out the pistachio flavor
✨ Super fluffy texture (the secret: let the batter rest!)
✨ Unique & impressive breakfast

The ground pistachios give these pancakes an incredible flavor and that gorgeous green tint without adding any crunch to your pancakes. The almond extract enhances the pistachio flavor and creates this rich, nutty taste that's SO good! And using honey instead of regular sugar? Game changer!

Top with butter, maple syrup, and extra crushed pistachios for the ultimate presentation!

Pro tips for FLUFFY pancakes:
🔸 Let the batter rest 15-30 minutes (don't skip this!)
🔸 Only add batter to a HOT pan
🔸 Look for bubbles on top before flipping
🔸 Use buttermilk for that classic fluffy texture

Trust me, once you try these pistachio pancakes, you'll want to make them every weekend! The flavor is incredible and they look so impressive stacked up on a plate.

Want the full recipe? Comment PANCAKES below and I'll send it straight to your DMs! 

#PistachioPancakes #PancakeRecipe #BreakfastRecipe #ButtermilkPancakes #HomemadePancakes #PistachioRecipes #WeekendBrunch #BrunchIdeas #FathersDay #FathersDayBreakfast #BreakfastGoals #FluffyPancakes #BreakfastFromScratch #BrunchRecipe #PancakeLove #PistachioLovers #SpecialBreakfast #WeekendBreakfast #HomemadeBreakfast #BreakfastIdeas #FoodBlogger #BrunchGoals #NuttyFlavors #FancyBreakfast #PancakeStack #MorningGoals #BreakfastTime #Foodie #DeliciousBreakfast
This Sweet Potato Gratin is about to steal the sho This Sweet Potato Gratin is about to steal the show at your holiday table! 

Thinly sliced sweet potatoes baked in a maple-spiced cream sauce and topped with Parmesan cheese. It's the perfect balance of sweet and savory, and honestly? It's EASIER than making mashed potatoes!

Why you'll LOVE this recipe:
✨ Sweet & savory flavor combo (maple + Parmesan!)
✨ Impressive presentation but simple to make
✨ Easier AND faster than mashed potatoes
✨ Creamy inside, crispy golden top
✨ Perfect for Thanksgiving, Christmas, or any holiday feast

Here's what makes this gratin special: the sweet potatoes are cooked in a cream sauce with maple sugar (or maple syrup), cinnamon, and nutmeg, then topped with grated Parmesan before baking. 

The result is a gorgeous layered side dish that's creamy, rich, and absolutely delicious! The texture is what sets this apart from traditional sweet potato casserole - those thinly sliced layers give you the perfect bite every time. And that crispy, golden Parmesan top? Chef's kiss 

Pro tips:
🔸 Use a mandolin slicer for perfectly even slices (be careful!)
🔸 Use GRATED Parmesan, not shredded (it melts better!)
🔸 Let it cool 15-20 minutes before serving for best texture
🔸 Can swap maple sugar for maple syrup

This is going straight on my Thanksgiving menu, and I think you should add it to yours too! It's fancy enough to impress but easy enough to not stress about. Win-win! 

Want the full recipe? https://www.certifiedpastryaficionado.com/sweet-potato-gratin/
I combined two breakfast classics into one AMAZING I combined two breakfast classics into one AMAZING treat - fluffy homemade cinnamon rolls filled with sliced bananas, chopped walnuts, brown sugar, and cinnamon. 

These Banana Nut Cinnamon Rolls are the breakfast dream you never knew you needed!

Here's what makes them INCREDIBLE:
✨ Fluffy, gooey homemade cinnamon rolls
✨ Fresh banana slices + crunchy walnuts in every bite
✨ Cream cheese frosting with optional walnut topping
✨ Brown sugar cinnamon filling

The secret? I replaced the egg in the dough with mashed banana, which adds SO much flavor without affecting the texture. 

The rolls come out just as fluffy and soft as traditional cinnamon rolls, but with that amazing banana bread taste we all love!

Yes, homemade cinnamon rolls take time (about 3 hours total with rising), but they are SO WORTH IT. 

The keys to success:
🔸 Use fresh yeast (make sure it foams!)
🔸 Knead the dough for the full 5 minutes
🔸 Don't rush the proofing time - fluffy rolls need time to rise!

These are perfect for weekend brunch, special occasions, or any time you want to seriously impress! The combo of bananas, walnuts, and cinnamon is absolutely divine.

Pro tip: You can prep these the night before! Let them do the second rise in the fridge overnight, then bake fresh in the morning. Your house will smell AMAZING! 

Want the full recipe? https://www.certifiedpastryaficionado.com/banana-nut-cinnamon-rolls/
This Pumpkin Crumb Cake is everything you love abo This Pumpkin Crumb Cake is everything you love about coffeehouse crumb cake, but with cozy pumpkin spice vibes! Dense, moist pumpkin cake topped with the most incredible crispy cinnamon sugar crumbs. It's the perfect fall treat!

What makes this crumb cake SO good:
✨ Whole can of pumpkin puree for maximum flavor
✨ Pumpkin pie spices (cinnamon, nutmeg, ginger, cloves)
✨ Super moist, slightly dense texture (in the best way!)
✨ Crispy, buttery cinnamon crumb topping
✨ Perfect with your morning coffee or afternoon tea

This is one of my all-time favorite coffeehouse treats, and the pumpkin version is PERFECT for fall! The cake is incredibly moist thanks to the pumpkin puree, and those crispy crumbs on top add the most satisfying texture contrast. It's divine!

You can serve it warm or at room temperature, and it stays fresh for days (if it lasts that long!). 

Perfect for:
🍂 Fall breakfast or brunch
🎃 Thanksgiving dessert
☕ Weekend coffee date at home
🍁 Cozy autumn afternoons

Pro tip: Make the crumb topping first and chill it in the fridge while you make the batter. This helps the crumbs stay crispy during baking!

Want the full recipe? https://www.certifiedpastryaficionado.com/pumpkin-crumb-cake/

Copyright © 2025 Certified Pastry Aficionado · Web Design by Viva la Violet

loading Cancel
Post was not sent - check your email addresses!
Email check failed, please try again
Sorry, your blog cannot share posts by email.