• Facebook
  • Instagram
  • Pinterest
  • RSS
  • Twitter
  • Home
  • About Me
  • Recipes
  • Cookbooks
  • Work With Me
  • Contact

CPA: Certified Pastry Aficionado

Chocolate Berry Fritters

doughnuts and sweet rolls· Holiday Favorites· pastries· Valentine's Day
February 3, 2020

Jump to Recipe Print Recipe

Chocolate Berry Fritters – Chocolate yeast donuts are loaded with three kinds of berries and then covered in sweet icing. 

Pulling apart a Chocolate Berry Fritters

And the chocolate desserts keep on coming! Today’s recipe is my third chocolate recipe in a row so I’m officially on a roll. I need to make sure you guys have plenty of options as VDay approaches!

A couple weeks ago, I started off this trend with my chocolate raspberry cake roll. Last week, I gave you this ultra-rich and gooey triple chocolate skillet cookie. Today, it’s all about the chocolate and berries again. But this time, the recipe can easily pass for breakfast or dessert.

Here are my Chocolate Berry Fritters!

Cooling rack of Chocolate Berry Fritters, blueberries and strawberriesCloseup of a strawberry on top of Chocolate Berry FrittersChocolate Berry Fritters on a cooling  rack with a whole stawberry

What is a fritter?

Fritters are a fried dough or batter with some sort of fruit or vegetable. I’ve seen corn fritters, apple fritters, and even peach fritters. The base of the fritter can be a wet batter or a yeast dough. These fritters are made with a yeast dough and are very similar to apple fritters, if you’ve had them.

How are these fritters made

There are three main part to making these fritters:

  1. Making the dough
  2. Frying the dough with the berries to make fritters
  3. Coating the fritters in icing

Let’s talk about each step of the process.

Chocolate yeast dough

Making the chocolate yeast dough is very similar to any sweet dough recipe. In fact, I used my sweet yeast dough recipe from these Nutella pull-apart muffins and my apple cinnamon monkey bread. I made a few tweaks to it to make it just right for the added chocolate.

First I added in solid chocolate and unsweetened cocoa. I added both so that I had enough chocolate flavor without messing with the texture of the dough. Then, I switched out the canola oil with butter to add extra flavor. And finally, I added a little more sugar to balance out the unsweetened cocoa that we added in.

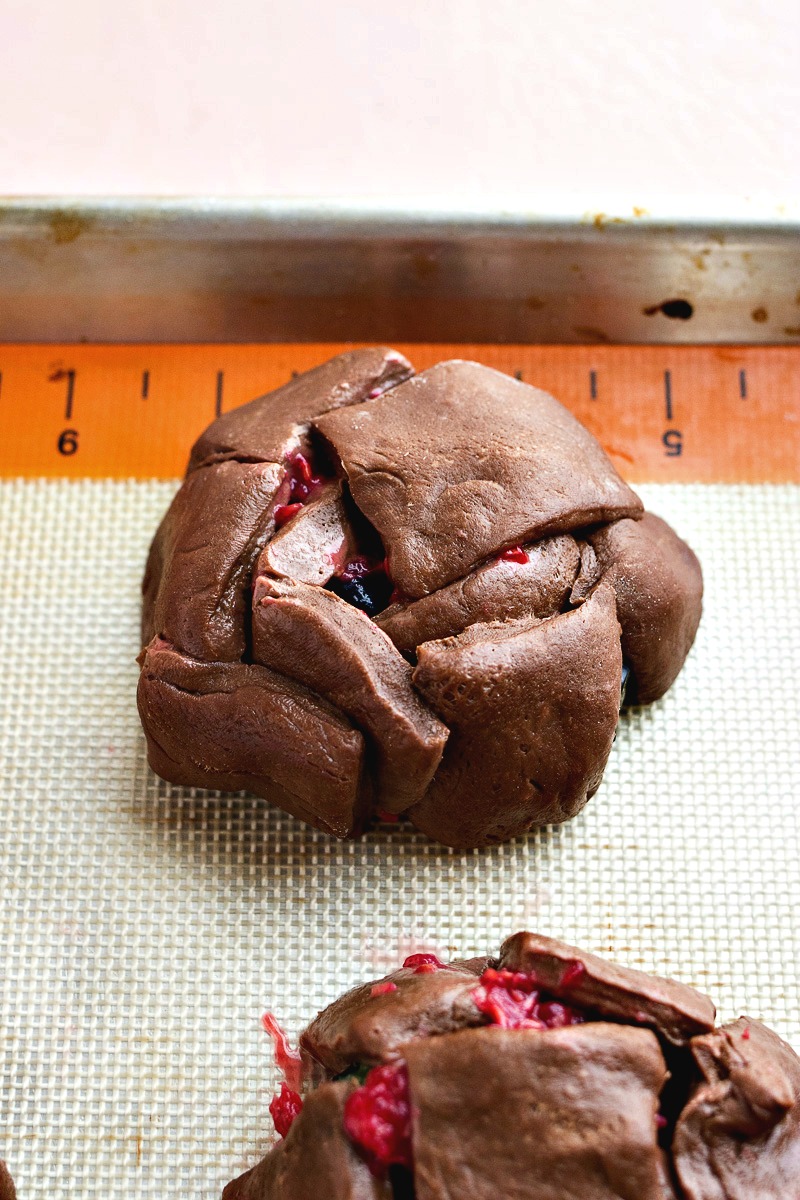
Once the dough is made, you continue on like you would with any other yeast dough: knead it, let it rise, and then roll it out. Once it’s rolled out, the berries are added to one half of the dough and then the other half of the dough is folded over to make what looks like a calzone.

Chocolate fritter dough flattened and topped with blueberries, raspberries and strawberries

Once the calzone is formed, you’re going to cut it into 12 short strips and then each strip is cut into 4 pieces and formed into a ball to make the fritter. Make sure to tuck in the berries as much as possible so they don’t fall out during frying.

Ball of chocolate fritter dough wrapped around a center of berries

Frying

Before frying, each ball of dough is flatten into a disk. Then, each disk is dropped into the hot oil and fried until puffed up and cooked through, about 2 minutes per side. Drain each fried fritter over paper towels before dipping in icing.

Coating in icing

Once the fritters have cooled and drained off the excess oil, it’s time for coating them in icing. Mix all the icing ingredients together until smooth. Dip the tops of each fritter into icing and sit onto baking sheet. Let the excess drizzle down the doughnut.

Tips & Tricks

  1. When making dough, it is very important that you take the time to knead it properly. You can either knead with a stand mixer or by hand. I like to knead by hand so I can tell how the gluten is developing. You’ll know when you’ve kneaded enough when the dough is soft and elastic, about 6 minutes.
  2. Do not skimp on rising time! In order for these fritters to get nice and fluffy, they need time to rise. So don’t go cutting corners and thinking you use the dough after it’s only half-risen. Trust me.
  3. Invest in a candy thermometer to monitor the hot oil. Oil temperature is super important when frying – too cold and the food will get greasy and fail to get browned and too hot and the food will brown on the outside but not cook all the way in the center.
  4. The fritters may separate while frying. Don’t freak out. The fritters will taste incredible whether they stay in one large, round fritter or break off into smaller pieces. However, if this still bothers you, try to pinch the dough pieces together before frying and make sure to seal the berries in the center.
Print Recipe

Chocolate Berry Fritters

Chocolate yeast donuts are loaded with three kinds of berries and then covered in sweet icing. 
Prep Time20 minutes mins
Cook Time15 minutes mins
Resting time2 hours hrs
Total Time2 hours hrs 35 minutes mins
Servings: 10 servings

Ingredients

For the dough:
  • 1 cup whole milk
  • 2 tablespoons butter salt
  • 3 ounces semi-sweet chocolate chopped
  • ¼ cup sugar
  • 1 teaspoon salt
  • 1 package active dry yeast
  • 2 tablespoons warm water
  • 3 ½ - 4 cups all-purpose flour plus more for dusting
  • 2 large eggs
  • 1 cup mixed berries chopped
  • 1 quart vegetable oil for frying
For the icing:
  • 2 cups powdered sugar
  • ⅛ teaspoon salt
  • ¼ cup milk

Instructions

  • First we will begin making the dough. Heat up milk in a small sauce pan until it begins to simmer. Remove from heat and add butter, chopped chocolate, sugar and salt and stir. Let it cool down to lukewarm to the touch. Stir milk to combine with chocolate. While milk is cooling, proof the yeast by adding the warm water and yeast in a small bowl and stirring together. Let it activate by setting it aside for 10 minutes.
  • Once milk is cool, add to a large bowl, along with 3 ¼ cups of the flour, cocoa powder, eggs, and yeast mixture. Stir together with a wooden spoon until combined. The dough will be very thick but still pretty wet and sticky.
  • Place ½ cup of flour on the surface of your counter. Place dough on top of it and begin kneading the dough with the flour until all the flour is mixed into the dough. Keep kneading for about 4-5 minutes until the dough is smooth and elastic. If it starts to stick to the counter, add a little more flour. Once you finish kneading, shape into a ball. Lightly grease another large bowl and place the ball of dough into bowl. Cover with a kitchen towel and let it
    rise for 2 hours, where it will be double the size. I like to place mine in the microwave to keep it away from any cool draft from the A/C.
  • Once dough has risen, punch it down with your fist and remove from the bowl. Lightly dust your counter with flour and place the dough on top. Roll out dough into a large rectangle, 16 inches x 24 inches. Sprinkle chopped berries along the bottom half of the long edge of the rectangle. Fold dough in half and seal all the edges together. Cut dough into 12 short strips. Cut each strip into 4 pieces. Take one strip of three pieces and gather together in to a ball,
    tucking the berries into the center and making sure none are exposed. If the berries release a lot of juice, add flour to your hands and press into the fritters to help absorb the extra juice while your form the fritter. Flatten into a round fritter. If you can see the berries, they'll probably escape while frying. Place onto baking sheet. Repeat with the other sets of strips. set fritters aside while we heat up the oil.
  • Place all vegetable oil into a Dutch oven. Heat over medium until oil reaches 350 degrees. Use a candy thermometer to watch temperature. Once oil is hot enough, add two fritters to oil. Cook for 2 minutes on each side and then remove. The fritters may separate into pieces but don't worry - they'll still taste amazing! If this bothers you, make sure to pinch the dough together and seal in the berries before frying. Drain fried fritters on paper towels and repeat with other fritters. Do not cook more than 2 at a time.
  • Once all the fritters are done frying and have cooled for at least 5 minutes, it's time to dip into icing. Mix powdered sugar, milk and salt together to form icing. Add more milk if it's too thick. Dip each fritter into ice and let excess drain off. Icing will dry in about 30 minutes. Serve immediately and within 24 hours.

Pin for later:

Chocolate Berry Fritters photo collage

More recipes you’ll love:

Chocolate Berry Cups

chocolate cup of blueberries, raspberries and blackberries drizzled in chocolate

Chocolate Raspberry Mousse

Spoonful of Chocolate Raspberry Mousse

Chocolate Raspberry Cake Roll

Chocolate Raspberry Cake Roll slice on a plate, topped with whipped cream, chocolate chips and a raspberry

Share this:

  • Click to share on Pinterest (Opens in new window)
  • Click to share on Facebook (Opens in new window)
  • Click to share on Twitter (Opens in new window)
  • Click to share on Tumblr (Opens in new window)
  • Click to email this to a friend (Opens in new window)

21 Comments

« Triple Chocolate Skillet Cookie
Classic Tiramisu »

Comments

  1. Aline says

    February 10, 2020 at 2:42 pm

    I had pinned this recipe to make it for Valentine’s day but I just couldn’t wait another week and made it over the weekend ahahaha They were soooooooooooooo amazing!!!! Thank you!!

    Reply
  2. Natalie says

    February 10, 2020 at 5:38 am

    Oh wow, this recipe sounds so delicious. Looks amazing too! I just saved it and will make it for Valentines for my boys. This will be such a treat fro them.

    Reply
  3. Jo says

    February 10, 2020 at 4:58 am

    I have come across so many varieties of fritters, but not berry fritters! This is brilliant idea! I love how delicious and decadent those fritters looks. Would be perfect treat for Valentines Day celebrations

    Reply
  4. Femi. O says

    February 10, 2020 at 12:11 am

    This actually had me drooling! I had these on the list as a possible valentine’s day gift bake but it might not make it that long… it’s like a combination of all the best things with chocolate on a plate!

    Reply
  5. Debbie says

    February 9, 2020 at 9:55 pm

    I adore fritters but never thought about your flavor combination. These chocolate berry fritters sounds amazing!! I will be trying these soon and can not wait !!

    Reply
  6. Paige says

    February 9, 2020 at 3:28 pm

    wow! These look SO great and who doesn’t love chocolate and cherry? I love how you have it served with fresh berries too!

    Reply
  7. Marisa F. Stewart says

    February 9, 2020 at 2:34 pm

    WOW! I’ve never seen anything quite like this. Making them chocolate instead of plain plus adding those delicious berries is quite unique. What a great dessert everyone will love. I will certainly make this as soon as I get my berries.

    Reply
  8. Kushigalu says

    February 8, 2020 at 5:58 am

    Chocolate and berry is one of my favourite combo. This fritter looks mouth watering.

    Reply
  9. Nicoletta De Angelis Nardelli says

    February 7, 2020 at 11:52 am

    Chocolate and berry are my favorite combo! These fritters look mouthwatering and cannot wait to try!

    Reply
  10. Veena Azmanov says

    February 5, 2020 at 12:31 pm

    Such a unique and delicious recipe. Best for my sweet tooth cravings. Looks yum.

    Reply
  11. Angela Campos says

    February 4, 2020 at 9:08 pm

    These look so AMAZING!!! They would be perfect for Valentine’s Day…YUM!!!

    Reply
  12. Shani | Sunshine & Munchkins says

    February 4, 2020 at 12:20 pm

    Get in my belly! These look absolutely delicious!

    Reply
  13. Marina says

    February 4, 2020 at 10:53 am

    Oh these look delicious and I’m also sure they taste good. Will try this recipe x

    Reply
  14. Marina says

    February 4, 2020 at 10:50 am

    Oh these look delicious and I bet they also taste good. Will try this recipe x

    Reply
  15. Jannine MacKinnon says

    February 4, 2020 at 1:53 am

    These look amazing! You can’t go wrong with berries and chocolate.

    Reply
  16. Cathleen @ A Taste of Madness says

    February 4, 2020 at 12:01 am

    Frying anything always scares me. My sister got burned by hot oil, and ever since I am terrified!! But this looks so good, I might even look past my fear and try it!

    Reply
  17. Terri says

    February 3, 2020 at 10:02 pm

    Love that you made fritters chocolate – what a great Valentine’s Day treat!

    Reply
  18. Erika says

    February 3, 2020 at 9:45 pm

    These fritters look amazing!!

    Reply
  19. Caroline says

    February 3, 2020 at 9:36 pm

    These look delicious! Berries and chocolate are tasty together and I can just imagine what a great treat these are.

    Reply
  20. Katie says

    February 3, 2020 at 8:47 pm

    Oh my goodness, my mouth is watering over these. They look incredible!

    Reply
  21. Amber Myers says

    February 3, 2020 at 3:19 pm

    Yes please, these look incredible! I just LOVE chocolate treats. I am so excited to try these.

    Reply

Leave a Reply Cancel reply

Your email address will not be published. Required fields are marked *

This site uses Akismet to reduce spam. Learn how your comment data is processed.

Hi, my name is Sharon. I’m an accountant by day, risk-taking baker and food enthusiast by night. Come join me as I share my favorite recipes and test out new ones along the way!

fall flavors

a stack of three Apple Cider Crumb Doughnuts on a cloth napkin with more doughnuts around them, shot from the front

Apple Cider Crumb Doughnuts

pumpkin cinnamon pull apart loaf with a center slice visable

Pumpkin Cinnamon Pull Apart Loaf

oatmeal rolls sitting on a baking sheet

Oatmeal Dinner Rolls

Twice Baked Sweet Potatoes

slice of carrot snack cake on a pink plate

Carrot Snack Cake

Butterscotch Pear Turnovers on a baking sheet with parchment paper, shot from overhead

Butterscotch Pear Turnovers

ORDER MY NEW COOKBOOK NOW!

photo of entertaining made easy cookbook available for preorder now

Breakfast
Appetizers
Entrees
Salads
Sides
Drinks
Desserts
Roundups
Holidays

Browse by Date

  • Home
  • About Me
  • Contact Me
  • Privacy Policy

holiday favorite

Pecan Pie Brownies

Sausage Egg & Cheese Pastry Muffins on a platter with a sprig of rosemary, shot from a side angle

Sausage, Egg, & Cheese Pastry Muffins

Peanut Butter Hot Chocolate styled with a spoon being dipped into it

Peanut Butter Hot Chocolate

plate of stack of pistachio pancakes with a bite of them on a fork with pistachios sprinkled around on a cloth napkin, shot from overhead

Pistachio Pancakes

Almond Butter Chocolate Tarts on a platter with a spoon of almond butter on it, shot from a side angle

Almond Butter Chocolate Tarts


I used to love cooking, but during busy weeks it f I used to love cooking, but during busy weeks it felt like a chore. I was too exhausted after work to make anything fun. But with all that time at home, I was able to rethink our favorite foods and make them more achievable for weeknights.

I'd always loved mojo pork (that Cuban citrus-marinated pork that's SO flavorful), but I never made it because traditional pork loin takes FOREVER to roast. But then I had a lightbulb moment: What if I used pork TENDERLOIN instead? 

We eat it all the time because it's lean, quick-cooking, and my husband can grill it in under 30 minutes. Why not marinate it in mojo?

Here's what makes this recipe a weeknight winner:
🍊 The Marinade: Orange juice, lime juice, garlic, cumin, and oregano create that classic Cuban flavor. Just dump everything in a bag and let it work its magic!
⏰ The Timeline: Marinate for 4-24 hours (I usually do overnight), then it's only 25 minutes of active cooking time. Quick sear + oven = done!
🍽️ The Versatility: Serve it with rice and beans, make tacos, top a salad, use for Cuban sandwiches, or meal prep it for the week!

Three critical tips:
-DRY the pork after marinating: This is SO important! Pat it completely dry before searing or you'll steam it instead of getting a beautiful crust
-Use a meat thermometer: Pull it at 145°F for perfectly juicy pork every time. No guessing, no cutting it open repeatedly
-Don't over-marinate: 24 hours max or the texture gets mushy!

This has become one of our absolute go-to meals. It tastes like you spent hours in the kitchen but it's secretly SO easy!

Want the full recipe? 💌 Comment 'MOJO' below and I'll send you the link!

#MojoPork #PorkTenderloin #CubanFood #WeeknghtDinner #EasyDinner #DinnerIdeas #MarinadeRecipe #HealthyDinner #MealPrepIdeas #QuickDinner
Can we talk about how guava and cream cheese is TH Can we talk about how guava and cream cheese is THE most underrated flavor combination ever?! 

Growing up, guava was always around. My dad would spread it on toast with butter every morning, and I did the same. But it wasn't until I had guava with cream cheese at a Latin bakery in Florida that I truly appreciated this tropical fruit. 

The cream cheese perfectly balances the tangy guava jelly and makes everything ultra creamy. Wrapped in flaky puff pastry? KILLER.

I know this pastry braid looks super fancy and complicated, but here's the secret: IT'S SHOCKINGLY SIMPLE. When I first saw a pastry braid, I was so intimidated by how intricate it looked. It felt almost unattainable without tons of practice. But I'm here to tell you that is absolutely not the case!

Here's the whole process:
1️⃣ Roll out puff pastry and cut slits on the sides
2️⃣ Spread cream cheese and guava down the center
3️⃣ Overlap the side pieces to create the braid
4️⃣ Brush with egg wash and sprinkle with coarse sugar
5️⃣ Bake until deep golden brown

THAT'S IT! The braiding technique is so much easier than it looks, and the result is absolutely stunning.

Two critical tips:
-Keep it COLD before baking: Cold puff pastry = steam when it hits the hot oven = flaky layers! If the butter is too warm, it won't puff properly.
-Bake until DEEP golden brown: Not just golden, but DEEP golden. This ensures crispy, flaky pastry that's cooked all the way through. Nobody wants soggy pastry!

This is perfect for brunch, dessert, or honestly just because you want something that looks impressive but is secretly easy to make. You can also substitute any fruit preserves if you can't find guava!

Want the full recipe? 💌 Comment 'GUAVA' below and I'll send you the link!

#GuavaPastry #PuffPastry #PastryBraid #LatinDesserts #CreamCheese #BrunchRecipes #HomemadePastries #BakingFromScratch #WeekendBaking #ImpressiveButEasy
Do you remember those Danish butter cookies that c Do you remember those Danish butter cookies that came in the fancy blue tin? The ones your mom would buy every Christmas and you'd go absolutely CRAZY for? 

Well, guess what? You can make them YOURSELF! And they're shockingly simple!

I'm talking about those perfectly crispy-on-the-outside, melt-in-your-mouth-on-the-inside shortbread cookies that are basically edible butter. And honestly? 

I don't think they should be reserved just for the holidays. These cookies deserve to be eaten ALL YEAR LONG!

Here's what makes them so special:
-The Recipe: Only FIVE ingredients—butter, flour, sugar, eggs, and vanilla. That's it! If you can cream butter and sugar together, you can make these.
-The Texture: They're like shortbread cookies but slightly softer, so when you bite into them, they literally melt in your mouth. It's pure butter heaven.
-The Secret: Use European-style butter! It has a higher fat content which makes these cookies extra creamy and flavorful. It's worth the upgrade, I promise!

Important tips:
Be VERY careful measuring your flour—too much and the dough will be impossible to pipe
Use a LARGE star tip (not a small one!) or you won't be able to squeeze the dough out
These actually taste BETTER after they cool! The crispiness is what makes them so good, so resist eating them warm (I know it's hard!)

These are perfect for coffee breaks, gift-giving, parties, or honestly just because you deserve a good cookie. You can make them in under an hour from start to finish!

Want the full recipe? 💌 Comment 'BUTTER' below and I'll send you the link!

#DanishButterCookies #ButterCookies #ShortbreadCookies #HolidayBaking #CookieRecipe #HomemadeCookies
After making approximately ONE MILLION pumpkin tre After making approximately ONE MILLION pumpkin treats recently, I was desperate for something with all those cozy fall vibes but maybe... a little less pumpkin? 

So I set my sights on something that doesn't get nearly enough love in the dessert world: SWEET POTATOES! 

And here's my controversial opinion: Sweet potato beats pumpkin ANY DAY OF THE WEEK. There, I said it! 

These Sweet Potato Cupcakes are super moist, perfectly spiced, and topped with the creamiest cinnamon cream cheese frosting. 

They taste similar to pumpkin cupcakes (so if you're a die-hard pumpkin lover, you can absolutely swap in pumpkin puree!), but here's why sweet potato wins:
✨ More starch = MORE moisture and density in the cupcake
✨ The flavor is 100x better (fight me on this!)
✨ That perfect balance between sweet and earthy

But what I'm MOST proud of is how the frosting and cake work together. You know how sometimes you get a cupcake with frosting that's way too sweet so you just eat the cake? Or killer frosting but blah cake so you only eat the frosting? NOT THIS CUPCAKE. 

The spiced cake needs a little sweetness to balance it out, and the tart cream cheese frosting is PERFECT. They're soulmates! 

Important tips:
-Don't undercook them or they'll sink in the center (but more frosting fixes everything!)
-Fill the liners 3/4 full—not all the way—to get exactly 12 cupcakes
-Use a 2M Wilton tip for that fancy frosting swirl (or just spread with a knife!)

Want the full recipe? 💌 Comment 'CUPCAKE' below and I'll send you the link!
Team Sweet Potato or Team Pumpkin? Let me know in the comments! 

#SweetPotatoCupcakes #CreamCheeseFrosting  #CupcakeRecipe
Y'all, I need to talk about these Kentucky Derby C Y'all, I need to talk about these Kentucky Derby Cookie Bars because they might just be the most decadent thing I've ever created!

So here's the deal: I love taking traditional recipes and giving them a major upgrade. 

Traditional Derby Pie is delicious, but I wanted to make something even MORE special. And these bars? They're Derby Pie on steroids!

Here's what makes them absolutely incredible:
The Cookie Crust: Instead of regular pie crust, we're using a thick chocolate chip cookie base. Game. Changer.
The Filling: Loaded with pecans, chocolate chips, and a hint of bourbon that adds this rich, complex flavor. The filling is more dense and cakey than traditional Derby Pie, which gives you the perfect chewy texture.
The Bourbon Caramel: This homemade bourbon caramel sauce is what takes these bars over the top. It's sweet, buttery, and has that gorgeous bourbon depth. And yes, the alcohol cooks out, so it's safe for everyone (even made these while I was pregnant!)!

Important tips:
Don't chop your pecans too finely—leave nice chunks for better texture
If the bars start browning too quickly, just cover them with foil while the center finishes baking
Don't over-thicken the caramel sauce on the stove—it will thicken as it cools!

These bars are perfect for Derby Day (obviously!), but honestly, they're amazing for any summer gathering, BBQ, or potluck. 

Want the full recipe with that bourbon caramel sauce? 💌 Comment 'DERBY' below and I'll send you the link!

#DerbyPie #CookieBars #BourbonDesserts #PecanDesserts

Copyright © 2026 Certified Pastry Aficionado · Web Design by Viva la Violet

loading Cancel
Post was not sent - check your email addresses!
Email check failed, please try again
Sorry, your blog cannot share posts by email.