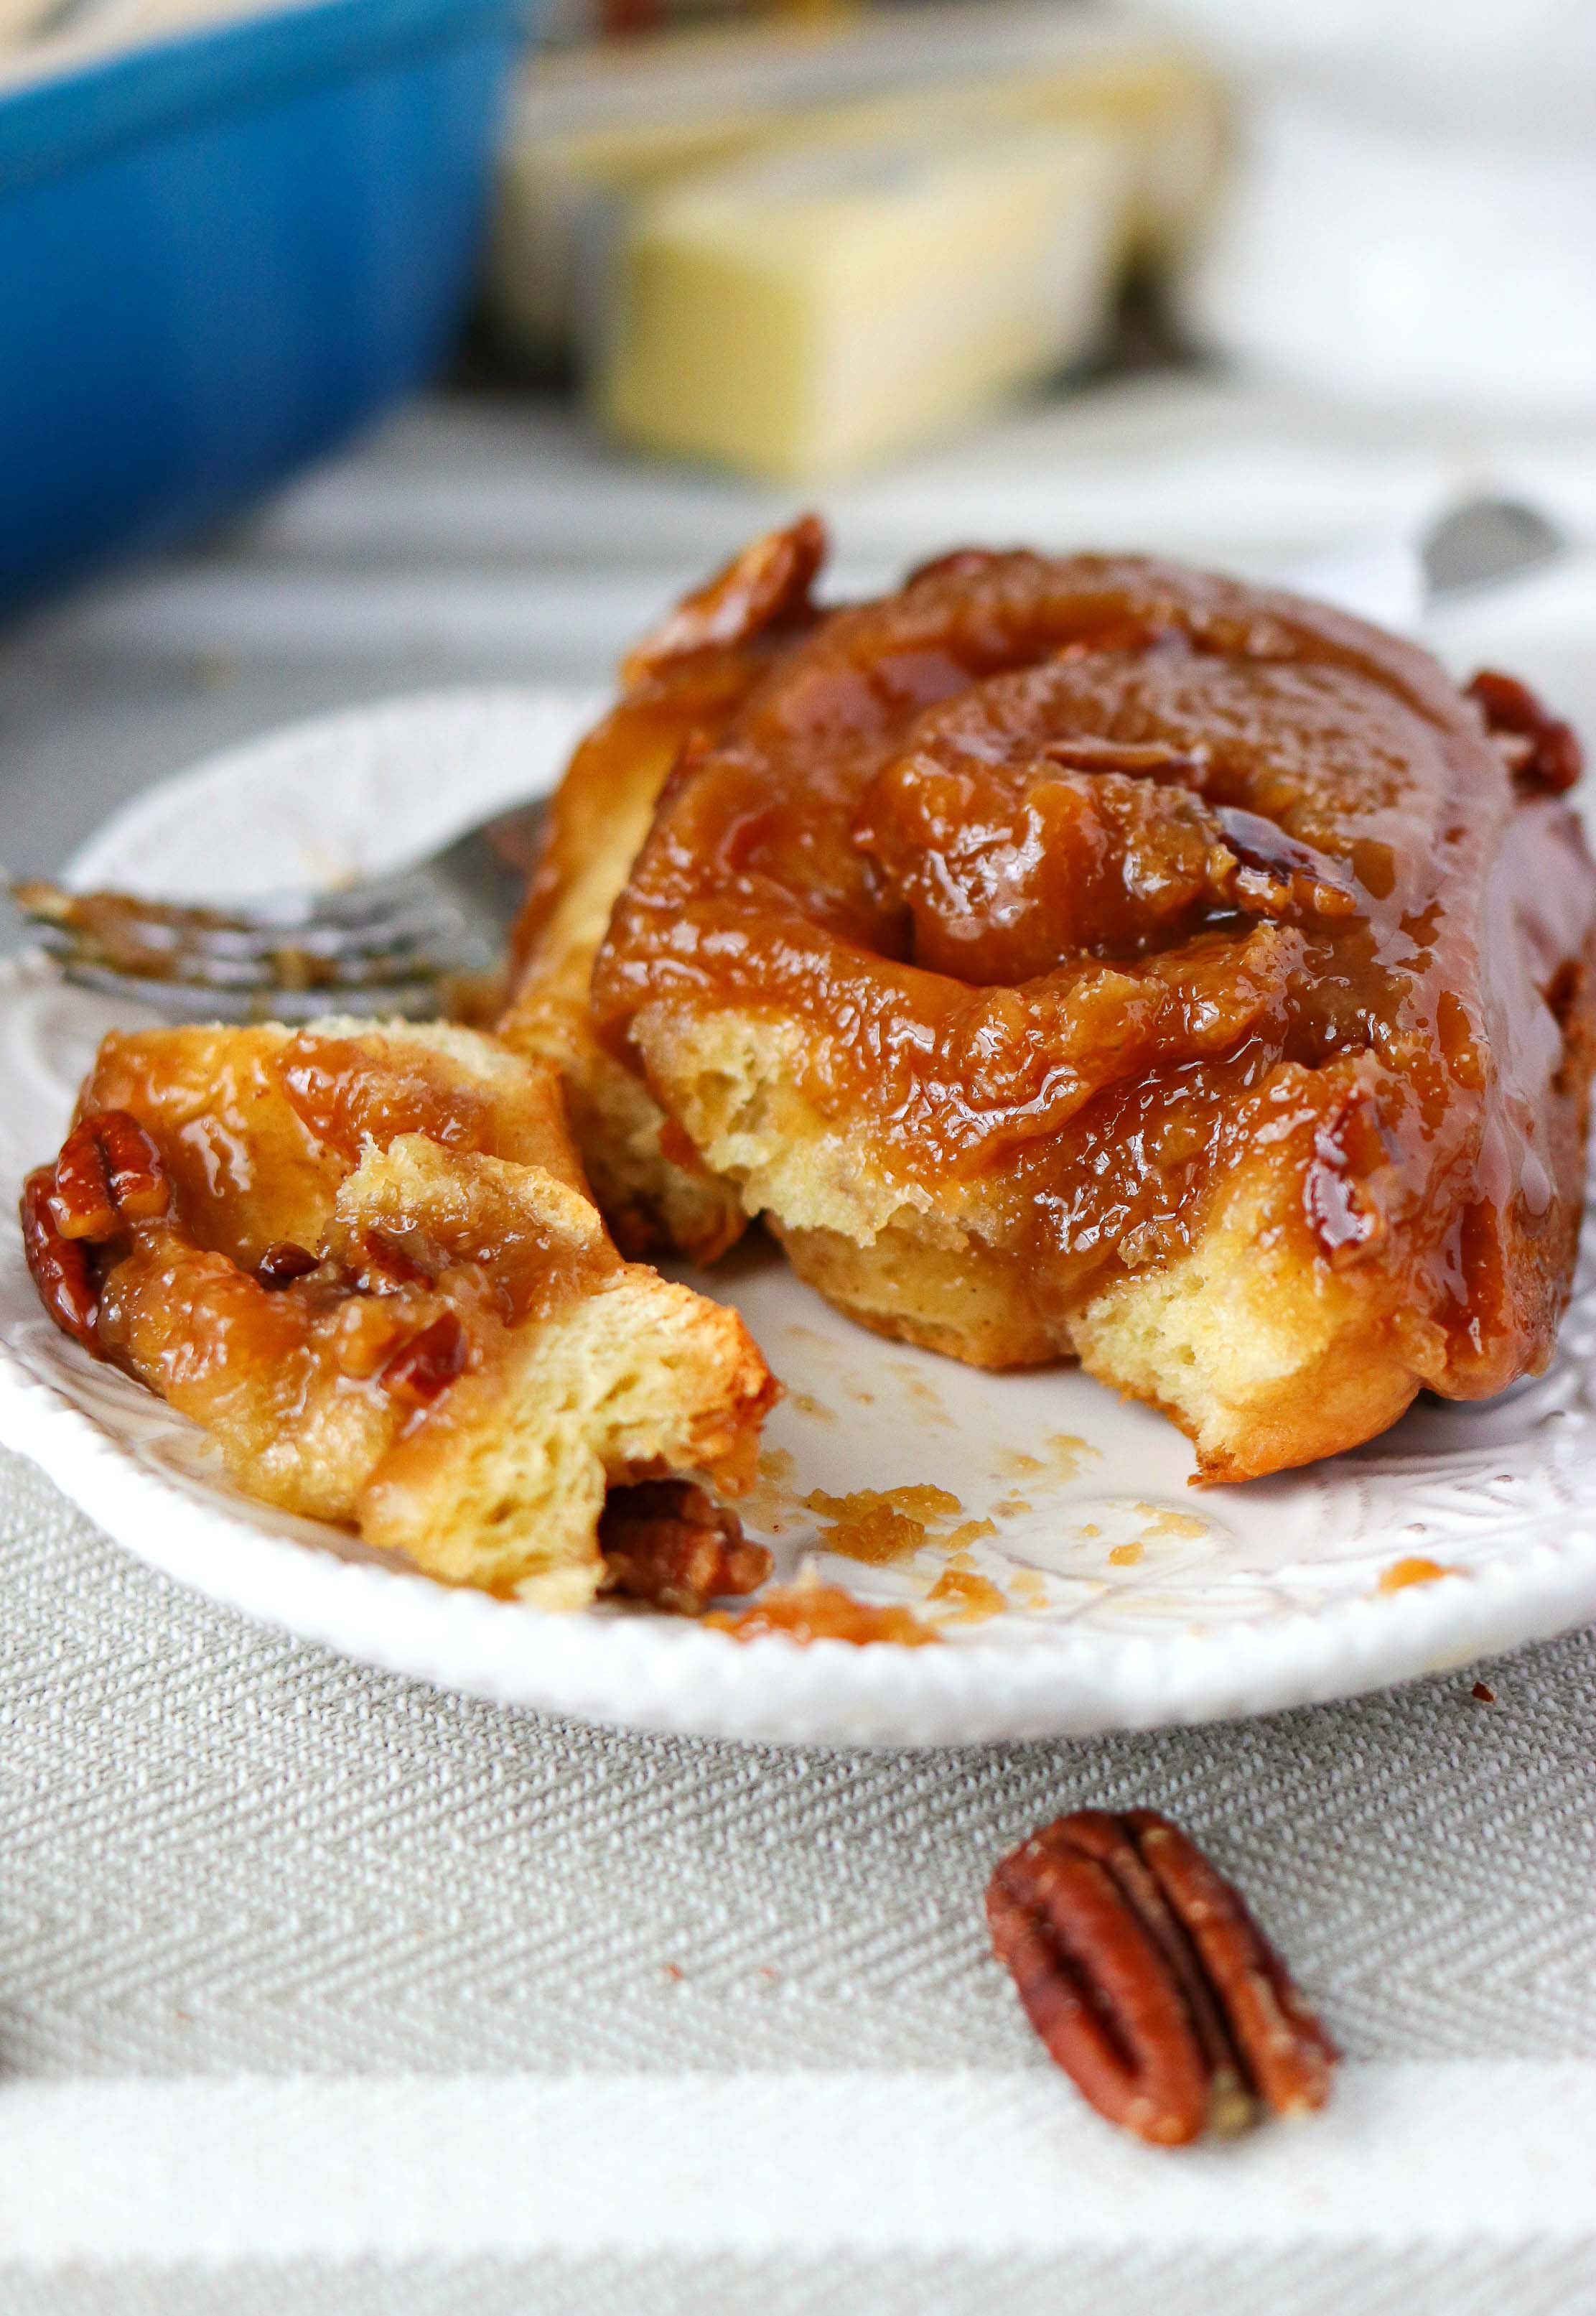
Pecan Sticky Buns – A super ooey, gooey, sticky bun made with brioche dough and tons of brown sugar and crunchy pecans. The flavor and texture of these buns will blow you away!
 If you’ve been following my posts from the last couple of weeks, you know that me and my husband just returned from a vacation in Boston. Boston is rich in American history, with so many museums and historical sites to visit.
However, my favorite part of the trip was, to no one’s surprise, the food. Honestly, my favorite part of any vacation is the food. But the food in Boston was particularly spectacular.
If you’ve been to Boston, you could probably guess my favorite spot…Mike’s Pastry! It’s a huge tourist spot, famous for their amazing cannoli. They have about 20 different flavors, plus a whole selection of other amazing sweet treats. Typically, I stay away from their tourist hotspots because they never turn out to be that great.
But Mike’s Pastry really did live up to the hype. So much so that we went there twice! I tried 4 different flavors but two were tied for my favorite: chocolate-covered, which was perfectly simple with an added crunch from the chocolate-covered cannoli shell, and Amaretto, which was loaded with almond flavor and Amaretto liquor and stole my heart immediately after the first bite. If you’re ever in Boston, you HAVE to visit Mike’s Pastry.
One day, I will try to attempt my own cannoli at home – it’s been on the bucket list for years. But today, I want to focus on another Boston treat that I’ve been in love with since I learned about it on Food Network years ago. No, it’s not Boston creme pie. But instead, it’s the most amazing gooey breakfast treat I’ve ever seen: pecan sticky buns from Flour Bakery in Boston.


I first saw these pecan sticky buns from Flour Bakery on Throwdown with Bobby Flay. Have you ever seen that show? I used to watch it all the time when it first came out in 2006. It’s basically a show where Bobby flay challenges chefs from all over the U.S. to a cook-off of their most iconic dish.
For one of the throwdowns, he challenges Joanna Chang from Flour Bakery to a cook-off, or should I say bake-off, for the best sticky bun. Flour Bakery is known for their amazing sticky buns made from brioche dough and tons of sticky “goo” on top. So Bobby had quite the competitor on his hands.
In the end, Bobby couldn’t make a better sticky bun and Joanna Chang won!
Ever since that episode, two things stuck with me: (1) I need to visit Boston to see this sticky bun in person and (2) sticky buns are distinct from cinnamon rolls.
The biggest and easiest difference to point out between sticky buns and cinnamon buns is that sticky buns bake with a layer of brown sugar and honey syrup under them (or “goo”) and then get flipped over when served so that sticky goo is exposed. Cinnamon buns are baked sans goo and instead are topped with a layer of icing.

Another big difference between the two is that sticky buns are adorned with nuts: walnuts, pecans, almonds – I’ve seen all as options in a sticky bun. Pecans are my favorite because, when cooked, their crunchy texture is softened and turns almost chewy.
Now that we know the difference between sticky buns and cinnamon rolls, let’s get to this recipe. Thankfully, Food Network published Joanna’s recipe for her amazing sticky buns. So I used that recipe when recreating them here.
One major thing to note about this recipe is that it’s made with brioche dough. Brioche is different from other dough because: (1) it’s made with lots of eggs and butter and (2) it’s first rise takes place overnight in the fridge instead of in a warm place.
Because of all the butter and eggs in the dough, you get an extremely rich consistency that is the perfect match for the insanely sweet goo. Plus, those two special ingredients make these buns super golden brown.


In Joanna’s recipe, the brioche dough makes enough for two batches, but I only used half of it for one batch of sticky buns and saved the other half to make a loaf of brioche bread instead. You can do that too, or simply freeze the other half of the dough for another batch of sticky buns later. If you decide to make the bread, here are the instructions I followed to get this gorgeous loaf.

So how did the buns turn out? UN-freaking BELIEVABLE. The dough is so buttery and rich and is taken to a whole other level with the goo that the buns are baked in. It was worth all the effort that goes into make the brioche.
The one thing I regret is not adding more nuts. The original recipe called for just 1/2 cup of nuts in the goo. But after seeing the original sticky buns for myself in Boston, I loved how they were loaded with buns on top. So I upped the nuts for you guys in the recipe below.
I made these buns a week or so before we left for Boston. So I actually tried my version before I had the original. I’m sure you wanna know…how did my buns stack up to the pro’s? Well, if I’m being honest, I thought mine tasted a lot better. And I’m not just saying that! I was wholeheartedly expecting Flour Bakery’s to be much better.
But they served theirs to me at room temperature which made them less decadent. Cold brioche is a little tough because the butter in the dough is hardened. I bet if theirs was warmed up, it would be better than the ones I made. Though, I will say, theirs looked a lot better than mine because of the aforementioned mountain of pecans on top.

Sticky bun and jelly doughnut from Flour Bakery in Boston. Please excuse the half eaten bun. I immediately dug into it before I could snap a pic!
I was a little shocked by the amount of work that went into these, and that’s saying a lot for me considering how much work went into these croissants. But just like with the croissants, all the effort that goes into making these from scratch at home is worth it. I promise! There is nothing like a sticky bun fresh from the oven – it’s a flavor and texture you just cannot get from a store-bought bun.
Before you guys get started on this recipe, I have a few more tips for you to consider:
- The brioche is a little more labor-intensive than a regular dough. It requires a lot of kneading in the stand-mixer so you’re going to want to use your mixer for this recipe. I tried to find alternatives to the stand mixer for brioche dough, but I couldn’t find anything. If you’ve made brioche without it, please give me your tips!
- Once the brioche is formed, you place it to “rise” in the fridge overnight. When I awoke the next morning, I was expecting it to be doubled in size, like dough typically is when it rises. To my dismay, the dough barely looked any bigger. My husband says it definitely looked like it grew but I was not convinced. I almost threw it out because I thought I failed! But since I’ve never made brioche before, I decided to move forward and see what happened. Maybe this was normal for brioche? I guess so because the dough ended up working out perfectly in the end! Once I saw how huge they rose during their second rise, I knew they were going to turn out just as intended.
- I love the look of these sticky buns when they’re loaded with pecans on top. So when serving, make sure to scoop out the remaining pecans from the bottom of the pan and place atop the buns. It makes the presentation much prettier! I’d even recommend dipping the sticky buns in chopped pecans for extra effect. I’ll definitely be doing this next time.
- The buns harden up when they cool off so DEFINITELY serve them warm. If you plan to store them for later, you will have to warm them up to remove them from the pan. The goo acts as a glue when it cools down so good luck trying to pry a bun free without reheating them. Pro tip: if you are going to store them for later, remove from the baking pan and individually wrap them. That way, you can microwave an individual bun when you want it instead of having to heat the entire pan of buns just to set one free.
Welp, there you have it – the most amazing pecan sticky buns you will ever try. I promise that they’re worth every second of effort. If you have any more questions about the recipe before you attempt if for yourself, let me know in the comments below!

Here are all the kitchen tools and serveware that I used in today’s recipe. For each item sold below, I make a small commission. I only recommend items that I own and love so you can trust that each recommendation is tried and true. Thank you for supporting CPA!
[show_shopthepost_widget id=”2547163″]
Pecan Sticky Buns
Ingredients
For the brioche dough:
- 3 1/4 teaspoons active dry yeast (1 1/2 packages)
- 1 3/8 cups unsalted butter room temperature
- 2 1/2 cups all-purpose flour
- 2 1/4 cups bread flour
- 1/3 cup + 1 tablespoon granulated sugar
- 1 tablespoon salt
- 1/2 cup cold water
- 5 large eggs
For the goo:
- 3/4 cup unsalted butter
- 1 1/2 cups light brown sugar
- 1/3 cup honey
- 1/3 cup heavy cream
- 1/3 cup water
- 1/4 teaspoon salt
- 2 cups pecans lightly chopped and toasted
For the filling:
- 1/4 cup light brown sugar
- 1/4 cup granulated sugar
- 1/8 teaspoon ground cinnamon
- 1/2 cup pecans lightly chopped and toasted
Instructions
For the brioche dough*:
- In a bowl fitted for a stand-mixer, add flours, yeast, salt, sugar, water, and eggs. Attach dough hook and mix ingredients on low for 3-4 minutes until all the ingredients are combined, scrapping down the sides, as needed, to incorporate all the ingredients. Once incorporated, continue mixing for another 3-4 minutes. The dough will seem dry, but don't worry.
- Cut butter into 12 pieces. Add one piece of butter to dough and mix on low until completely incorporated into dough. Repeat with remaining pieces of butter, 1 piece at a time. Once all butter is added, continue to mix on low for another 10 minutes. It is important for all the butter to be thoroughly mixed into the dough.
- Once the butter is completely mixed into the dough, increase the speed to medium and beat for 15 minutes, until the dough is soft and slightly sticky. Don't worry - it will take time for the dough to come together so it will take the full 15 minutes. The dough will start of really loose and shaggy but will come together in the last couple of minutes. Once it's finished, beat on high for 1 minute. You should hear the dough make a slap-slap-slap sound as it hits the sides of the bowl. It will be ready once you can grab it all up in a ball. If it's still too loose, continue mixing for 2-3 more minutes on medium.
- Put the dough in a large bowl or plastic container and cover it with plastic wrap, pressing the wrap directly onto the surface of the dough to prevent it from drying out. Let the dough proof in the refrigerator for at least 6 hours or up to overnight.
For the goo:
- The next day, melt butter over medium heat. Add brown sugar and cook to combine. Once it starts to bubble, remove from heat and add honey, cream, water, and salt. Whisk together to combine. Let it cool for 30 minutes while we roll out the dough.
For the assembly:
- The next morning, remove ball of dough from fridge. It will have risen slightly but not doubled in size and be the consistency of cold Play-doh. Cut dough ball in half and save half for another use. Place remaining half on floured surface and begin rolling out into a rectangle until it is 12x16 and about 1/4-inch thick. Position the rectangle so that the short side is facing you.
- In a small bowl, mix the ingredients for the filling. Sprinkle filling all over the rectangle of brioche dough in one even layer. Begin tightly rolling the rectangle into a log, starting on the short side closest to you and ending on the other short side. The log should be 12 inches long.
- Using a serrated knife, cut log into 8 even slices. Pour all of the goo into a 9x13 pan so that it coats the bottom evenly. Sprinkle 2 cups of chopped pecans evenly over the goo. Place all 8 slices of the dough into prepared pan and space them out evenly. Cover with a towel and place in a warm spot so they can get puffy and almost triple in size. This will take about 2 hours.
- When you have about 20 minutes left of rise-time, preheat oven to 350 degrees. Bake buns in a preheated oven for 35-45 minutes, until the tops are deep golden brown.
- Let the cooked buns cool for 20 minutes so that the molten goo doesn't burn your mouth. Once cooled, use a spatula to invert a bun one at a time onto a serving plate. Spoon extra goo over the top. Serve immediately.
Notes
Pin for later:

More breakfast sweets you’ll love:
Apple Pie Cinnamon Rolls

Strawberries and Cream Danish

Classic Butter Croissants


Chicken Road takes a simple idea and turns it into hours of entertainment. Swipe to guide your chicken across busy roads, rushing rivers, and train tracks. The pace increases with every attempt, demanding faster reflexes and sharper timing. Despite the lighthearted cartoon style, the game is surprisingly intense, and mistakes happen often. But that’s the charm — failure only makes you want to try again. Easy to learn, hard to master, and endlessly replayable, Chicken Road is a mobile gem.
Hey I know this is off topic but I was wondering if you knew of
any widgets I could add to my blog that automatically tweet my newest twitter updates.
I’ve been looking for a plug-in like this for quite some time and was hoping maybe
you would have some experience with something like this. Please let
me know if you run into anything. I truly enjoy reading your blog
and I look forward to your new updates.
Also visit my web site lpe88 pc download
Briovhe is a great recipe for baked goods . I love to make loaves then use for french toast. This recipe is making me want to have one now!!! When i didnt havea kitchenaide i use to beat the dough on the counter it realy did rise. Help with the stress.
Such a gorgeous tempting recipe! I am drooling!
Delicious!! My daughter is reading this with me and said she could eat one right now!! SO GOOD!!
Um, YESSSS, please! How can anyone possibly turn down a warm, fresh from the oven sticky bun? These look wonderful. 🙂
One of my favorite breakfast treats!! I have tried a few different recipes but never found one that I love. I need to try this one!!
Oh girl these buns are gonna rock your world! Let me know if these end up passing the test 🙂
I always say that I try to eat healthy, and then I discover recipes like this, and have to make them. I mean, I can’t not make them, right?? 🙂 These look fantastic!
I love the idea of using brioche bread! So rich and fluffy! This might have to be one of those recipes that I make on a rainy Sunday when I’m stuck inside! They ooks great!
You’re so right! I love baking on those days 🙂
Those sticky buns do look amazing. My daughter would love these. I am curious to know what they are like reheated, especially if you have to rebake to remove from the pan. Great recipe!
They are still great when reheated. Not as fluffy, obviously, but still amazing. These sticky buns would be a fun weekend breakfast for you two to create!
i remember going to Mike’s pastry as well as Flour for the sticky buns…it’s been a while but i can still taste all those sweet goodness.
i have never made sticky buns at home but im pretty sure they are worth every single step.
Oh that’s so awesome that you went to Flour, too! Did you eat anything else there? We had breakfast there and it was also PHENOMENAL
Those look amazing! I want them tomorrow for breakfast.
those look so delicious. My mouth is watering! <3
I would love to try this. I am soo looking forward to it. Thanks for sharing this recipe.
These look delicious! I’m on a diet but I’m sooo going to make these on cheat day!
Welcome to Boston. I live 60 mi south of Boston on Cape cod and I must say I have not tried these sticky buns but I did see the Food Network show with Bobby Flay. They look absolutely divine. I’m glad you enjoyed your trip here. We are a fanatical sports town with alot of history. I have lived here my whole life and just love it .I just found your website and it looks quite interesting.
Aw thanks so much for stopping by! We had such an amazing time. And yes – we definitely felt the spirit of the various teams while we were there. We especially loved stopping by for the Fenway tour. I can’t wait to go back in the warmer months so we can visit Cape Cod, as well. I heard it’s gorgeous there!
Oh my goodness these look so good! The perfects weekend breakfast treat!
Sticky buns are seriously my favorite food. I try not to eat them too often though, but I would eat these every day if I could! Can’t wait to try the recipe!
I feel the same way! I end up sending the extras with my husband at work so I’m not bad all week long haha
I will have to make these for my husband soon. He loves sticky buns and pecan is his fave! Love all your photos (as always). Gorgeous post!
They’re so fun to make. And the pecans are one of the best parts of these buns! They get so chewy when baked in the goo
Amazing! I love sticky buns but Im trying to be good right now haha
Yum! Those look tasty!
How delish! Sticky buns are my favorite for breakfast. I’ll have to save this for
later.
Aren’t they the best?!
Mmmm, you had me at ooey gooey! These look AMAZING.
Aw thanks so much!